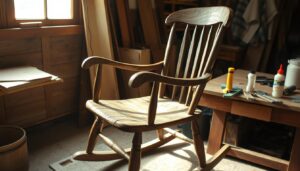
Are you tired of looking at the unsightly scratches on your beloved veneer sideboard?
Veneer furniture can be particularly susceptible to damage from heat, humidity, or water, causing the glue that holds the veneer to release, resulting in chips, blisters, or peeling.
Fortunately, you don’t need to be a professional to give your furniture a new lease on life. With the right guidance, you can repair the damage and restore your piece to its original beauty.
Key Takeaways
- Learn how to identify different types of veneer damage and determine the best restoration approach.
- Understand the common causes of veneer damage, including moisture, heat, and everyday wear and tear.
- Follow a step-by-step guide to restore your veneer sideboard to its original finish.
- Save money by restoring your existing piece rather than replacing it.
- Gain confidence in tackling furniture repair projects yourself.
Understanding Veneer Damage
Understanding the types of damage to your veneer sideboard is crucial for effective restoration. Veneer damage can manifest in various forms, including scratches, indentations, and peeling.
Types of Veneer Damage
Veneer damage includes scratches that remove wood surface material and indentations that compress wood fibres without removing material. Older furniture may show age through dry, cracked surfaces, and the veneer may peel or chip due to failing glue.
- Scratches that remove wood material
- Indentations that compress wood fibres
- Peeling or chipping veneer due to failing adhesive
Assessing Your Scratched Veneer Sideboard
To assess your sideboard, examine it carefully, paying special attention to areas near edges and corners where veneer is most vulnerable. Check for patterns in the wood grain to ensure any repairs blend seamlessly.
- Examine the sideboard carefully, focusing on vulnerable areas
- Check for patterns in the wood grain for seamless repairs
- Assess the thickness of your veneer for appropriate handling
Preparing Your Veneer Sideboard for Restoration
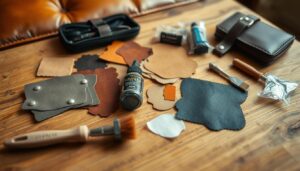
Restoring a veneer sideboard requires careful preparation to achieve the best results. This involves gathering the necessary tools and materials, as well as cleaning and removing hardware to ensure a smooth restoration process.
Gathering the Necessary Tools and Materials
To start your restoration project, you will need to gather all the necessary supplies. These include wood glue, sandpaper in various grits (80-320), wood filler or Bondo, clean cloths, a putty knife, and appropriate finishing materials.

- Begin by collecting all necessary supplies to avoid interruptions during the restoration process.
- Create a suitable workspace with good lighting and ventilation before starting, as some products used may emit strong fumes.
Cleaning and Removing Hardware
Before starting any work on the veneer, it needs to be cleaned to remove dust or dirt that has stuck to the surface. Use a lightly damp cloth or soft sponge to clean the wood. If the veneer has any hardware attached, such as handles or legs, these should be removed to make it easier to sand the veneer and apply the finish.
- Thoroughly clean the entire sideboard with a lightly damp cloth to remove accumulated dust and grime.
- Document your sideboard with photographs before disassembly, noting how hardware is attached to ensure proper reassembly later.
- Carefully remove all hardware, storing them in labelled containers to prevent loss.
- Make sure the piece is completely dry after cleaning before proceeding to the next step.
How to Restore a Scratched Veneer Sideboard
You can easily restore your scratched veneer sideboard with the right techniques and materials. The process involves assessing the damage and applying the appropriate repair methods to achieve professional-looking results.
Repairing Scratches and Indentations
To repair scratches and indentations, you can use different methods depending on the type of damage. For indentations, the water and iron method is effective.
Using the Water and Iron Method for Indentations
This method involves applying distilled water to the indented area and then using a warm iron over a clean cloth to steam the area, allowing the compressed wood fibers to expand back to their original position. Make sure to use a clean cloth to prevent direct metal to wood contact.
Sanding Method for Surface Scratches
For surface scratches, carefully sand with progressively finer grits of sandpaper, always working with the wood grain to avoid creating additional damage.
Fixing Peeling or Chipped Veneer
To fix peeling or chipped veneer, you need to carefully lift the loose section, apply wood glue beneath it, and then clamp or weight it down until completely dry. For severely damaged sections, score with a utility knife and lift away the damaged portion before applying new veneer or wood filler.
Sanding and Preparing for Finishing
When sanding repaired areas, work through multiple grits (starting with 120 and progressing to 220 or finer) to achieve a smooth surface that will accept finish evenly. Remove all sanding dust between grits and before applying any finishes, using a vacuum with a soft brush attachment followed by a tack cloth. For more detailed guidance, you can refer to this comprehensive guide on fixing scratches and damages on veneer furniture.

Finishing Your Restored Veneer Sideboard
The last step in rejuvenating your veneer sideboard is to apply a suitable finish that brings out the wood’s natural beauty. To achieve this, you need to select the right finish based on the intended use and desired look. Options include polyurethane, shellac, or Danish oil.
Before applying any stain or finish to the entire piece, test it on an inconspicuous area, such as the inside of a drawer, to ensure the colour and appearance meet your expectations. For more information on rejuvenating wood veneer, visit The Wood Veneer Hub.
Apply stain evenly with a clean, lint-free cloth, working in the direction of the wood grain. To protect your restored furniture, consider applying furniture wax or a clear topcoat. Regularly dust with a soft cloth to maintain your newly restored piece.