Are you tired of feeling the chill of cold air seeping into your home through the gaps around your doors? Effective weatherstripping is crucial for maintaining a comfortable indoor temperature and reducing energy bills.
According to the U.S. Department of Energy, sealing doors and windows can reduce heating and cooling costs by more than 20%. This comprehensive guide will walk you through the process of replacing your door’s weatherstripping, a relatively straightforward project that can be completed in a short time.
By ensuring a tight seal around your doors, you can prevent air leakage, reduce drafts, and improve your home’s overall energy efficiency, especially during harsh weather conditions.
Key Takeaways
- Understand the importance of weatherstripping for your home’s energy efficiency.
- Learn how to identify when your door’s weatherstripping needs replacement.
- Discover the steps involved in replacing your door’s weatherstripping.
- Improve your home’s comfort by eliminating drafts and cold spots.
- Reduce your energy bills by ensuring a tight seal around your doors.
Understanding Weather Stripping and Its Benefits
Weather stripping is a simple yet effective solution for enhancing your home’s energy efficiency and comfort. It involves sealing gaps around doors and windows to prevent air leaks, thereby reducing heat loss in the winter and heat gain in the summer.
What is Weather Stripping?
Weather stripping refers to the materials used to seal gaps between doors, windows, and their frames. It is typically made from flexible materials such as foam, felt, or rubber, designed to compress and fill gaps, thereby preventing air leakage.
Energy Efficiency Benefits
One of the primary benefits of weather stripping is its contribution to energy efficiency. By sealing gaps around doors and windows, you can significantly reduce heat transfer, keeping your home warmer in the winter and cooler in the summer. As a result, you’ll enjoy lower energy bills and a reduced carbon footprint. “A well-sealed home is a key factor in reducing energy consumption,” says a leading energy expert.
Additional Advantages
Beyond energy savings, weather stripping offers several other benefits. These include:
- Noise reduction by blocking sound transmission through gaps.
- Prevention of moisture infiltration, which can lead to mould growth and structural damage.
- A barrier against insects and pests that might enter through small openings.
- Enhanced lifespan of doors and windows by reducing exposure to external elements.
- Improved comfort by eliminating drafts, creating a more pleasant home environment.
These benefits not only make your living space more enjoyable but also contribute to a healthier indoor environment.
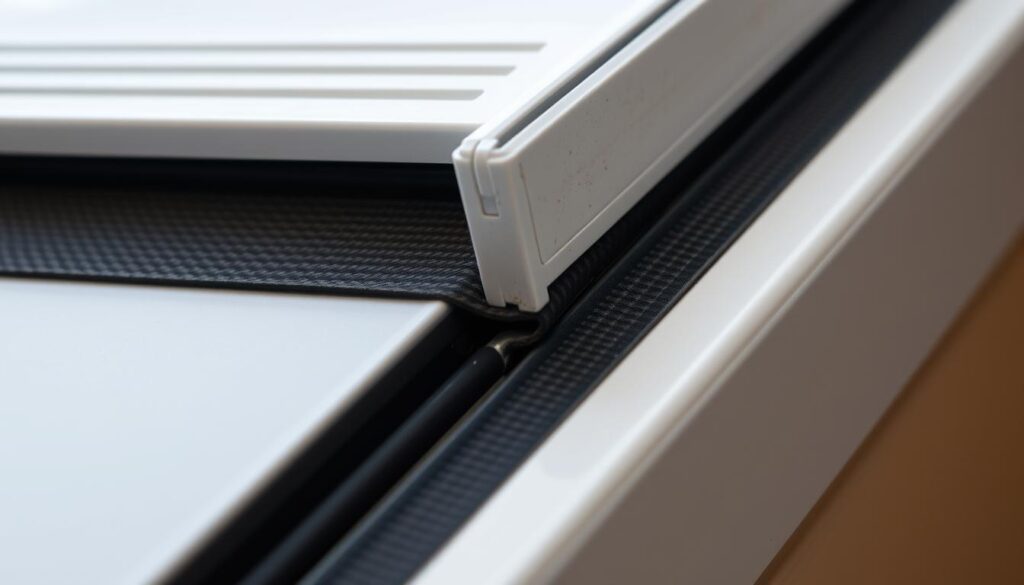
Types of Exterior Weather Stripping Materials
Different types of weather stripping materials are available for exterior applications, catering to various needs. When selecting a material, it’s essential to consider several factors, including the location, frequency of use, and local climate conditions.
V Strip/Tension Seal
The V strip or tension seal is a durable option, often used for doors and windows. It provides a tight seal and can withstand various weather conditions.
Felt and Foam Tape
Felt and foam tape are easy to install and provide a good seal. However, they may not be as durable as other options and can be more suitable for less frequently used doors or windows.
Tubular Weather Stripping
Tubular weather stripping is another effective option, offering a robust seal. It’s available in various materials, including rubber and vinyl, and is suitable for high-traffic areas.
Door Sweeps
Door sweeps are installed at the bottom of the door and provide a seal against drafts and moisture. They come in different materials, including vinyl and metal-reinforced options.
Choosing the Right Material for Your Home
When choosing a weather stripping material, consider factors such as durability, ease of installation, and weather resistance. A well-chosen material will ensure the best performance and longevity.

| Material | Durability | Ease of Installation | Weather Resistance |
|---|---|---|---|
| V Strip/Tension Seal | High | Moderate | Excellent |
| Felt and Foam Tape | Low-Moderate | Easy | Good |
| Tubular Weather Stripping | High | Moderate | Excellent |
| Door Sweeps | High | Easy-Moderate | Excellent |
Essential Tools and Materials for Replacing Exterior Weather Stripping
Before you start replacing exterior weather stripping, it’s crucial to gather the necessary tools and materials. Having the right equipment ensures a smooth installation process.
Basic Tools Needed
You will need a few basic tools to begin your project. A hammer and finishing nails are necessary for installing certain types of weather stripping that require nailing into the door frame. Additionally, a caulking gun and silicone caulk can provide additional sealing around fixed parts of the weatherstripping installation.
Optional Specialised Equipment
For more complex installations or for achieving professional-quality results, consider using specialised equipment. A power drill with appropriate bits makes installation faster and easier when working with screw-mounted weather stripping. Needle-nose pliers can help with removing stubborn old weather stripping or positioning new materials in tight spaces. A mitre box and saw allow for precise angle cuts when joining weather stripping at corners.
| Tool/Material | Purpose |
|---|---|
| Hammer and Finishing Nails | Nailing weather stripping into place |
| Caulking Gun and Silicone Caulk | Sealing around fixed parts |
| Power Drill | Screw-mounted weather stripping installation |
| Needle-nose Pliers | Removing old weather stripping and positioning new materials |
| Mitre Box and Saw | Precise angle cuts for weather stripping at corners |
Preparing for Weather Stripping Replacement
Before you start replacing your exterior weather stripping, it’s essential to prepare properly. This involves several key steps to ensure a successful installation.
Inspecting Current Weather Stripping
Begin by inspecting your current weather stripping for signs of wear and tear. Check for any gaps or damage around your door and frame, as these areas are crucial for maintaining energy efficiency.
Measuring Correctly
Accurate measurements are vital for a proper fit. Measure the length and width of the areas where you’ll be applying new weatherstripping, taking note of any obstructions or irregularities around the door frame.
Surface Preparation
To ensure a strong bond, the surface must be clean and dry. Use a degreaser or isopropyl alcohol to remove dirt, old adhesive, or debris from the door frame. Allow the surface to dry completely before proceeding with the installation.
| Preparation Task | Description |
|---|---|
| Cleaning | Use a degreaser or isopropyl alcohol |
| Inspection | Check for damage or rot |
| Measuring | Measure length and width of areas for weatherstripping |
Step-by-Step Guide to Replacing Exterior Weather Stripping
Replacing exterior weather stripping is a task that you can accomplish with a few simple steps, helping to reduce drafts and energy losses around your doors. Effective weatherstripping ensures a comfortable and energy-efficient home.
Removing Old Weather Stripping
Start by removing the old weather stripping from around your doors. This may involve scraping off old adhesive or pulling out worn-out strips. Be thorough to ensure a clean surface for the new weather stripping. As noted in The Essential Guide to Weatherstripping, proper removal is key to a successful replacement.
Installing Weather Stripping on Door Sides and Top
Measure the sides and top of your door frame to determine how much weather stripping you’ll need. Cut the weather stripping to size and press it firmly onto the door frame, ensuring a tight seal. Make sure it’s aligned properly to avoid any gaps.
Replacing Door Sweeps
A door sweep is a crucial component in sealing the gap between the door and the threshold. Remove the old door sweep and replace it with a new one, ensuring it’s properly aligned and securely attached to prevent drafts.
Testing the Seal
After installation, test the seal by closing the door slowly to observe how the weather stripping compresses. Check for light penetration and use the smoke test to detect any air leaks. Ensure the door operates smoothly without catching or requiring excessive force. As “A proper seal is essential for energy efficiency and comfort”, making any necessary adjustments is crucial.
Weather Stripping for Different Door and Window Types
To maximise energy savings, it’s crucial to choose the right weather stripping for your specific doors and windows. Different types of doors and windows have unique requirements for effective weather stripping.
Exterior Doors
For exterior doors, you can use a variety of weather stripping materials, including V-strip, felt, and foam tape. Applying weather stripping around the door frame can significantly reduce air leaks. Ensure a snug fit by choosing the correct size for your door.
Double-Hung Windows
Double-hung windows require weather stripping that can accommodate their moving parts. Use V-strip or tubular weatherstripping along the sash and frame to prevent air leaks. Make sure the weather stripping is not too thick, as it may interfere with the window’s operation.
Sliding Windows
Sliding windows need a slightly different approach. Clean the tracks and frame thoroughly before applying weather stripping. Use pile weatherstripping in the tracks to reduce friction while maintaining a seal. Apply V-strip or tubular weatherstripping along the vertical edges where the window meets the frame, and install a brush seal at the interlocking meeting stiles.
| Window/Door Type | Recommended Weather Stripping |
|---|---|
| Exterior Doors | V-strip, Felt, Foam Tape |
| Double-Hung Windows | V-strip, Tubular Weatherstripping |
| Sliding Windows | Pile Weatherstripping, V-strip, Brush Seal |

Troubleshooting Common Weather Stripping Issues
Common issues with weatherstripping can often be resolved with a few simple adjustments. When problems arise, it’s essential to identify the root cause to apply the correct fix.
Gaps and Persistent Drafts
If you notice gaps or persistent drafts despite having weatherstripping in place, check for any debris or dirt accumulation that might be preventing a proper seal. Ensure the weatherstripping is properly aligned and consider replacing it if it’s damaged or worn out.
Sticking Doors or Windows
Sticking doors or windows can sometimes be attributed to weatherstripping that’s too thick or improperly installed. Adjust or replace the weatherstripping to achieve a smoother operation. You can also check for any warping or swelling of the door or window frame that might be causing the issue.
When to Consider Professional Installation
For complex situations or historic homes, consider hiring a professional for weatherstripping installation. Professionals can offer expert material selection, precise application, and often provide a warranty on their work. Key benefits include:
- Access to commercial-grade materials not readily available to homeowners.
- Efficient and precise application, saving time and ensuring consistent results.
- Ability to address underlying issues that might affect weatherstripping performance.
Maintaining Your Weather Stripping for Longevity
Proper care and maintenance of your weatherstripping can significantly impact its effectiveness and longevity. To extend its lifespan, regularly inspect and clean your weatherstripping with mild soap and water to remove dirt and debris. It’s also essential to lubricate moving parts of doors and windows to reduce wear on weatherstripping. By doing so, you can prevent damage and energy loss, ensuring your home remains comfortable and energy-efficient.
Typically, weatherstripping lasts 2-5 years depending on material quality and exposure to elements. Homeowners should budget for regular replacement as part of home maintenance.