Are you struggling with a fridge door that won’t shut properly or noticing that your refrigerator is working harder than usual? A faulty gasket seal could be the culprit. The seal around your fridge door plays a crucial role in maintaining the internal temperature and efficiency of your appliance.
When the door seal is compromised, it can lead to temperature regulation issues and increased energy consumption. Fortunately, replacing the gasket is a relatively straightforward DIY task that can save you money on professional repairs.
This article will guide you through the process of identifying problems with your fridge’s seal, obtaining the right replacement part, and completing the replacement process, usually within under an hour.
Key Takeaways
- Identify common problems caused by a faulty fridge door seal.
- Understand the importance of maintaining your refrigerator’s internal temperature.
- Learn how to replace the gasket seal as a DIY-friendly task.
- Discover how replacing the seal can save you money on energy bills.
- Find out how long the replacement process typically takes.
Signs Your Fridge Gasket Seal Needs Replacing
Your fridge’s door seal plays a vital role in keeping the cold air in, and when it fails, you may notice several symptoms. A faulty seal can lead to a range of issues, from increased energy consumption to food spoilage.
Temperature Issues and Food Spoilage
If your fridge’s door seal is damaged, warm air can enter, causing the temperature inside the fridge to fluctuate. This can lead to food spoilage and potentially harmful bacterial growth. Check your fridge’s temperature and inspect your food for any signs of spoilage.
Increased Energy Consumption
A faulty door seal can cause your fridge to work harder to maintain the desired temperature, resulting in increased energy consumption. This not only increases your energy bills but also puts additional strain on your appliance.
Visual and Physical Indicators
Inspect the seal for any visible signs of damage, such as cracks, tears, or mould growth. You can also check for cold air escaping by running your hand around the door frame. If you feel cold air, it may indicate that the seal is no longer working properly. Additionally, look out for signs of condensation or puddles around the fridge, as these can be indicative of a faulty seal.
| Signs | Description |
|---|---|
| Cracks or Tears | Visible damage to the seal |
| Mould Growth | Indicates moisture accumulation due to seal failure |
| Cold Air Escaping | Can be detected by running your hand around the door frame |
| Condensation or Puddles | Signs of humidity entering the fridge due to a faulty seal |
Testing Your Fridge Door Seal
To determine if your fridge door seal needs replacing, you must first test its integrity. A faulty seal can lead to various issues, including temperature fluctuations and increased energy consumption.
The Banknote Test Method
One simple way to test your fridge door seal is by using the banknote test. Insert a banknote between the door seal and the fridge frame, then close the door. If the note can be easily pulled out, the seal is likely faulty. This method gives you a quick indication of whether the seal is compromised.

Manual Inspection Techniques
For a more thorough check, manually inspect the door seals along their entire length. Look for signs of wear, such as tears or cracks, which would necessitate replacement. You can also check the seal’s compression by closing the door on a piece of paper; if it slips out easily, the seal may be worn out.
- Inspect the seal visually and tactilely along its entire length.
- Check for proper seal compression when the door is closed.
- Use a flashlight to inspect the seal more thoroughly.
- Distinguish between seal issues that require replacement versus those that just need cleaning.
By following these steps, you can accurately assess the condition of your fridge’s door seals and determine if they need replacing.
Tools and Materials Needed

To successfully replace your fridge gasket seal, ensure you have all the necessary tools and materials prepared. The first step is to identify the correct replacement seal for your fridge model.
Finding the Correct Replacement Seal
Before beginning the replacement, you need to find your fridge’s model number to ensure you buy the correct door seal. This number is usually displayed on a sticker or data plate, often on an internal wall inside the fridge or behind the vegetable drawer. The model number may include letters, numbers, and characters like a dash (-) or a slash (/).
Essential Tools for the Job
You will need a set of screwdrivers, including both flathead and Phillips head types, as different fridge models may require different screwdriver types. Additionally, cleaning supplies such as soap and warm water will be necessary for preparing the door frame. Measuring tools can also be helpful. Optional tools include gloves for handling old, potentially mouldy seals, and extra fasteners in case the originals are damaged during removal.
Preparing for the Replacement
Before you start replacing the fridge gasket seal, it’s essential to prepare properly to ensure a successful outcome. This involves taking a few crucial steps to get your appliance ready for the new seal.
Safety Precautions Before Starting
Before beginning any work on your refrigerator, make sure to unplug it to avoid any accidental start-ups or electrical shocks. It’s also a good idea to wear protective gloves to prevent injuries from sharp edges or corners.
Locating Your Fridge Model Number
To ensure you purchase the correct replacement seal for your door, you need to locate the model number of your fridge. This is usually found on a sticker or data plate inside the fridge, often on an internal wall or behind the vegetable drawer. The model number may be a combination of letters and numbers, and could include other characters such as a dash (-) or a slash (/). Take note of this number or photograph it for reference when ordering the replacement parts.
How to Remove the Old Fridge Gasket Seal
Removing the old fridge gasket seal is a crucial step in maintaining your refrigerator’s efficiency. The gasket, or door seal, plays a vital role in keeping your fridge airtight, and over time, it can become worn or damaged, necessitating replacement.
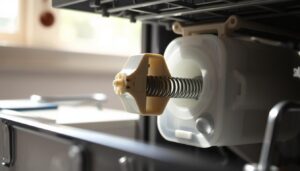
Removing Screw-Mounted Gaskets
For fridges with screw-mounted gaskets, the removal process involves taking out the screws that hold the gasket in place. Typically, these screws are located under a rubber lip or within the door frame. Once the screws are removed, you can gently pull the gasket away from the door. Be cautious not to damage the door or the gasket if it’s still in good condition.

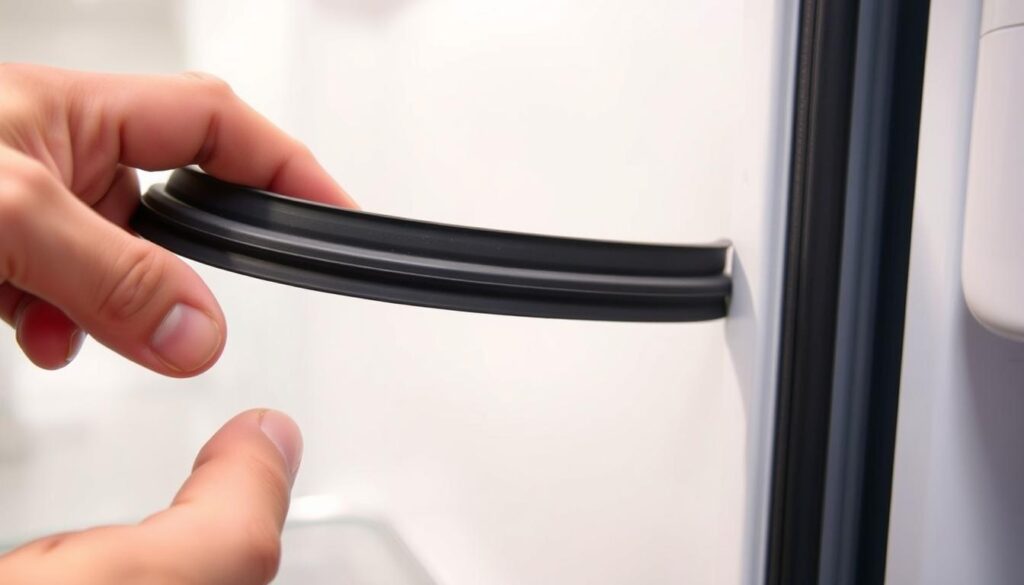
Removing Push-In Style Gaskets
If your fridge has a push-in style gasket, the removal process is somewhat simpler. You can start by locating the edge of the gasket and gently pulling it away from the door frame. The gasket should come out relatively easily, but be prepared to use a gentle tool to help release any stubborn sections. It’s essential to be careful to avoid damaging the door or the channel that holds the gasket.
| Gasket Type | Removal Method | Tools Required |
|---|---|---|
| Screw-Mounted | Remove screws, then pull gasket away | Screwdriver |
| Push-In Style | Pull gasket away from door frame | Gentle tool (optional) |
Cleaning the Door Frame
To ensure your fridge door seal works properly, start by cleaning the door frame. This step is crucial for removing any debris or grime that might interfere with the new seal’s adhesion.
Removing Mould and Grime Build-up
Use a cleaning spray and a cloth to wipe down the door frame, removing any mould or grime. Pay particular attention to the areas around the seal mounting channel or screw holes, as these can harbour debris. Ensure the surface is clean and dry before proceeding.
Preparing the Surface for the New Seal
After cleaning, inspect the door frame for any damage or remaining debris. Check the alignment of the door to ensure it is properly positioned. If necessary, clean the mounting channel or screw holes again. Apply any manufacturer-recommended lubricants or adhesives to the surface. Finally, verify that the entire perimeter is free from obstructions.
| Preparation Step | Description |
|---|---|
| Clean the door frame | Use a cleaning spray and cloth to remove grime and mould. |
| Inspect for damage | Check the door frame for any damage or debris. |
| Apply lubricants/adhesives | Use manufacturer-recommended products on the surface. |
How to Replace Fridge Gasket Seal Properly
Installing a new fridge gasket seal requires attention to detail to avoid common pitfalls. Ensuring a proper fit is crucial for maintaining your fridge’s efficiency and preventing energy loss.
Preparing the New Gasket
Before installation, soak the new gasket in warm water to make it more pliable and easier to install. This step is essential for a smooth installation process. The gasket should be flexible enough to be pressed into place without creasing or buckling.
Step-by-Step Installation Process
To fit the new door seal, start by pressing it into place on the frame, beginning at the top corner. Work your way around, pressing firmly to ensure the seal is securely in place. Next, take the new gasket out of the water and put it on the refrigerator door, pushing the lip over the metal retainer that holds the screws. Finally, tighten the screws in the retainer to secure the gasket. Make sure it’s evenly compressed around the door perimeter.
Troubleshooting Common Installation Issues
During installation, you may encounter a few issues. If the gasket appears too long or too short, adjustments may be necessary. For corners that won’t stay seated, use a bit of petroleum jelly to help the gasket stay in place. If the gasket pulls away from the door, check the alignment and ensure the screws are tightened evenly. Addressing these issues promptly will ensure a proper seal.
Some common problems include uneven compression around the door perimeter and alignment issues between the door and the main refrigerator body. If you encounter persistent issues, it may be wise to consider seeking professional help to avoid further complications.
Conclusion
With the steps outlined in this guide, you’re now equipped to replace your fridge’s gasket seal with ease. Replacing the seal is a simple yet effective way to improve your appliance’s efficiency and reduce energy consumption.
By following this guide, you’ve learned how to test the new seal to ensure it’s working properly and how to maintain it to extend its lifespan. Typically, seals need replacement every few years, so keep an eye out for signs of wear and tear. Proper door seal replacement can also improve food preservation and reduce waste.
Remember, regular maintenance is key to extending the life of your fridge and its components, including the freezer door seal. For more tips on maintaining your refrigerator, visit TCL’s guide on refrigerator door seal. By taking care of your appliance, you’ll enjoy a more efficient and reliable performance.