Is your fence starting to lean or wobble, leaving you wondering if it’s time to replace it entirely? Before you consider a costly new installation, you might be able to stabilise it with a simple repair.
A wobbly fence can be unsightly and may indicate a more significant issue with the fence posts. One effective solution is to use a concrete repair spur to strengthen the existing posts and prevent further damage.
Using a concrete spur can be a cost-effective way to extend the life of your fence without replacing it entirely. In this article, we’ll explore the process of replacing a broken fence-post concrete spur and provide you with valuable tips to ensure a successful DIY project.
Key Takeaways
- Learn how to stabilise a wobbly fence using a concrete repair spur
- Understand the benefits of using concrete spurs to strengthen fence posts
- Discover the tools and materials needed for a successful DIY repair
- Find out how to properly secure fence posts to prevent future repairs
- Explore aftercare tips to maintain your repaired fence
Understanding Concrete Repair Spurs
A concrete repair spur is a simple yet effective solution for reinforcing weakened fence posts. It acts as a structural support, taking some of the pressure off the original post to prevent further damage.
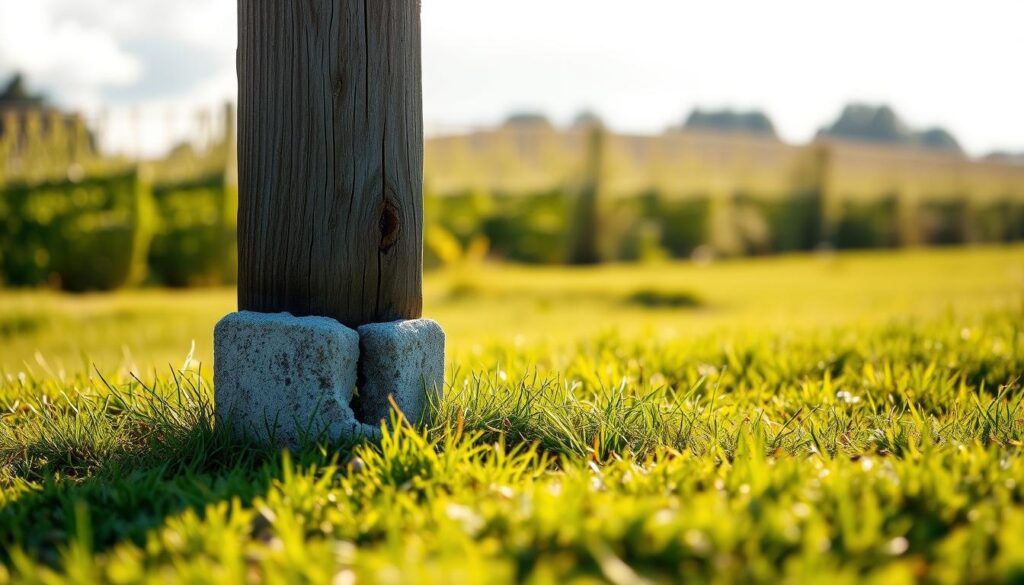
What Is a Concrete Fence Repair Spur?
A concrete fence repair spur is designed to sit against the original fence post, much like a splint on a broken limb. The dimensions of a standard repair spur are 910mm x 75mm x 100mm, making it suitable for repairing 75mm x 75mm (or 3″ x 3″) posts.
Benefits of Using Repair Spurs
Using concrete repair spurs offers several benefits, including cost savings and extended fence life. Some key advantages include:
- Structural support for weakened or rotting fence posts without requiring complete replacement
- Absorbing weight and pressure to prevent further damage
- Superior durability against ground moisture and rot compared to traditional wooden posts
By using a concrete repair spur, you can maintain the aesthetic appeal of your wooden fence while strengthening its overall structure.
| Benefits | Description |
|---|---|
| Cost Savings | Using repair spurs is more cost-effective than replacing entire fence sections or posts. |
| Extended Fence Life | Repair spurs help extend the life of your existing fence by absorbing weight and pressure. |
| Durability | Concrete spurs provide superior durability against ground moisture and rot. |
When to Replace Broken Fence-Post Concrete Spurs
A broken fence-post concrete spur can compromise the stability of your entire fence, so knowing when to replace it is vital. If you’re experiencing issues with your fence, it’s essential to identify the signs that indicate the need for a replacement spur.
Signs Your Fence Post Needs Repair
Your fence post likely needs repair when you notice a wobbly fence that leans or moves when pushed, indicating deterioration at the base. Look for visible signs of wood rot, splitting, or cracking, particularly at the soil line where moisture tends to accumulate.
Assessing Post Condition Before Repair
Before deciding on a repair spur, assess whether the post has sufficient structural integrity above ground to warrant repair rather than complete replacement. Consider whether neighbouring posts show similar signs of deterioration, as addressing multiple posts simultaneously may be more efficient.

Why Fence Posts Rot and Fail
Understanding why fence posts rot and fail is crucial for maintaining the integrity of your fencing. Fence posts are exposed to various environmental conditions that can lead to their deterioration.
Common Causes of Post Deterioration
Fence posts primarily rot due to prolonged exposure to ground moisture. Poor quality wood or inadequate treatment before installation can significantly increase the likelihood of premature post failure. Additionally, posts installed without proper drainage or set directly in soil without gravel are particularly susceptible to moisture damage.
Preventing Future Damage
Preventing future damage begins with selecting high-quality, pressure-treated timber specifically rated for ground contact. Consider using concrete posts with wooden panels for your garden fencing to combine durability with aesthetic appeal. Proper installation techniques and regular inspection can also significantly extend fence life.
| Cause of Failure | Prevention Method |
|---|---|
| Prolonged exposure to moisture | Use pressure-treated timber |
| Poor quality wood | Select high-quality wood |
| Inadequate drainage | Ensure proper drainage during installation |
Tools and Materials Needed

Before you start repairing your fence post, make sure you have the essential tools and materials. The right equipment will ensure a successful and long-lasting repair.
Essential Tools for the Job
The essential tools for replacing a broken fence-post concrete spur include a spade for digging, a power drill for creating fixing holes, and spanners for securing bolts. You’ll also need measuring tools such as a tape measure and spirit level to ensure proper alignment of your repair spur with the existing post.
Required Materials and Fixings
For each post repair, you’ll require one concrete repair spur sized appropriately for your post dimensions. You’ll also need two coach bolts with washers per spur to securely attach the concrete support to your wooden post. Additionally, postcrete or quick-setting concrete is essential for securing the base of the repair spur firmly in the ground.
Preparation Steps Before Installation
Proper preparation is essential for the effective replacement of a broken concrete spur on a fence post. This involves checking for underground services and digging around the existing post to ensure a clean and safe working area.
Checking for Underground Services
Before you start digging, it’s vital to check for any underground services such as water pipes, gas lines, and electricity cables that might be running along your fence line. You can contact utility companies or use a cable detector to identify any potential hazards. This step is crucial to prevent damage to your fence and avoid costly compensation claims if you accidentally break a neighbouring service.
Digging Around the Existing Post
Carefully dig around the existing post to expose the rotted section, creating a hole approximately 300-400mm wide. Remove any old concrete or postcrete from around the base of the post to create a clean working area for the new repair spur. Ensure neighbouring fence panels are properly supported during this process.

How to Replace Broken Fence-Post Concrete Spur
Replacing a broken fence-post concrete spur is a straightforward process that requires some basic DIY skills. To begin, you’ll need to prepare the area around the damaged post.
Step1: Positioning the Spur
Position the concrete repair spur against the old post, ensuring they sit flush together. Mark the holes in line with the pre-drilled holes in the spur using a pencil or marker.
Step2: Drilling and Fixing
Drill holes through the wooden post that align with the pre-drilled holes in the concrete spur. Secure the spur to the post using coach bolts with washers, tightening them firmly.
Step3: Securing with Postcrete
Fill the hole with rubble and postcrete, a specialized concrete mix. Finally, cover with earth, ensuring the post and spur are perfectly upright.
Aftercare and Maintenance Tips
To keep your fence in top condition, follow these aftercare and maintenance tips to ensure it remains sturdy and secure for years to come.
Longevity and Stability
Ensuring the long-term stability of your fence is crucial. Regularly check the stability of your fence, especially after high winds or heavy rainfall. Apply a wood preservative to the exposed wooden parts annually to prevent further deterioration. For fencing in exposed locations, consider additional repair spurs as a preventative measure. Proper drainage around your fence line is also essential to prevent water accumulation.
Disguising the Repair
If you’re concerned about the appearance of the concrete spur against your natural wood fence, there are several options. You can paint the concrete spur using exterior masonry paint to match your fence. Alternatively, strategically place climbing plants or shrubs around the concrete spur to naturally disguise it. Evergreen plants are particularly effective as they provide year-round coverage. For more advice on maintaining your fence, consider seeking professional guidance to ensure the longevity of your fencing.
| Maintenance Task | Frequency | Benefit |
|---|---|---|
| Check fence stability | After high winds or heavy rainfall | Ensures fence remains secure |
| Apply wood preservative | Annually | Prevents wood deterioration |
| Maintain drainage | Ongoing | Prevents water accumulation |
Conclusion
Repairing your fence post with a concrete repair spur is a cost-effective solution that saves time and money. By following the steps outlined, you can extend the life of your fence without needing a complete replacement. Remember to check for underground services before digging and ensure proper positioning of the repair spur for maximum stability. With the right tools and materials, this repair can be completed in a single afternoon. Regular maintenance will keep your fence post stable and attractive for years to come.