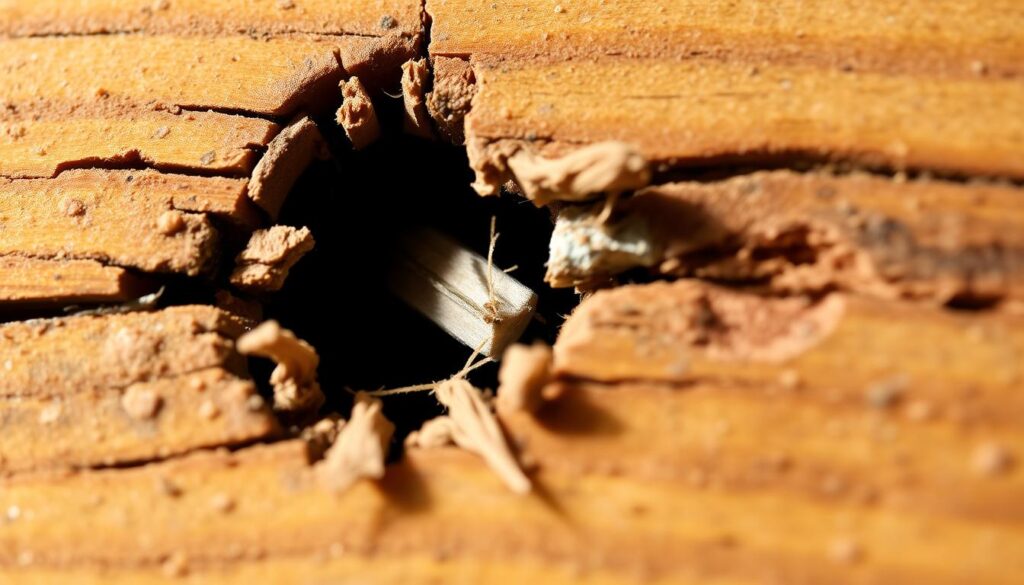
Have you ever struggled with a screw that just won’t hold in a piece of wood? Perhaps you’ve tightened it multiple times, only to have it come loose again. This frustrating issue is often due to a stripped screw hole, where the wood fibres around the screw threads have torn away.
When this happens, it can be challenging to know how to fix the problem effectively. Fortunately, there are several methods to address this common issue, ranging from simple, quick fixes to more advanced solutions for severely damaged holes.
Key Takeaways
- Identify when a screw hole has become stripped and understand the underlying causes.
- Learn multiple repair techniques for stripped screw holes.
- Discover step-by-step instructions for each repair method.
- Find out how to prevent future occurrences.
- Extend the life of your wooden items with effective repair solutions.
Understanding Stripped Screw Holes in Wood
The problem of stripped screw holes is prevalent in wooden fixtures around the home. When a screw hole becomes stripped, it means the screw can no longer grip the wood securely, leading to loose joints or parts falling apart.

Why Screw Holes Become Stripped
Screw holes become stripped due to frequent movement or heavy loads on the screwed joint. Over time, the wood around the screw hole can wear out, causing the screw to lose its grip. This is particularly common in areas with high usage, such as door hinges and cabinet doors.
Common Places Where Stripping Occurs
Stripped screw holes can occur in various wooden structures around the home. Some common places include:
- Door hinges, which endure frequent movement and weight stress.
- Cabinet doors and drawer slides, especially in kitchens with high usage.
- Furniture joints, particularly in chairs and tables that bear significant weight.
- Bed frames and headboards, which often suffer from regular movement and pressure.
- Window hardware and curtain rod mounts, particularly in older homes where the wood may have dried out.
Understanding where and why stripped screw holes occur can help you take preventive measures and repair them effectively.
Tools and Materials You’ll Need
Before you start repairing stripped screw holes, it’s essential to gather the necessary tools and materials.
Essential Tools for Repairs
To carry out repairs effectively, you’ll need a set of basic tools. A drill, drill bits, and a screwdriver are fundamental. You may also find a utility knife and sandpaper useful for preparing the area around the stripped hole.
Materials for Different Repair Methods
Various materials can be used depending on the repair method. Here are some of the most common:
- Wood glue is a fundamental material for most repair methods, providing the necessary adhesion to secure fillers and create a strong bond.
- Toothpicks or wooden matchsticks serve as excellent fillers for minor to moderate damage, offering a simple yet effective solution.
- Wood dowels of various diameters are ideal for more substantial repairs, particularly when dealing with larger stripped holes.
- Wood strips or shavings matching the original wood type ensure the best aesthetic and structural results for medium-sized repairs.
- Commercial screw hole repair kits containing plastic anchors may be useful for certain applications, though they’re typically less versatile than traditional wood-based repair methods.
Method 1: Using Larger Screws
To repair a stripped screw hole, you can opt for a larger screw, ensuring it’s not too big for the surrounding wood. This method is straightforward and effective, provided you follow the right steps.
Selecting the Right Replacement Screw
When choosing a new screw, it’s crucial to select one that is not so large that it splits the wood when you drive the screw in. Typically, going up one or two gauge sizes is sufficient. The key is to find a balance between a screw that is large enough to grip the wood firmly and one that doesn’t cause further damage.
| Screw Gauge | Typical Use |
|---|---|
| Original Screw | Standard Fixing |
| +1 Gauge | Repairing Stripped Holes |
| +2 Gauge | Heavy-Duty Repairs |
Proper Installation Technique
Before installing the larger screw, make sure to remove any debris from the stripped hole to ensure proper seating. If necessary, create a pilot hole, especially in hardwoods, to prevent splitting. Applying a small amount of wax to the screw threads can reduce friction, making installation smoother. When driving the screw, use controlled, steady pressure, and stop tightening once the screw head is flush with the wood surface.
- Remove debris from the hole.
- Create a pilot hole if necessary.
- Apply wax to screw threads.
- Use steady pressure when driving the screw.
- Avoid overtightening.
Method 2: The Toothpick and Wood Glue Method
The toothpick and wood glue method is a straightforward solution for repairing stripped screw holes in wood. This technique is particularly useful when you don’t have access to more advanced woodworking tools.
Step-by-Step Toothpick Repair Process
To fix a stripped screw hole using toothpicks and wood glue, start by inserting as many toothpicks as possible into the hole. Once you’ve determined the number that fits snugly, remove them and apply 2-3 drops of wood glue to the ends. Use a cotton swab to spread the glue along the length of each toothpick. Then, reinsert the toothpicks into the hole and tap them gently with a hammer until they’re fully seated. If necessary, snap off any exposed ends. Allow the glue to dry for at least 1 hour before reinserting the screw.

Tips for a Stronger Hold
For a more robust repair, consider the following tips:
- Use a high-quality wood glue specifically designed for woodworking projects.
- Rotate the toothpicks as you insert them to create a stronger composite material.
- Pre-coat the toothpicks with wood glue for better adhesion.
- Allow the glue to dry completely, ideally for 1-2 hours or overnight.
- Create a small pilot hole in the dried toothpick bundle before reinserting the screw.
| Tip | Benefit |
|---|---|
| Use high-quality wood glue | Stronger bond |
| Rotate toothpicks | Improved composite strength |
| Pre-coat toothpicks with glue | Better adhesion |
By following these steps and tips, you can effectively repair stripped screw holes using the toothpick and wood glue method, ensuring a strong hold for your screws.
Method 3: How to Repair Stripped Screw Holes in Wood with Wood Strips
For a durable fix, consider using wood strips to fill stripped screw holes in wood. This method involves inserting wood strips into the hole to create a solid base for the screw.
Preparing Wood Strips or Shavings
It’s essential to cut the filler strips from the same type of wood to ensure a seamless repair. Using hardwood filler strips in softwood or vice versa can lead to further damage due to differences in wood behavior. Apply a small amount of wood glue to both the inside of the stripped hole and to the wood strips before insertion.
Filling and Finishing the Hole
Insert the glued wood strips into the hole, tapping them gently with a hammer until the hole is completely filled. Let the glue dry for at least 2-3 hours or preferably overnight. Once dry, use a sharp chisel or utility knife to trim any protruding wood strips flush with the surface, then sand the area smooth.
| Step | Description |
|---|---|
| 1 | Apply wood glue to the hole and wood strips |
| 2 | Insert wood strips into the hole |
| 3 | Let the glue dry for 2-3 hours |
| 4 | Trim and sand the area smooth |
Before reinstalling the screw, drill a pilot hole slightly smaller than the screw diameter into the center of the filled area. Take care when driving the screw into the repaired area, using moderate torque to avoid stripping the newly repaired hole.
Method 4: Advanced Repairs for Severely Damaged Holes
In cases where basic repairs won’t suffice, advanced techniques can salvage severely damaged screw holes. When the standard stick-fill fixes aren’t effective, it’s time to consider more sophisticated methods.
Using Hardwood Plugs or Dowels
For severely damaged holes, using hardwood plugs or dowels can provide a robust solution. A hardwood dowel repair kit can be particularly useful, offering pre-cut dowels and adhesive for a strong fix. To repair, drill out the damaged hole to a standard size, then insert a dowel coated with wood glue. Once dry, trim the dowel flush and drill a new pilot hole for the screw.
Special Techniques for Particleboard and MDF
Particleboard and MDF require special consideration due to their composite structure. For these materials, consider using screw repair kits that include plastic or metal inserts. Another effective method involves applying epoxy wood filler to the damaged hole, allowing it to harden before drilling a new pilot hole. When working with cabinet hinges, installing threaded inserts can provide a more secure hold by allowing metal-to-metal contact for the screws.
For severely damaged areas, cutting out the damaged section and gluing in a solid wood block can serve as a base for new screws. Always use screws specifically designed for particleboard or MDF, as they have deeper, more aggressive threads that provide better holding power.
Conclusion: Preventing Future Stripped Screw Holes
Maintaining the integrity of your wooden items requires attention to screw holes. To prevent future stripped screw holes in your home, it’s essential to adopt a few best practices. When inserting screws, especially in hardwoods or near the edge of a board, always drill appropriate pilot holes.
Choose the right screw type and size for each application. Larger, coarser screws are suitable for softwoods, while finer threaded screws are better for hardwoods. Avoid overtightening, as this is a primary cause of stripped holes. For items that bear significant weight, consider reinforcing screw connections with wood glue, dowels, or metal brackets.
Regularly checking and tightening loose screws, particularly in high-use items, will also help prevent stripped screw holes. By following these tips, you can maintain the integrity of your wooden items and avoid the need for repairs.