Are you tired of seeing your once-luxurious leather sofa now marred by unsightly tears and scratches? The good news is that you don’t have to replace it. With a leather repair kit, you can restore your sofa to its original condition, saving you money and extending its lifespan.
DIY leather repair is now more accessible than ever, thanks to comprehensive kits that include everything you need to achieve professional-looking results at home. Whether it’s a tear, scratch, or colour fading, these kits are designed to be easy to use, regardless of your technical ability.
Key Takeaways
- Save money by opting for DIY leather repair instead of professional services.
- Extend the life of your leather sofa with proper repairs.
- A leather repair kit contains all the necessary products and instructions.
- No special skills are required to achieve professional results.
- Various types of damage, including tears and scratches, can be effectively repaired.
Understanding Leather Sofa Damage
Recognizing the different types of damage to your leather sofa is the first step towards restoring it to its original condition. Leather furniture, while durable, is susceptible to various forms of damage due to wear and tear, environmental factors, and accidents.
Common Types of Leather Damage
Leather sofas can suffer from a range of damages, including scuffs, scratches, tears, burns, and fading. Different types of leather, such as pigmented, aniline, and semi-aniline, have varying levels of susceptibility to these damages. For instance, aniline leather, being more natural, tends to show scratches and scuffs more prominently than pigmented leather.
- Scuffs & scratches from daily wear
- Tears & rips due to accidental pulls
- Burns & holes from cigarettes or other heat sources
Why Professional Repairs Can Be Costly
Professional leather repair services charge premium rates due to their specialized equipment, high-quality materials, and expert craftsmanship. The cost of these repairs can often be substantial, sometimes approaching the price of new furniture, which makes DIY repair options increasingly attractive.
| Type of Repair | Professional Cost | DIY Cost |
|---|---|---|
| Minor Scratch Repair | £50-£100 | £10-£20 |
| Major Tear Repair | £200-£500 | £20-£50 |
Understanding the extent and type of damage is crucial for selecting the appropriate repair approach. Early intervention can prevent minor damage from becoming more serious, thus prolonging the life of your leather sofa.
What Is a Repair Leather Sofa Tear Patch Kit?
A leather sofa repair kit is a must-have for anyone looking to restore their damaged leather furniture. This comprehensive kit is designed to help you fix tears, scratches, and other forms of damage on your leather sofa.

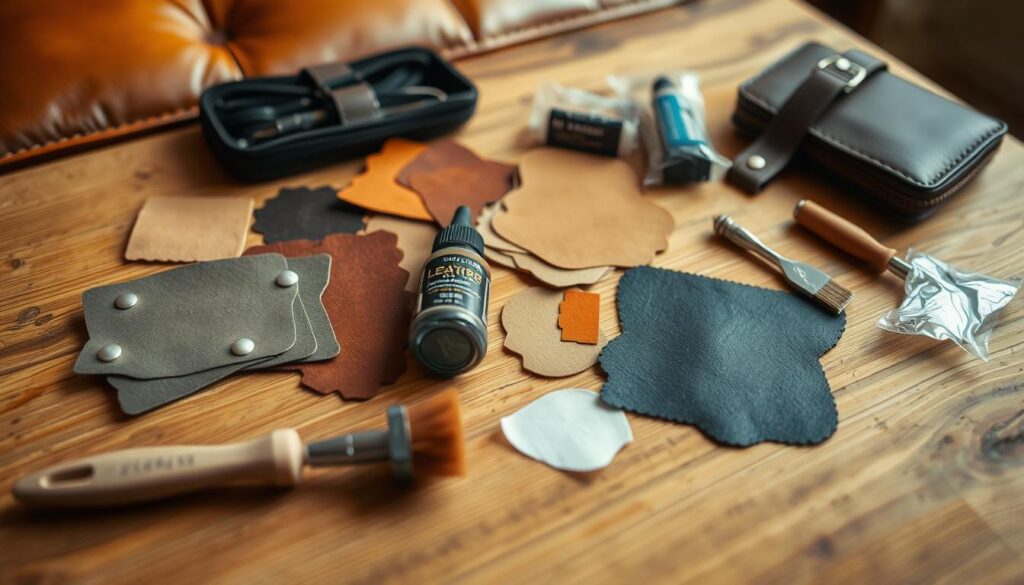
Components of a Quality Repair Kit
A quality leather repair kit contains essential components, including a Leather Prep Pad, 5ml Leather Glue, Repair Sub Patch, 10ml Heavy Filler, Heavy Filler Applicator, Sandpaper, 50ml Leather Repair Paint, 15ml Tints, Sponge, Stirrer, and Mixing Cup. These products work together to help you achieve a successful repair.
Benefits of DIY Leather Repair
Using a leather repair kit allows you to enjoy several benefits, including cost savings, convenience, and the satisfaction of completing repairs yourself. Modern repair kits have simplified the process, making it accessible to people without specialized skills. You can address multiple types of damage and use the kit on various leather items beyond just sofas.
Types of Damage You Can Fix with a Repair Kit
Restoring your leather items is easier with a repair kit, which can be used to fix a range of damage types, from tears to colour loss. A typical leather repair kit includes various tools and materials designed to address different kinds of damage.
Tears and Rips
Tears and rips in leather occur due to wear and tear or accidental damage, compromising the structural integrity of the material. A repair kit can help mend these tears, restoring the leather’s original appearance.
Scratches and Scuffs
Scratches and scuffs affect the appearance of leather surfaces, differing in depth and requiring different repair approaches. A leather repair kit provides the necessary tools to address these issues.
Burns and Holes
Repairing burns and holes is challenging, as it often involves both structural repair and colour restoration. A repair kit can help fix damage up to about 5cm in diameter.
Colour Fading and Loss
Colour fading and loss can result from sun exposure, wear, and improper cleaning. A leather repair kit can help restore the original colour, covering areas up to the size of a seat cushion or car bolster.
It’s essential to understand the limitations of a repair kit in terms of damage size and severity to determine whether your leather item is suitable for DIY repair.
Choosing the Right Repair Leather Sofa Tear Patch Kit
To achieve professional-looking results, you need to select a high-quality repair leather sofa tear patch kit that matches your sofa’s leather type and colour. A suitable kit will ensure a seamless repair that blends with the surrounding area.

Matching Your Leather Type
Leather comes in different types, such as pigmented, aniline, and semi-aniline. Identifying your leather type is crucial to choose a compatible repair kit. Using a kit that doesn’t match your leather type can lead to further damage or an unsightly repair.
Colour Selection and Matching
The kit comes in a range of 12 different base colours, including Beige, Black, and Cream. To match your leather colour, assess the base colour and undertones. You can then mix and match colours to achieve an exact match. This ensures a seamless blend with the surrounding area.
Kit Size for Your Repair Needs
Determine the kit size based on the extent of the damage and the number of repairs needed. A larger kit may be necessary for extensive damage, while a smaller kit is suitable for minor repairs. Consider the size and number of patches, as well as the amount of filler and glue provided.
Preparing for Your DIY Leather Repair
Preparing for a DIY leather repair involves several crucial steps to ensure a successful outcome. You need to gather the necessary tools, clean the damaged area, and set up your workspace.
Gathering Additional Tools
Beyond what’s included in a standard repair kit, you may need additional tools such as cotton swabs, extra cloths, or tweezers to facilitate the leather repair process.
Cleaning the Damaged Area
Thoroughly clean the surface with a Leather Prep Pad to ensure proper adhesion and colour matching. This step is crucial for a successful leather repair.
Setting Up Your Workspace
Set up your workspace with good lighting, ventilation, and protection for surrounding surfaces. Organize all materials before beginning to ensure an efficient repair process.

Step-by-Step Guide to Repairing Leather Tears
Restoring your leather sofa involves several key steps, starting with preparing the damaged area for repair. Using a repair leather sofa tear patch kit can simplify the process and yield professional results.
Applying the Sub-Patch
To begin, you need to apply a sub-patch behind the tear. This provides structural support to the damaged area. Put the sub-patch behind the leather tear, ensuring it is centred and smooth. This step is crucial for a durable repair.
Using Leather Glue Effectively
Next, apply leather glue to secure the sub-patch in place. Use a small amount to avoid excess glue squeezing out beyond the edges. Allow the glue to dry completely, following the manufacturer’s instructions for drying time.
Filling Gaps with Heavy Filler
Once the glue is dry, use a heavy filler to fill any gaps or holes in the leather. Apply the filler in thin layers, allowing each layer to dry before adding the next. This helps achieve a smooth surface that blends with the surrounding leather.
Smoothing the Surface
After filling the gaps, use a gentle sanding technique to smooth the surface. This ensures the repair area is even with the rest of the leather, creating a seamless finish.
Colour Matching and Application Techniques
Effective colour matching and application are key to a professional-looking leather repair. A leather repair kit usually comes with various colours and tints to help you achieve a perfect match.
Mixing Colours for a Perfect Match
To match your leather’s colour, you may need to mix different shades. For instance, adding a little red to cream can create a rose/pink hue, while adding yellow can make it brighter. Each kit comes with the right tints to match a huge spectrum of similar colours!
Testing on an Inconspicuous Area
Before applying the mixed colour to the damaged area, test it on an inconspicuous part of the leather to ensure a perfect match.
Applying Colour in Thin Layers
Apply colour in thin, even layers to build up depth and achieve a natural-looking finish. This technique helps prevent over-saturation and ensures a seamless blend with the surrounding leather.
Repairing Specific Types of Damage
Repairing leather damage requires a tailored approach depending on the type and extent of the damage. Using a leather repair kit can simplify the process.
Fixing Cat Scratches
Cat scratches often result in multiple fine surface damages. To repair, clean the area and apply a small amount of leather filler. Gently smooth the surface to blend with the surrounding leather.
Repairing Cigarette Burns
Cigarette burns can disfigure leather and create holes. Use a repair kit to fill the damaged area, applying a sub-patch if necessary, and then restore the colour.
Addressing Large Tears
Large tears require more extensive repair. Use a leather repair kit to apply a sub-patch, followed by leather glue and filler to reinforce the tear.
Treating Surface Scuffs
Surface scuffs primarily affect the colour layer. Clean the area and apply a matching colour using a repair kit. This helps restore the original appearance.

Finishing and Protecting Your Repair
With your leather repair job done, the focus shifts to finishing and protecting the repaired area to extend the life of your furniture. Proper finishing techniques are crucial for a durable repair.
Drying Time Requirements
The leather repair kit instructions should be followed for drying times. Generally, the repair will be touch dry within 30 minutes, but it’s advisable to wait 24 hours before using the item to allow the colourant to cure properly.
Applying Protective Coatings
Applying a protective coating can help seal the repair and protect it from future damage. This step can also aid in matching the sheen and texture of the original leather, making the repair less noticeable.
When to Avoid Using the Furniture
It’s essential to avoid using the furniture for 24 hours after the repair. Environmental factors like humidity and temperature can affect drying and curing times, so patience is key.
| Component | Drying Time | Curing Time |
|---|---|---|
| Adhesive | 30 minutes | 2 hours |
| Filler | 1 hour | 4 hours |
| Colourant | 2 hours | 24 hours |
Maintenance Tips for Repaired Leather
To keep your leather sofa looking its best after a repair, regular maintenance is crucial. By following a few simple steps, you can extend the life of your leather sofa and keep it looking great.
Regular Cleaning Practices
Regular cleaning is essential to maintain the appearance and durability of your repaired leather sofa. Use a soft, dry cloth to wipe away dust and dirt. For tougher stains, use a leather cleaner that is suitable for your leather type. Avoid using harsh chemicals or abrasive materials that can damage the leather.
- Use a soft, dry cloth for daily dusting
- Apply a leather cleaner for tougher stains
- Avoid harsh chemicals and abrasive materials
Preventing Future Damage
Preventing future damage is just as important as regular cleaning. Place your leather sofa away from direct sunlight to prevent fading. Keep it away from pets and sharp objects that can cause scratches or tears. Use a leather conditioner regularly to keep the leather soft and supple.
- Position furniture away from direct sunlight
- Keep pets and sharp objects at bay
- Use a leather conditioner regularly
By following these maintenance tips, you can enjoy your repaired leather sofa for years to come. Regular cleaning and preventive measures will not only maintain its appearance but also extend its lifespan, reducing the need for future repairs and supporting a more sustainable approach to furniture care.
Conclusion: Extending the Life of Your Leather Sofa
Extending the life of your leather sofa is achievable with the right tools, such as a leather repair kit. By using a repair leather sofa tear patch kit, you can significantly extend the life of your leather furniture. Our customers have reported saving a fortune by using MastaPlasta’s repair kit. The skills you learn can be applied to other leather items, like car seats and accessories.
Proper repairs and maintenance not only save you money but also help the environment by reducing waste. Address small damages promptly to prevent more extensive repairs. With the right care, your leather sofa can remain beautiful and durable for years to come.