Are you tired of seeing unsightly cracks on your home’s exterior walls? Do you worry that these cracks might be a sign of a more serious issue? If left untreated, damaged render can lead to costly repairs and compromise your home’s structural integrity.
You don’t have to be a seasoned DIY expert to tackle this problem. Our comprehensive guide will walk you through the process of identifying, assessing, and repairing different types of cracks on your home’s exterior.
Key Takeaways
- Identify the causes of render damage, from weather exposure to structural movement.
- Learn when to attempt DIY repairs and when to call in professional help.
- Understand the importance of restoring your home’s exterior finish.
- Discover how to improve your home’s structural integrity.
- Follow a step-by-step guide to effectively repair damaged render.
Understanding Exterior Render and Why It Cracks
Exterior render plays a crucial role in protecting your home, but it can develop cracks over time due to various factors. To address these cracks effectively, it’s essential to understand what exterior render is and the common causes behind its deterioration.
What Is Exterior Render?
Exterior render is a layer of material applied to the external walls of a building to provide a durable and weather-resistant surface. It is typically made from a mixture of cement, sand, and lime, and is designed to protect the underlying structure from the elements. A well-applied render can last for many years, but it is not immune to damage and cracking.
Common Causes of Render Cracks
There are several reasons why exterior render cracks. One of the primary causes is poor application techniques, where the render dries too quickly or isn’t properly bonded to the wall. Structural movement, including settlement, subsidence, or thermal expansion and contraction, can also create stress that leads to cracking. Weather exposure, particularly freeze-thaw cycles, can cause water trapped in tiny cracks to expand and contract, gradually widening the cracks over time.
Moisture penetration is another significant factor, as water that gets behind the render can cause it to detach from the wall and create bulging sections that eventually crack. As “Moisture becoming trapped between the render and the external wall is the single biggest cause of cracked render.” It’s crucial to identify and address these underlying issues to prevent further damage.
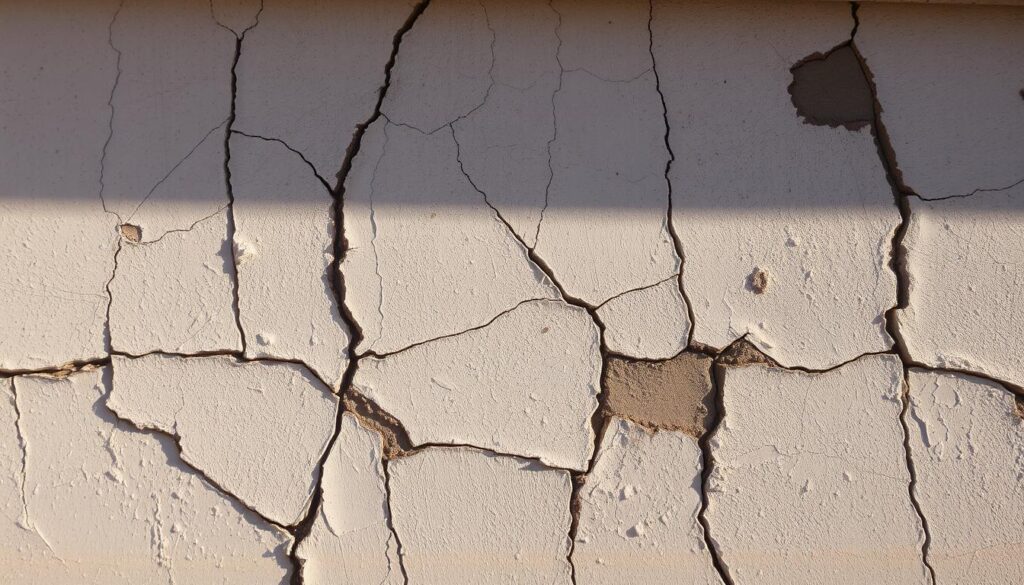
Identifying Different Types of Render Cracks
The first step in repairing cracked exterior render is to identify the different types of cracks that may have appeared. Cracks can vary significantly in their appearance, cause, and the repair method they require.
Hairline Cracks
Hairline cracks are typically very fine and may not be very deep. They are often caused by minor shrinkage of the render as it dries. Repairing hairline cracks is relatively straightforward and usually involves filling the crack with a suitable filler.
Structural Cracks
Structural cracks are more significant and can indicate underlying structural issues with your building. These cracks may be wider and deeper than hairline cracks. It’s crucial to assess the cause before proceeding with repairs, as structural cracks can compromise the integrity of your wall.
Map or Pattern Cracks
Map or pattern cracks present as interconnected networks of cracks across your render surface, resembling a spider’s web. They often result from shrinkage during the drying process or improper application of the render.  You can identify map cracking by its characteristic networked appearance, typically affecting larger areas. While map cracking may not always indicate structural issues, it allows moisture penetration and requires more extensive repair work.
- Map or pattern cracks typically result from shrinkage during the initial drying process or improper render application.
- These cracks can be identified by their networked appearance, often affecting larger areas of the render surface.
Assessing the Damage Before Repairs
Evaluating the condition of your render is essential before proceeding with any repairs. A thorough assessment helps identify the root cause of the cracks and ensures that all necessary repairs are addressed.
Examining the Extent of Cracking
Start by closely examining the cracked areas on your external wall to determine the extent of the damage. Check if the cracks are superficial or if they penetrate deeper into the render. You should also note the width and length of the cracks, as this information will be crucial in deciding the appropriate repair method. Moisture can often be a contributing factor, so it’s essential to inspect for any signs of water ingress or dampness around the cracked areas.
Checking for Underlying Issues
It’s vital to examine your property for underlying issues that may have contributed to the render cracks. Check interior walls corresponding to the damaged exterior areas for signs of damp, mould, or staining, which could indicate moisture penetration through the render and wall structure. Inspect guttering, downpipes, and roof edges above the cracked render for any signs of water leakage, as fixing these issues is crucial before proceeding with render repairs. Additionally, look for signs of structural movement, such as sticking doors or windows, sloping floors, or cracks on both sides of a wall, which may necessitate professional assessment.
| Area to Inspect | Signs of Damage or Issues |
|---|---|
| Interior Walls | Damp, mould, staining |
| Guttering and Downpipes | Water leakage, blockages |
| Structural Elements | Cracks, sticking doors/windows |
Essential Tools and Materials for Render Repair

To effectively repair your home’s exterior render, you’ll need specific tools and materials. The right equipment ensures a durable and weather-resistant finish that blends with your existing render.
Required Tools
For a successful repair, you’ll need a set of basic tools. These include a trowel for applying filler or render mix, a hammer for removing loose render, and a brush for cleaning the affected area. A masonry cleaner is also essential for preparing the surface.
Recommended Materials
Selecting the right materials is crucial for a seamless repair. For hairline cracks, use a flexible exterior-grade filler. Larger repairs require a render mix that matches your existing render type. A bonding agent or PVA primer ensures good adhesion between the existing render and repair materials. Finally, exterior masonry paint with waterproofing properties provides a protective finish.
Preparing the Cracked Surface for Repair
To ensure a durable repair, the cracked surface must be prepared correctly. This involves a series of steps that are crucial for a successful outcome.
Cleaning the Affected Area
Start by cleaning the cracked area thoroughly to remove dirt, debris, and any loose material. This step is essential to ensure that the repair material adheres properly to the render surface. Use a stiff brush or a wire brush to scrub the area, and then rinse it with clean water.
Opening Up Cracks for Better Adhesion
For better adhesion of the repair material, it’s necessary to open up the cracks. Use a hammer and chisel or a similar tool to slightly widen the cracks, making sure not to damage the surrounding render. This will help the repair material to fill the cracks more effectively and bond with the existing wall surface.
Removing Loose Render
Inspect the area around the cracks for any loose or hollow render. Tap the surface gently with a wooden mallet or the handle of a screwdriver to check for hollow sounds, indicating that the render has detached from the wall. Remove any loose render using a hammer and chisel, working outward from the cracked area until you reach sound material.
| Step | Description |
|---|---|
| 1 | Clean the cracked area thoroughly |
| 2 | Open up the cracks for better adhesion |
| 3 | Remove any loose or hollow render |

After removing loose render, brush the exposed wall surface thoroughly to remove dust and loose material, then dampen it slightly before applying new render to ensure proper adhesion for the repair.
How to Repair Cracked Exterior Render: Step-by-Step Guide
To maintain your home’s exterior integrity, learning how to repair cracked exterior render is essential. The process involves assessing the type of crack and applying the appropriate repair technique.
Repairing Hairline Cracks
Hairline cracks are the most common type of crack found in exterior render. To repair them, start by cleaning the area around the crack using a wire brush to remove any debris or loose render. Next, widen the crack slightly with a chisel or scraper to ensure better adhesion of the repair material. Then, fill the crack with a suitable crack repair mortar or filler, making sure it penetrates the entire crack. Smooth the surface, feathering the edges to blend with the surrounding render. Allow the repair to cure as per the manufacturer’s instructions before lightly sanding the area to achieve a smooth finish.
Fixing Structural Cracks
Structural cracks are more serious and indicate underlying issues that need to be addressed. Begin by assessing the extent of the damage and determining if the affected render can be repaired or if it needs to be completely replaced. For repairable structural cracks, follow a similar process to that for hairline cracks but use a more robust repair material if necessary. Ensure the area is clean and free of loose material before applying the repair compound. It is crucial to apply a bonding primer after the repair has cured to enhance adhesion between the old and new render.
Addressing Map or Pattern Cracks
Map or pattern cracking typically affects larger areas and may indicate issues with the original application or material compatibility. For such cracks, assess whether the render can be repaired or needs replacement. If repairable, start by removing loose material and thoroughly cleaning the affected area. Apply a stabilising primer to bind any remaining small cracks and provide a sound base for subsequent repairs. Then, apply a flexible fibre-reinforced render repair compound across the entire affected area to create a new surface layer that resists future cracking.
Regardless of the type of crack, finishing the repair with a coat of paint or tint that matches the existing render is essential for a seamless finish. Regular maintenance and inspections can help prevent future cracks and ensure the longevity of your exterior render.
Choosing the Right Repair Products

Choosing the right products is vital for effectively repairing and protecting your exterior render. The right materials ensure a durable and long-lasting fix, safeguarding your home against the elements.
Exterior Fillers and Their Applications
Exterior fillers are used to fill in cracks and damaged areas. They should be chosen based on the type of render and the extent of the damage. For instance, flexible fillers are ideal for hairline cracks, while more substantial repairs may require a robust filler that can withstand moisture and weathering.
Render Mixes for Larger Repairs
For larger repairs, render mixes are essential. These mixes should be compatible with the original render to ensure a uniform finish. It’s crucial to select a mix that provides adequate protection against the elements and is suitable for your render type.
Waterproof Coatings and Paints
After completing render repairs, applying a suitable waterproof coating or paint provides essential protection against future water damage. Modern silicone-based masonry paints offer excellent water repellency while maintaining high breathability, allowing any trapped moisture to escape. For more information on render repair, visit our comprehensive guide on render crack repair.
When selecting exterior coatings, look for products with an SD value under 0.5 and hydrophobic properties. For properties in exposed or coastal areas, consider specialised salt-resistant coatings. Always ensure compatibility between your repair materials and any protective coatings to avoid further damage to the render.
Finishing Techniques for a Seamless Repair
The final touches are crucial in ensuring your render repair blends in with the surrounding area. A well-finished repair not only enhances the appearance of your walls but also contributes to the longevity of the render.
Matching Texture and Appearance
Once the repair has cured, sand the area lightly to create a smooth surface. This step is essential for achieving a uniform texture that matches the surrounding render. Apply a bonding primer to the repaired area, ensuring it covers the repair and the surrounding render. This helps in achieving a consistent appearance when you finally paint or tint the repaired area to match the existing color of the render.
Painting and Protecting Repaired Areas
Proper painting and protection of repaired render areas are essential for both aesthetic consistency and long-term durability. Allow all repair materials to cure fully according to the manufacturer’s recommendations before applying any paint or protective coating. Use a suitable primer designed for masonry surfaces to ensure even absorption and adhesion of the topcoat.
| Best Practices | Benefits |
|---|---|
| Extend paint to natural break points | Less noticeable repair |
| Apply a complete new coat of masonry paint | Uniform appearance and comprehensive protection |
Preventing Future Render Cracks
Ensuring your render remains crack-free requires a combination of good maintenance practices and effective protective measures. By adopting a proactive approach, you can significantly extend the lifespan of your render and reduce the need for costly repairs.
Maintenance Tips for Rendered Walls
Regular maintenance is crucial to preventing render cracks. This includes inspecting your render for signs of damage, ensuring that all roof elements, guttering, and downpipes are functioning properly to prevent water ingress. Using flexible render products that can accommodate building movement is also advisable.
Protective Measures Against Weather Damage
Implementing protective measures against weather damage can significantly enhance the durability of your render. Consider applying a waterproof masonry paint or a silicone water-repellent treatment to create a protective barrier on your external walls. Additionally, ensuring adequate drip details on window sills and copings can direct water away from the render surface, reducing the risk of moisture damage.
Conclusion
A well-executed repair job on cracked exterior render not only enhances your home’s appearance but also safeguards its exterior walls. By understanding the causes of cracks and applying the right techniques, you can effectively restore your home’s render. Regular maintenance is key to preventing future cracks and ensuring the longevity of your render. Whether you choose to DIY or hire professionals, investing in quality materials will ensure a lasting result. This approach is a viable option for homeowners looking to protect their property.