Are you tired of looking at that unsightly crack in your ceramic sink? Do you think it’s time to replace it entirely? Think again! With the right DIY guide, you can restore your sink to its former glory without breaking the bank or calling in a professional.
Repairing a damaged sink at home is more achievable than you might think. By understanding the cause of the damage and assessing whether your sink is suitable for a DIY repair, you can save both time and money.
Key Takeaways
- Learn how to assess the damage to your sink and determine if it’s suitable for DIY repair.
- Discover the essential tools and materials needed for a successful repair.
- Understand the step-by-step process of repairing your ceramic sink.
- Gain insights into preventative measures to extend the life of your sink after repairs.
- Find out how to achieve a seamless finish and make your sink look like new again.
Understanding Ceramic Sink Damage
The bathroom sink is a daily fixture, and cracks or chips can be an unwelcome sight. Cracks typically appear as fine lines across the sink surface, ranging from hairline cracks to more visible, deeper ones.
Common Causes of Cracks and Chips
Several factors contribute to porcelain sink damage. Impacts from heavy objects, extreme temperature changes, and general wear over time are common causes. Understanding these factors can help you prevent future damage.
Assessing the Severity of Damage
To determine whether a DIY repair is feasible or if professional help is needed, you must assess the severity of the damage. Different types of damage, such as hairline cracks, deep cracks, chips, and surface scratches, require different approaches. Evaluating the extent of the damage to your porcelain sink will guide your repair decisions.
By understanding the causes and types of damage, you can make informed decisions about repairing your sink.
Tools and Materials You’ll Need

To repair a cracked ceramic sink, you’ll need to gather the right tools and materials. A successful DIY repair depends on having the correct equipment.
Essential Repair Supplies
The following supplies are necessary for a basic ceramic sink repair:
- Gather all necessary supplies including a high-quality porcelain ceramic repair kit specifically designed for sink repairs.
- Understand the importance of choosing the right epoxy formulation for ceramic sink repairs and how to select one that matches your sink’s colour.
- Use sandpaper (typically 120-grit for roughening and 400-600 grit for finishing) for preparation and smoothing out the repaired area.
Optional Tools for Better Results
In addition to the essential supplies, the following tools can improve your repair results:
- Discover additional tools that can enhance your repair, such as applicator brushes, mixing trays, and colour-matching pigments.
- Understand the safety equipment needed, including disposable gloves and proper ventilation, when working with repair chemicals.
By gathering the right tools and materials, you’ll be well-prepared to tackle the repair of your cracked ceramic sink.
Preparing Your Sink for Repair
Proper preparation is key to a successful ceramic sink repair. Before applying any repair materials, you need to ensure the area around the crack or chip is properly cleaned and prepared.
Thorough Cleaning Techniques
Begin by cleaning the damaged area with an all-purpose cleaner to remove any dirt, soap residue, or grease that could interfere with the repair. Use a gentle scrubber to avoid scratching the surrounding surface.
After cleaning, rinse the sink thoroughly with clean water to remove any remaining cleaner. This step is crucial to ensure a clean surface for repair.
Drying and Surface Preparation
Allow the sink to dry completely for at least one hour before proceeding. Moisture can prevent proper adhesion of repair materials. Once dry, use medium-grit sandpaper to roughen the surface of the cracked area, creating a better bonding surface for the repair materials.
| Preparation Step | Purpose |
|---|---|
| Cleaning with all-purpose cleaner | Remove dirt and grease |
| Rinsing with clean water | Remove remaining cleaner |
| Drying completely | Prevent moisture interference |
| Sanding the surface | Create a better bonding surface |
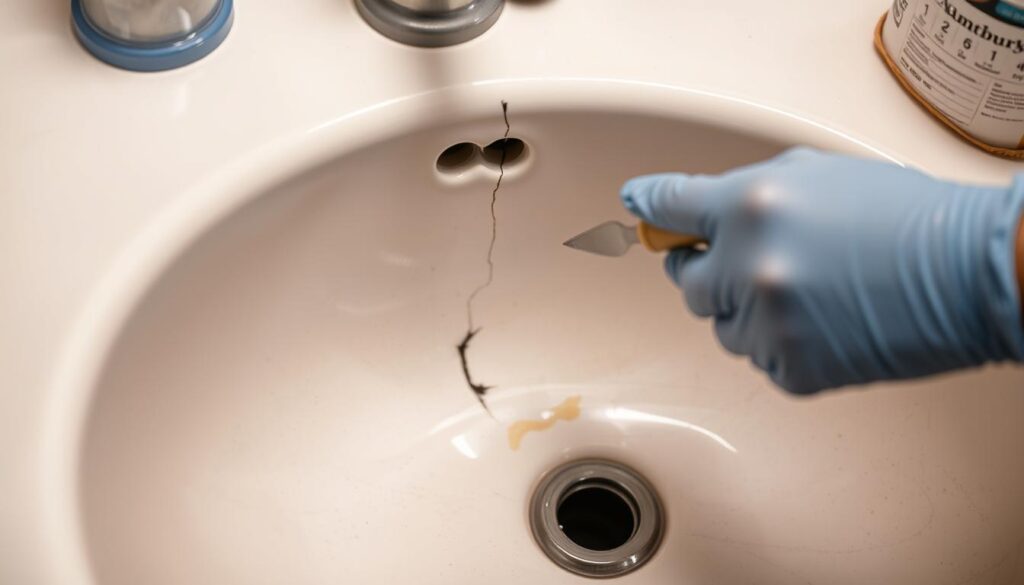
How to Repair Cracked Ceramic Sink: Step-by-Step Guide
You can restore your ceramic sink to its original condition by following a simple repair guide. The process involves several key steps that ensure a durable and visually appealing fix.
Sanding the Damaged Area
Begin by carefully sanding the damaged area to create a rough surface. This helps the epoxy bond effectively. Use a fine-grit sandpaper to smooth out the edges around the crack or chip.
Mixing and Applying Epoxy
To apply epoxy, first follow the manufacturer’s instructions to mix the two parts. Use the provided brush or a toothpick to empty the contents into a mixing tray. Mix thoroughly for at least one minute. Then, apply a thin coat of epoxy to the chip or crack, letting it dry for 45 minutes before applying another coat.
Layering Techniques for Deep Cracks
For deeper cracks, it’s crucial to use a layering technique. Allow each layer of epoxy to partially set before applying the next. This ensures maximum strength and a durable repair.
| Step | Description | Drying Time |
|---|---|---|
| Sanding | Prepare the damaged area | N/A |
| Mixing Epoxy | Follow manufacturer instructions | N/A |
| Applying Epoxy | Thin coat to crack or chip | 45 minutes |
Repairing Hairline Cracks
Hairline cracks, though small, can lead to significant issues in your ceramic or porcelain sink if not properly fixed. These fine cracks are often barely visible but can compromise the integrity of your sink.
Identifying Hairline Damage
To address hairline cracks, you first need to identify them. Look for fine lines that are often more visible when the sink is dry. Early detection is crucial to prevent these cracks from developing into larger problems.

Specialised Techniques for Fine Cracks
To fix a hairline crack in a porcelain sink, you can use epoxy glue, a two-part adhesive that is very strong and durable. Mix the epoxy according to the manufacturer’s instructions and apply it to the crack using a toothpick or fine-tipped applicator. Let it dry completely. Key steps include:
- Carefully cleaning the area around the crack
- Applying epoxy glue precisely to the hairline crack
- Allowing the epoxy to dry completely before using the sink
By following these steps, you can effectively repair hairline cracks and extend the life of your sink.
Fixing Chips and Surface Damage
To restore your sink’s original appearance, you’ll need to master the art of filling chips and surface damage. This process involves techniques distinct from those used for repairing cracks.
Filling Techniques for Chips
When filling chips, it’s essential to build up layers of repair compound gradually. Start by applying a small amount of epoxy to the damaged area. Use the tip of the repair kit’s brush or a toothpick to push the epoxy deep into the chip or crack. If you apply too much epoxy, wipe away the excess with a damp paper towel.
Apply new layers of epoxy, waiting 45 minutes between coats. Gently brush another layer of epoxy onto the chip or crack and wait 45 minutes before applying another coat. Repeat this process until the filled chip or crack raises slightly above the sink’s surface.
| Layer Number | Application Time | Drying Time |
|---|---|---|
| 1 | Immediate | 45 minutes |
| 2 | After 45 minutes | 45 minutes |
| 3 | After 1.5 hours | 45 minutes |
Matching Sink Colour and Texture
After filling the damaged area, you’ll need to match the sink’s original colour and texture. This can be achieved by using a colour-matching guide or consulting with a professional for porcelain sink repair. To recreate the original texture, gently sand the repaired area once it’s fully dry.
By following these steps, you can effectively repair chips and surface damage on your sink, restoring its original appearance and functionality.
Finishing and Curing Your Repair
Now that you’ve applied the epoxy, the finishing touches will make all the difference in the appearance and durability of your repair.
Sanding the Repaired Area
Let the epoxy dry for 24 hours, then sand down the repaired area using 400- to 600-grit sandpaper. This will ensure the filled-in area is completely smooth and level with the rest of the sink’s surface.
Applying Touch-Up Paint (If Necessary)
If your sink is made of porcelain, apply porcelain touch-up paint over the filled-in chip, scratch, or crack according to the manufacturer’s instructions. These paints are waterproof and come in various colours to match your sink’s finish.
Proper Curing Time
Time is crucial in allowing the epoxy to dry completely. Most products recommend not using the sink for 12 to 24 hours after applying the last coat of epoxy. Try not to clean the sink for at least 5 days after finishing the repair.
| Step | Action | Recommended Time |
|---|---|---|
| 1 | Apply Epoxy | As per manufacturer’s instructions |
| 2 | Sand the Repaired Area | After 24 hours |
| 3 | Apply Touch-Up Paint (if necessary) | After sanding |
| 4 | Avoid Using Sink | For 12 to 24 hours after last epoxy coat |

When to Replace Instead of Repair

While repairing a ceramic sink is often a viable option, there are instances where replacement is the better choice. Understanding when to opt for a new sink can save you time, money, and the hassle of dealing with persistent leaks or further damage.
Signs That Repair Isn’t Sufficient
If your sink has structural cracks that leak water or extensive damage, it may be beyond repair. Such damage can compromise the integrity of your sink, making it unsafe for use. Additionally, if the sink’s surface is severely chipped or worn out, replacement might be the more practical solution.
Cost Comparison: Repair vs. Replacement
When deciding between repair and replacement, it’s essential to consider the costs involved. If the cost of repair is close to or exceeds the price of a new sink, it may be more economical to replace the sink entirely. Factor in the cost of plumbing services, materials, and your time to make an informed decision.
To replace your sink, you’ll need to disconnect the water supply lines. Start by shutting off the water supply by turning the supply valves clockwise. Use a wrench to loosen and remove the supply hoses from the supply valves, then use a basin wrench to remove them from the faucet on the underside of the sink. Place a towel or bucket under the hoses to catch any remaining water. Next, disconnect the P-trap from the drain by unscrewing the plastic joints and wiggling it off the drain pipe into a bucket.
By understanding the signs that indicate a need for replacement and comparing the costs, you can make a well-informed decision about whether to repair or replace your ceramic sink.
Preventing Future Sink Damage
To keep your kitchen sink in good condition, it’s essential to adopt a few simple habits. By doing so, you can significantly reduce the risk of cracks and chips forming in your porcelain sink.
Daily Maintenance Tips
Daily maintenance is crucial in preventing damage to your sink. You should avoid sudden impacts by not dropping heavy objects into the sink or hitting it with hard objects. Additionally, be mindful of extreme temperature changes; avoid pouring boiling water directly into the sink, and refrain from sudden changes between hot and cold water.
Using mild cleaning agents is also vital. Harsh chemicals can damage the porcelain finish, so opt for gentle cleaners instead. After using the sink, rinse it thoroughly with clean water to remove any dirt or debris that could cause scratches.
Protective Measures for Longevity
To further protect your sink, consider using a sink grid. This will help shield the surface from scratches and impact damage. Regularly inspecting your sink for any signs of cracks or chips is also a good practice, allowing you to address any issues promptly.
By implementing these daily maintenance practices and protective measures, you can extend the life of your ceramic or porcelain sink and prevent future damage.
Conclusion
Completing a DIY ceramic sink repair project can be a rewarding experience, and this guide is here to help. By following the steps outlined in this article, you’ve learned how to assess, prepare, and repair your cracked ceramic sink. The key to a successful repair lies in proper preparation and adhering to manufacturer instructions.
With the right tools and techniques, you can achieve professional-looking results without the need for professional help. This not only saves you money but also gives you a sense of accomplishment. To ensure the longevity of your newly repaired sink, remember to follow daily maintenance tips and take protective measures to prevent future damage.
By taking on this DIY project, you’re not only repairing your sink but also gaining the confidence to tackle similar tasks in the future. With this comprehensive guide, even novice DIY enthusiasts can successfully repair their cracked ceramic sinks.