Are you aware of the importance of regularly changing your refrigerator’s water filter? Failing to do so can lead to a decline in the quality of the water your fridge dispenses. Most manufacturers recommend changing filters approximately every six months to ensure you enjoy clean, fresh-tasting water and ice.
This comprehensive guide will walk you through the process, from understanding why it’s necessary to the actual replacement steps. By following this guide, you’ll maintain optimal water quality and protect your refrigerator’s water system.
Key Takeaways
- Understand the importance of regular water filter replacement.
- Learn how to identify when your filter needs replacing.
- Discover how to select the correct filter for your refrigerator model.
- Follow clear, step-by-step replacement instructions.
- Maintain optimal water quality and protect your appliance.
Why Replacing Your Refrigerator Water Filter Matters
To ensure your drinking water remains free from contaminants, replacing your refrigerator water filter is essential. Water filters in refrigerators are designed to reduce contaminants including chlorine, lead, mercury, and emerging contaminants like pharmaceuticals.

Benefits of Regular Filter Replacement
Regularly replacing your fridge water filter ensures you enjoy clean, great-tasting water. The benefits include:
- Clean drinking water free from contaminants like chlorine and lead
- Maintaining the efficiency of your refrigerator’s water dispensing system and ice maker
- Potentially extending the life of these components
Risks of Neglecting Filter Maintenance
Neglecting your water filter replacement can lead to several issues, including:
- Unpleasant smell and taste in your drinking water
- Reduced effectiveness of the filter, potentially allowing harmful substances into your water
- Filters becoming breeding grounds for bacteria and mould, contaminating your water and ice
Most manufacturers recommend changing your water filter every six months.
When to Replace Your Refrigerator Water Filter
Knowing when to replace your refrigerator water filter is crucial for maintaining clean drinking water and optimal appliance performance. Regular replacement ensures that your water remains free from contaminants and that your refrigerator’s water dispenser and ice maker function properly.
The Six-Month Replacement Rule
The industry-standard recommendation is to replace your refrigerator water filter every six months, regardless of usage, to ensure optimal water quality and system performance. Many modern refrigerators are equipped with indicator lights that automatically alert you when it’s time to replace the filter.

Signs Your Filter Needs Changing
Watch for noticeable changes in water flow, such as reduced pressure from your water dispenser, which often indicates a clogged filter that needs replacement. Changes in water taste, odour, or clarity are clear signs that your filter is no longer effectively removing contaminants.
- Reduced water pressure from the dispenser
- Changes in water taste, odour, or clarity
- Ice maker producing fewer ice cubes or ice with unusual taste or appearance
Understanding Filter Indicator Lights
Different refrigerator models have various ways of indicating filter status—some use colour-changing lights, while others display digital messages or icons on control panels. The indicator light functions on a six-month timer, signaling when it’s time for a filter change.
Preparing for Refrigerator Water Filter Replacement Steps
Before you start replacing your refrigerator water filter, it’s essential to prepare properly. This involves identifying the correct filter model and its location within your fridge.
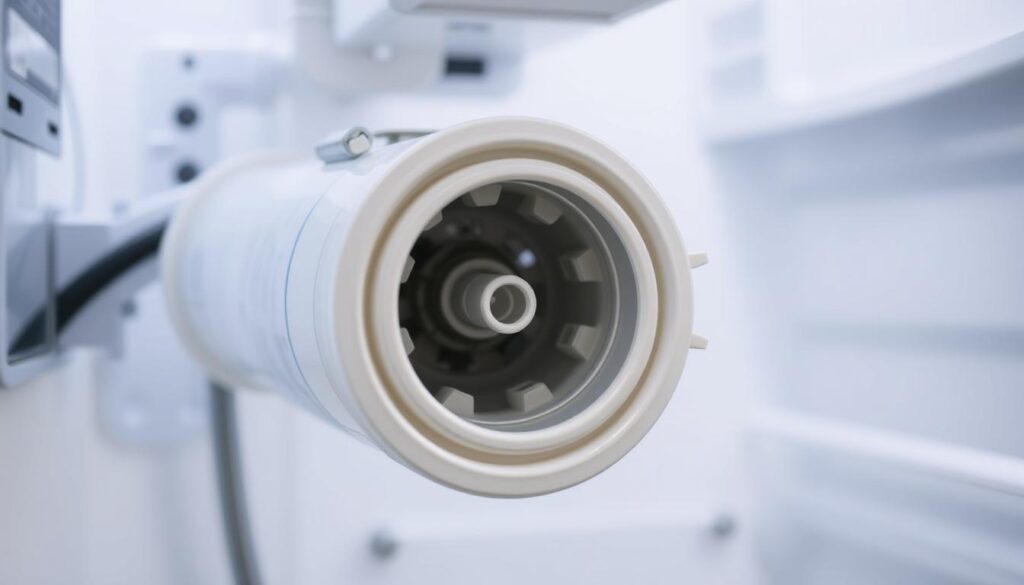
Identifying Your Filter Model and Location
To find your filter’s location, consult your refrigerator’s user manual, as it varies by model. Typically, water filters are located in the upper right-hand corner of the refrigerator interior, behind the base grille, or in the back wall. Once located, note the model number on the existing filter to ensure you purchase the correct replacement.
Purchasing the Correct Replacement Filter
Different refrigerator brands use specific filter types, such as twist-in or push-in models. Check your appliance’s instruction manual or the existing filter for the model number to buy a compatible replacement from a reputable source.
Tools and Materials Needed
For most filter replacements, no special tools are required. However, having a towel handy to catch any water drips is recommended. Some models may require turning off the water supply before replacement, so locate your refrigerator’s water shut-off valve, typically behind the refrigerator or under the sink.
| Filter Model | Location | Tools Needed |
|---|---|---|
| HAF-CIN, HAF-QIN, HAFCU1 | Upper right corner or base grille | Towel |
| Twist-in or Push-in | Back wall or upper right corner | None or shut-off valve |
Step-by-Step Refrigerator Water Filter Replacement
With our guide, you’ll be able to replace your refrigerator’s water filter with ease, ensuring fresh and clean drinking water. This process involves several key steps that are straightforward and easy to follow.
Turning Off the Water Supply
Begin by turning off the water supply to your refrigerator. This is typically done by closing the shut-off valve located either behind the refrigerator or under the kitchen sink. Ensuring the water supply is off is crucial to avoid any leaks or water damage during the replacement process.
Removing the Old Filter
For twist-in filters, open the filter compartment cover, grasp the old filter firmly, and rotate it counterclockwise until it unlocks. Then, gently pull it straight out of the housing. For push-in filter types, press the release button before pulling the filter straight out from its housing.
Twist-In Filters
Twist-in filters require a counterclockwise turn to unlock. This simple mechanism ensures safe removal.
Push-In Filters
Push-in filters usually have a release button that needs to be pressed before the filter can be pulled out. Some models may have a special eject mechanism.
Installing the New Filter
Before installing the new filter, remove any protective caps or seals, being careful not to touch the filter connection points to avoid contamination. For twist-in models, align the new filter with the housing, insert it, and turn clockwise until it locks into place.
Flushing the System
After installation, dispense at least 2-4 gallons of water to remove any air and carbon particles from the new filter. This water should be discarded.
Resetting the Filter Indicator
Reset the filter indicator light according to your refrigerator model’s instructions. This typically involves pressing and holding a specific button or combination of buttons on the control panel.
| Filter Type | Removal Method | Installation Method |
|---|---|---|
| Twist-In | Rotate counterclockwise | Rotate clockwise |
| Push-In | Press release button | Push in until locked |
Conclusion
Ensuring your refrigerator water filter is replaced regularly is vital for the health and wellbeing of your family. By following the step-by-step guide outlined in this article, you can confidently replace your water filter without professional assistance, saving time and money.
To maintain optimal performance, remember to mark your calendar or set a reminder to replace your filter every six months. It’s also a good idea to keep a spare filter on hand, and consider using a manufacturer’s subscription service for automatic replacements.
If you encounter any difficulties during the replacement process, consult your refrigerator’s user manual or contact the manufacturer’s customer support for assistance. Proper disposal of your old filter is also important; check if the manufacturer offers recycling programmes or consult your local waste management service for environmentally friendly disposal options.