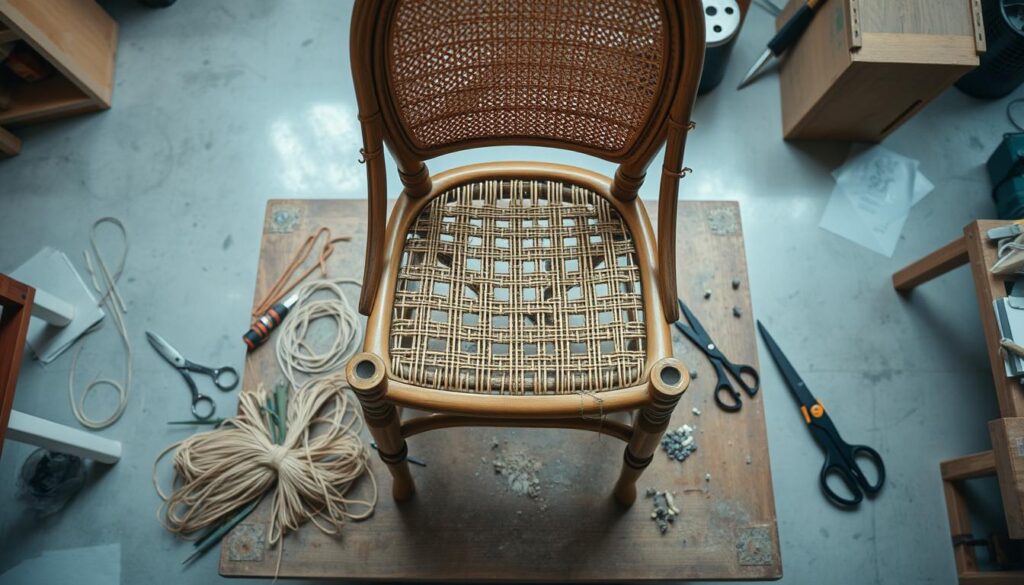
Are you looking to restore an antique chair to its former glory? Perhaps you’ve inherited a family heirloom with damaged caning or discovered a bargain chair that needs restoration. Restoring a seat with cane is a rewarding skill that can breathe new life into vintage furniture pieces.
Learning to re-cane a chair seat can be a valuable restoration technique, preserving the authenticity and value of your furniture. Our comprehensive guide will walk you through the traditional seven-step hand caning method, creating the classic octagonal pattern seen in many antique and vintage chairs.
Key Takeaways
- Restoring cane chair seats is a rewarding skill that can save you money.
- The traditional craft of chair caning dates back centuries.
- Our guide covers the seven-step hand caning method.
- You can preserve the authenticity and value of your vintage chair.
- Learning this skill can provide immense satisfaction.
Understanding Cane Chair Seats
When it comes to restoring or repairing a cane chair seat, knowledge of the different types of cane seating is crucial. Cane seating has been a staple in furniture making for centuries, offering a durable and aesthetically pleasing solution for chair seats.
What is Chair Caning?
Chair caning involves weaving strand chair cane coils through a frame to create a seat. This traditional technique requires patience and skill, as the strands are carefully threaded through holes drilled around the perimeter of the seat frame.
Types of Cane Seating
There are several types of cane seating, including hand-woven cane, pre-woven cane webbing, and pressed cane panels. The type of cane seating used in your chair will determine the repair approach and tools needed.
| Type of Cane Seating | Description | Installation Method |
|---|---|---|
| Hand-woven Cane | Individual strands woven through holes around the seat frame | Threading strands through holes |
| Pre-woven Cane Webbing | Sheet of cane installed using a spline | Spline installation |
| Pressed Cane Panels | Machine-made sheets with a uniform pattern | Adhesive or spline installation |
Tools and Materials Needed for Re-caning

Before you start re-caning, it’s essential to gather the necessary tools and materials. To begin, you’ll need to measure your chair seat to determine the correct size of cane to purchase.
Essential Tools for Chair Caning
The essential tools for chair caning include a measuring tape, a sharp utility knife or cane cutter, and a spline (if required). You may also need a hammer and some pegs or tacks to secure the cane in place.
Selecting the Right Cane Material
Selecting the correct size of cane is crucial for a successful restoration. Options range from fine (2.25mm) to common (3.5mm), depending on the hole spacing in your chair. To determine the appropriate cane size, measure the diameter of the drilled holes and the distance between hole centers in several places around the seat frame.
For a standard 14-inch chair seat, you’ll need approximately 250-270 feet of cane. Additionally, you’ll need binder cord, which should be purchased in the same gauge as the weaving cane to ensure a consistent appearance. Natural rattan cane is the traditional and preferred material for authentic restorations, though synthetic alternatives are available for chairs that will be exposed to high humidity or outdoor conditions.
Assessing Your Chair Before Starting
To ensure a successful re-caning project, you need to evaluate your chair’s current state. This involves a thorough examination of the chair frame and accurate measurements to determine the correct cane size.
Examining the Chair Frame
Start by inspecting the chair frame for any damage or wear. Check for loose joints, cracks, or broken parts that may need repair before proceeding with re-caning. Ensure the frame is sturdy enough to support the new cane seat.
Measuring for the Correct Cane Size
To select the appropriate cane size, measure the diameter of the drilled holes and the distance between them. Use a measuring tape to take measurements from multiple locations around the seat frame. Record your findings and compare them to a conversion table to determine the correct cane size. Key considerations include:
- Measuring hole diameter and spacing to ensure a proper fit.
- Calculating the center-to-center distance between adjacent holes.
- For pre-woven cane, measuring the groove width and depth to select the correct spline size.

Removing Old Cane from Your Chair
Removing the old cane from your chair is a crucial step in the re-caning process. This step is essential to ensure a clean and stable base for the new cane material.
Safe Removal Techniques
To safely remove the old cane, start by taking out any visible cane material. For chairs with a spline groove, use a small chisel and hammer to carefully remove any remaining cane or spline fragments. This process requires patience to avoid damaging the chair frame.
After removing the visible cane, use an awl or a small drill bit to clean each hole, ensuring they are completely clear.
Cleaning the Seat Frame
Once the old cane is removed, clean the seat frame thoroughly. Use fine sandpaper to smooth out the wood surface around the holes and groove, removing any rough edges that might damage the new cane. Inspect the frame for any splits or cracks hidden by the old caning.
Ensure all holes are free-flowing by passing a piece of wire or a small dowel through each one before starting the new caning process.
How to Re-cane Dining Chair Seat: The 7-Step Method
To restore your dining chair to its former glory, follow our 7-step method for re-caning the seat. This process involves careful planning and execution to achieve a professional finish.
Step 1: Installing Vertical Strands
Begin by installing the vertical strands. This step lays the foundation for the rest of the caning process. Ensure that the strands are evenly spaced and properly tensioned.
Step 2: Adding Horizontal Strands
Next, add the horizontal strands over the vertical strands. This creates a grid that will form the base of your cane seat. Maintain consistent spacing and tension.
Step 3: Creating the Second Vertical Layer
Now, install the second vertical strands to the right of the first vertical layer. Place these strands over the top of both the original vertical strands and the horizontal strands. This step is crucial for creating a sturdy foundation.
| Step | Description |
|---|---|
| 1 | Install vertical strands |
| 2 | Add horizontal strands |
| 3 | Create second vertical layer |

By following these initial steps, you will be well on your way to successfully re-caning your dining chair seat. Ensure that each step is completed with care to achieve a beautiful and durable finish.
Completing the Weaving Pattern
To achieve a professional finish, carefully follow the steps for completing the weaving pattern on your chair. This involves several intricate steps that require patience and attention to detail.
Step4: Weaving Horizontal Strands
Begin by weaving the horizontal strands, ensuring they are tightly secured to the frame. This layer is crucial for the stability and appearance of the cane seat.
Step5: Adding First Diagonal Weave
Next, add the first diagonal weave, starting from one corner and moving to the opposite corner. This step begins to form the characteristic woven pattern of the cane seat.
Step6: Adding Second Diagonal Weave
For the second diagonal weave, start from the front corner hole on the right and weave over the horizontals and under the verticals. This step completes the octagonal pattern, creating a robust and visually appealing cane surface.
- The final weaving step adds diagonal strands, completing the octagonal pattern.
- Begin at the front right corner hole, weaving in the opposite direction to the previous diagonal strands.
- These strands should pass over the horizontal pairs and under the vertical pairs.
Finishing Your Cane Seat
After completing the weaving pattern, you’ll need to apply a binder cord to secure the cane in place.
Step7: Applying the Binder Cord
You will continue the looping process, moving to the right one hole each time, and pick up any loose “tails” to incorporate them under the binder cord in the “No-Knot” fashion. As you go around the four rails of the chair seat, you’ll add new lengths at each corner and secure them with a peg. This process helps to minimize the number of loose ends that need to be tied off later.
Trimming and Securing Loose Ends
After completing the binder cord application, trim any visible loose ends on the underside of the chair seat. Use the “No-Knot” system to secure loose ends by tucking them under the binder cord. For any remaining ends, tie them off neatly and apply a small drop of white glue to secure. Finally, trim all ends close to the knots or securing points.
| Task | Description |
|---|---|
| Apply Binder Cord | Secure cane in place with binder cord, adding new lengths at corners and securing with pegs. |
| Trim Loose Ends | Trim visible loose ends on the underside of the chair seat. |
| Secure with Glue | Apply white glue to tied-off ends to secure them. |
Allow the completed seat to dry thoroughly for at least 24-48 hours before using the chair to ensure the cane tightens properly.
Alternative Options for Damaged Cane Seats
Damaged cane seats don’t necessarily mean you need to discard the entire chair. You have alternatives to restore its functionality and aesthetic appeal.

Converting to an Upholstered Seat
If you’re dealing with a damaged cane seat, converting it to an upholstered seat is a viable option. This involves covering the existing seat frame with new upholstery material, effectively concealing any damaged areas, including the groove where the spline was previously seated. For guidance on upholstery, you can refer to resources like Upholstery 101.
Professional Restoration Services
For valuable antiques or complex cane patterns, consider hiring professional restoration services. These experts have the necessary tools and knowledge to restore your chair to its original state, including repairing the frame, refinishing, and re-caning. They can also address issues like removing old spline material without damaging the chair frame.
Conclusion
Congratulations on completing your first cane chair project; your patience and attention to detail have paid off. You’ve not only restored a cherished piece of furniture but also acquired a valuable skill. To ensure your newly caned seat remains in top condition, follow proper care tips. For more information on the chair caning process, visit Adams Furniture Restorations. By doing so, you’ll enjoy your beautifully restored chair for years to come.