Have you ever noticed an unsightly hole in your wall, perhaps from a doorknob mishap or a nail used to hang a picture? Such drywall damage is a common issue many homeowners face, and if left unaddressed, it can lead to further deterioration and costly repairs down the line.
Repairing drywall is a straightforward DIY home project that requires minimal tools and materials. By learning how to fix these holes, you can maintain your home’s aesthetic appeal and save money on professional repairs. This guide will walk you through the process, providing you with the confidence to tackle this task and the skills to ensure seamless, invisible repairs.
Key Takeaways
- Understand why addressing drywall damage promptly is crucial for maintaining your home’s condition.
- Learn that repairing drywall is a simple DIY project requiring minimal tools.
- Gain confidence in tackling drywall repairs yourself, saving on professional fees.
- Preview the step-by-step guide to various drywall repair methods.
- Recognise the importance of mastering basic drywall repair skills for homeowners.
Understanding Different Types of Drywall Damage
The first step in repairing drywall is to assess the type and extent of the damage. Drywall can suffer from various types of damage, ranging from small dents and nail holes to larger holes and structural damage. Understanding the nature of the damage is crucial for selecting the appropriate repair method.
Small Dents and Nail Holes
Small dents and nail holes, typically under 1/2 inch in diameter, are the most straightforward to repair. These minor imperfections can be easily filled with spackling compound. They are often caused by everyday wear and tear, such as nail holes from hanging pictures or small dents from furniture.
Small to Medium-Sized Holes
Holes that are between 1/2 inch and 6 inches in diameter fall into the small to medium-sized category. These are commonly caused by doorknobs, furniture impacts, or the removal of wall fixtures. For holes up to 6 inches, a California Patch can be an effective repair solution.
Larger Holes and Wall Damage
For larger holes exceeding 6 inches, a more comprehensive approach is required. This involves creating a drywall patch with a different attachment method to securely repair the wall. Larger holes often necessitate the replacement of drywall pieces and the installation of supporting structures to ensure a stable repair.
Essential Tools and Materials for Patching Drywall

Before you start patching drywall, it’s essential to have the necessary tools and materials at your disposal. Gathering everything you need beforehand ensures a smooth, uninterrupted workflow.
Basic Tools You’ll Need
For small hole repairs, you’ll need basic tools such as a putty knife, a sanding block or sponge, and a clean cloth for dust removal. A utility knife is also handy for cutting drywall or removing damaged sections.
Materials for Different Sized Repairs
The size of the repair dictates the materials you’ll need. For tiny holes, spackling compound is sufficient. For small to medium holes, self-adhesive mesh patches are ideal. Larger repairs require actual drywall pieces to be cut and fitted into place.
Optional Tools for Professional Results
For more precise and professional results, consider using specialised tools like drywall saws, taping knives, and a drywall mud pan. These tools can make a significant difference in the quality of your repair.
Understanding the difference between quick-setting joint compound and regular joint compound is also crucial. Quick-setting compound is ideal for larger repairs or when you need to work quickly, while regular compound provides more working time for smaller, more detailed work.
Safety Precautions Before You Begin
Before starting your drywall repair, it’s crucial to take necessary safety precautions. This will help you avoid potential hazards associated with the task.
Protective Equipment
You should wear protective clothing, including work gloves, goggles, and a dust mask when working with drywall. This protective gear will shield you from debris, sharp edges, and inhalation of drywall dust.
Checking for Electrical Wires
It’s vital to check for electrical wires behind the wall before cutting or drilling into drywall. Use a stud finder with wire detection capabilities to locate the wall studs and any hidden wires.
Workspace Preparation
Properly prepare your workspace by laying down dust sheets, ensuring adequate ventilation, and removing or covering furniture with protective sheets. This will help prevent damage and ensure a clean working environment.
| Safety Measure | Purpose |
|---|---|
| Wear protective clothing | Protects against debris and dust |
| Check for electrical wires | Prevents electrical shock or damage |
| Prepare workspace | Ensures a clean and safe working area |
By following these safety precautions, you can ensure a safe and successful drywall repair. Make sure you also keep children and pets away from the repair area and have basic first aid measures in place.
Patching a Small Hole in Drywall: The Simple Method
You can easily fix small holes in drywall using a straightforward technique. This method is perfect for small holes typically under 1/2 inch in diameter.
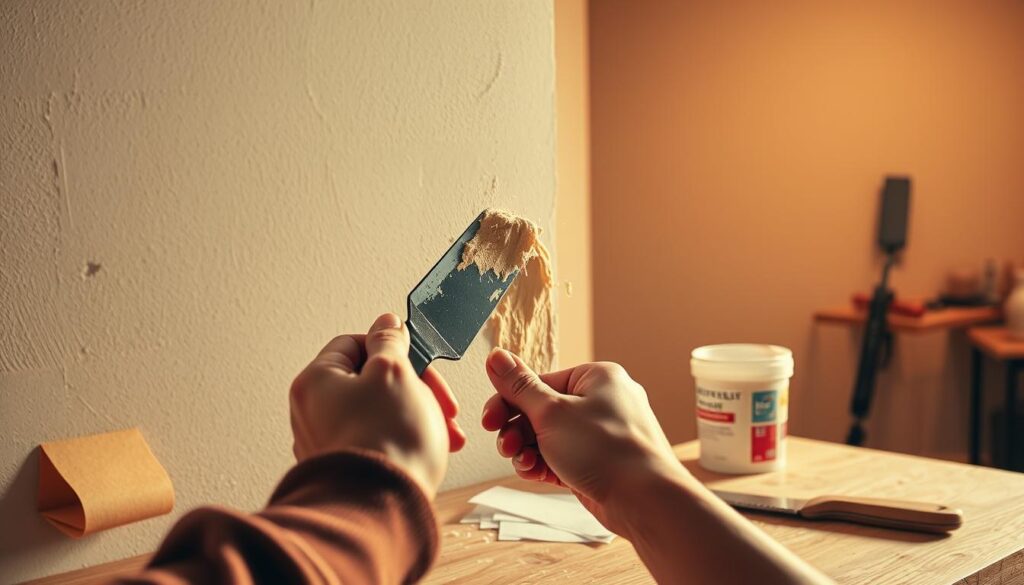
Preparing the Damaged Area
Start by scraping away any loose debris from the hole. Lightly sand the edges to create a clean surface for the repair. This step is crucial for ensuring a smooth finish.
Applying Spackling Compound
Cover the hole with fast-drying spackle, bringing it level with the drywall surface. Use a putty knife to apply the spackling compound, ensuring you fill the hole completely.

Smoothing and Feathering Techniques
Sand the area smooth, feathering the edges so that the repair blends with the surrounding wall. This technique helps create an invisible finish.
Drying Time Considerations
Allow the spackling compound to dry for 24 hours or as recommended by the manufacturer’s instructions. Check for uniform colour with no dark spots to ensure it’s fully cured.
Some key tips to keep in mind include:
- Applying multiple thin layers of spackling compound often yields better results than a single thick application.
- Temperature and humidity can affect drying time, so be patient and check the compound regularly.
- Avoid common mistakes like over-sanding or under-filling to ensure a professional finish.
Using Self-Adhesive Mesh Patches for Small Holes

Self-adhesive mesh patches offer a straightforward method for fixing small drywall holes. These patches are particularly useful for holes between 1/2 inch and 3 inches in diameter, making them an ideal solution for repairs caused by doorknobs or other minor impacts.
When to Use a Patch Kit
A patch kit is suitable for small holes where the drywall is not severely damaged. It’s essential to select a kit that matches your specific repair needs, considering factors like hole size and wall texture.
Applying the Self-Adhesive Mesh
To apply the patch, place the self-adhesive mesh over the hole, ensuring it lies flat against the wall. Use a drywall knife to smooth out any wrinkles or bubbles.
Covering with Joint Compound
Cover the mesh patch with a layer of joint compound or spackling compound in a crisscross pattern. Feather the edges to blend with the surrounding wall, applying gentle pressure and adjusting the knife’s angle as needed.
After applying the compound, let it dry completely before sanding it smooth. If necessary, apply a second coat to achieve a seamless finish.
The California Patch Method for Medium Holes
When dealing with medium-sized drywall holes, professionals often turn to the California Patch method for a durable fix. This technique is particularly effective for holes measuring between 2 and 6 inches in diameter.
Creating the California Patch
To start, cut a piece of drywall into a square shape that’s 2 inches larger in width and height than the area to be repaired. Score the back of the drywall with a utility knife about an inch from each side, then snap off the gypsum, leaving the paper backing intact.
Fitting the Patch into the Wall
Hold the patch over the hole and trace around the gypsum square. Cut out the traced square with a drywall saw. Apply joint compound to the back of the paper border, then fit the gypsum into the new hole and press the paper edges into place.
Securing and Finishing the Repair
Cover the entire patch with joint compound until the lines are camouflaged, feathering the edges. This may require two coats of compound, with drying time in between. Sand smooth to finish.
By mastering the California Patch method, you can achieve a strong and seamless repair that blends with the surrounding wall.
Repairing Larger Holes with Furring Strips
For holes exceeding 6 inches, a specialised technique using furring strips is employed to create a sturdy repair. This method involves several key steps to ensure a strong and durable fix.
Preparing the Hole
First, you’ll need to cut a piece of drywall into a square that is slightly larger than the hole. Hold this square over the hole and trace around its edges. Then, use a drywall saw to cut along the traced lines, creating a clean edge around the hole.
Installing Furring Strips
Inside the hole, attach furring strips to either side using screws. These strips provide a solid backing for the new drywall piece. Ensure the screws are sunk beneath the drywall surface to create a smooth finish.
Securing the New Drywall Piece
Place the drywall patch into the hole and screw it into the furring strips. Again, make sure the screws are countersunk below the surface.
Taping and Mudding the Seams
Apply joint tape to the borders of the patch to strengthen the bond between the patch and the wall. Then, cover the tape with joint compound, feathering the edges to blend with the surrounding area. Allow the compound to dry, and apply a second coat if necessary.
| Step | Description |
|---|---|
| 1 | Cut a drywall square larger than the hole |
| 2 | Attach furring strips inside the hole |
| 3 | Secure the drywall patch to the furring strips |
| 4 | Apply joint tape and compound to the seams |
Sanding Techniques for a Smooth Finish
To ensure a seamless blend between the patch and the wall, proper sanding techniques are essential. The goal is to achieve a smooth surface that is indistinguishable from the surrounding drywall.
Choosing the Right Sandpaper Grit
Selecting the appropriate sandpaper grit is crucial for different stages of the sanding process. Typically, you start with 120-grit sandpaper and finish with 150 or 180-grit for final smoothing. Using the right grit ensures that the compound is adequately smoothed out.
Proper Sanding Techniques
Employing the correct sanding motion is vital. Use light, circular movements to achieve smooth results without creating gouges or uneven areas. This technique helps in feathering the edges of your repair area, gradually transitioning from the patched area to the existing wall surface.
Avoiding Common Sanding Mistakes
Be cautious not to over-sand, as this can expose the mesh tape or the patch itself. It’s also important to minimise dust during the sanding process and properly clean up afterwards to prepare for painting.
| Sanding Stage | Grit Size | Purpose |
|---|---|---|
| Initial Sanding | 120-grit | Remove excess compound |
| Final Smoothing | 150-180 grit | Achieve smooth finish |
As emphasised by professionals, “A smooth finish is not just about sanding; it’s about creating a surface that blends seamlessly with the surrounding area.” 
Priming and Painting the Repaired Area
Once you’ve successfully patched the drywall, the next crucial steps involve priming and painting to achieve a seamless finish. Proper priming is essential as it seals the porous surface of the drywall repair, providing a uniform base for paint adhesion.
Selecting the Right Primer
Choosing the appropriate primer is vital for a successful paint job. Consider the size of the patch and the type of paint you’ll be using. For most drywall repairs, a universal primer is suitable, but for larger repairs or when using a semi-gloss finish, consider a primer specifically designed for drywall.
Matching Existing Paint
To make your repair truly invisible, you need to match the existing wall paint as closely as possible. This includes matching the colour, sheen, and texture. If you’re repainting a large area, ensure you have enough paint to cover the entire section to avoid colour discrepancies.
Blending Techniques for Seamless Results
To achieve a seamless finish, apply primer evenly over the repaired area, ensuring complete coverage without excessive buildup. When painting, use techniques like feathering and stippling to blend the repaired area with the surrounding wall. Multiple thin coats of paint yield better results than a single thick coat, especially when matching existing paint.
| Technique | Description | Benefit |
|---|---|---|
| Feathering | Softly blending the edges of the repair | Creates a seamless transition |
| Stippling | Creating a textured finish with a stippling brush | Matches the texture of the surrounding area |
| Thin Coats | Applying multiple thin layers of paint | Prevents buildup and ensures an even finish |
By following these steps and techniques, you can achieve a professional-looking finish that makes your drywall repair virtually invisible.
Dealing with Textured Drywall Repairs
The key to successful textured drywall repairs lies in accurately identifying the texture type and applying the appropriate repair method. Textured drywall can present unique challenges beyond standard smooth-wall repairs, but with the right techniques, you can achieve a seamless finish.
Texture Identification
Before you start the repair, it’s crucial to identify the type of texture on your wall. Common textures include orange peel, knockdown, popcorn, and skip trowel. Understanding the texture type will help you choose the right tools and techniques for the job.
Creating and Applying Texture
To create a matching texture, you can use a mixture of joint compound and water. For instance, mix 4 parts joint compound with 1 part water in a small bowl. Dip a stiff brush into the mixture and hold it close to the wall, bristles up. Flick the mixture onto the wall by running a gloved finger across the surface of the bristles. The faster the flicking motion, the smaller the particles on the wall. Alternatively, you can use a textured spray can, shaking it well before spraying the patch area in a circular motion 6-18 inches from the wall.
Matching Existing Patterns
To blend the repair with the surrounding area, it’s essential to match the existing texture pattern. Practice your texture technique on a scrap piece of drywall before applying it to the actual wall. Consider the lighting in the room, as it can affect the appearance of the textured surface.
| Texture Type | Tools Required | Technique |
|---|---|---|
| Orange Peel | Stiff brush, joint compound | Flicking motion |
| Knockdown | Trowel, joint compound | Pressing down |
| Popcorn | Textured spray can | Circular motion |
By mastering these techniques and understanding the importance of texture matching, you can achieve a professional-looking repair that blends seamlessly with the surrounding wall.
Conclusion
As you’ve learned through this comprehensive guide, repairing drywall damage can be a simple and cost-effective DIY project. By following the steps outlined, you can achieve professional-quality results when fixing small holes in your drywall. It’s essential to select the right repair method based on the size and type of damage. Patience is crucial, particularly when allowing compound to dry between coats. With the right tools and preparation, drywall repairs become significantly easier. Mastering these basic skills can save you money by avoiding professional repair costs. Practice on less visible areas before tackling prominent repairs, and keep basic drywall repair supplies on hand for quick fixes.