You’ve invested time and effort into decorating your home, but peeling paint can quickly make your walls look worn and neglected.
In the UK, where the climate can be quite damp, paint durability is a common concern. The good news is that most peeling paint issues can be addressed with the right techniques and tools.
This comprehensive guide will walk you through the steps to identify, fix, and prevent peeling paint on various surfaces in your home. You’ll learn how to maintain the aesthetic appeal and structural integrity of your walls.
Key Takeaways
- Understand the common causes of peeling paint in UK homes.
- Learn how to identify peeling paint issues early.
- Discover the right techniques for fixing peeling paint.
- Find out how to prevent peeling paint in the future.
- Get tips on maintaining your home’s surfaces.
Understanding Why Paint Peels in UK Homes
Peeling paint is a common issue in UK homes, often caused by a combination of factors related to the home’s environment and maintenance. The integrity of paint on walls is challenged by various conditions, leading to peeling, cracking, or flaking.
The Impact of British Weather and Humidity
The UK’s notoriously damp climate creates unique challenges for paint adhesion and longevity. Seasonal humidity fluctuations cause paint to expand and contract, eventually leading to peeling. Condensation in poorly ventilated homes further exacerbates the issue, affecting different wall surfaces in various ways. Excess moisture is a primary culprit, as it prevents paint from bonding properly with the wall surface.
Common Causes of Paint Peeling in Different Rooms
Inadequate surface preparation is a common cause of paint peeling, regardless of the room type. Layering different paint types incorrectly, such as applying latex paint over oil-based paint, can lead to chemical incompatibility issues. Specific rooms experience unique challenges: bathrooms suffer from steam, kitchens from cooking moisture, and living areas from external wall penetration. Intermittent heating patterns in UK homes can also exacerbate paint adhesion issues. Understanding these room-specific causes can help in applying targeted solutions to prevent peeling paint.
Identifying Different Types of Paint Peeling Problems
Paint peeling can manifest in various forms, each indicating a different underlying issue that needs to be addressed. Recognizing the specific type of peeling is crucial for determining the appropriate repair method.
Bubbling and Blistering Paint
Bubbling and blistering paint is characterized by the formation of bubbles or blisters on the paint surface, often indicating trapped moisture or heat beneath the paint. This issue can arise due to poor surface preparation or exposure to high temperatures.

Flaking and Cracking Paint
Flaking paint involves the detachment of small paint pieces, while cracking paint remains attached but develops visible lines. Flaking often results from poor adhesion, whereas cracking can indicate aging paint or settlement issues. Understanding the difference is vital for addressing the root cause.
Peeling from the Surface vs. Between Layers
It’s essential to determine whether the paint is peeling from the surface or between layers. Peeling from the surface suggests an adhesion failure to the wall, while peeling between layers indicates a cohesion failure between paint coats. This distinction guides the repair approach.
To effectively fix peeling paint, you must identify the type of paint and its condition. For instance, latex paint tends to have a rubbery, stretchy consistency when peeling, whereas oil-based paint often results in brittle flakes. By examining the peeling pattern and location, you can diagnose the root cause and choose the appropriate fix.
- Examine the visual characteristics of the peeling paint to determine its type and condition.
- Assess the pattern and location of the peeling to identify potential underlying issues.
- Consider the material of your walls, as different materials exhibit unique peeling patterns.
Essential Tools for Your Paint Peeling Fix Project
When tackling paint peeling issues in your UK home, having the right tools is crucial for a successful repair. The task requires a combination of basic and specialized tools to ensure a professional finish.
Scrapers and Sandpaper Options
For removing peeling paint, you’ll need a reliable paint scraper. For larger areas, consider the Ultimate Paint Scraper, which gently buffs away peeling paint. For smaller surface areas, use the Ultimate Fine Sandpaper with a Seriously Good Cork Block to rapidly clean up the area. Having multiple sandpaper grits (coarse to fine) is essential for different stages of the repair process.
Fillers and Primers
For damaged walls, you’ll need a suitable filler. UK homes can benefit from either ready-mixed or powder fillers, depending on the extent of the damage. A primer is also crucial as it creates a proper foundation for new paint and prevents future peeling issues.
Painting Tools and Accessories
An image of various painting tools and accessories
Beyond basic brushes and rollers, consider painting tools like extension poles, paint pads for edges, and specialized applicators for difficult areas. These tools will help you achieve a professional finish on your paint project.
Safety Equipment
An image of safety goggles and a dust mask
When removing old peeling paint, it’s vital to use proper safety equipment, including dust masks and eye protection, to safeguard against hazardous substances.
By investing in quality tools and following the right techniques, you’ll be well-equipped to tackle paint peeling issues in your UK home effectively.
Step-by-Step Guide to Fix Peeling Paint on Walls
With the right guidance, you can easily fix peeling paint on your walls and achieve a smooth finish. This step-by-step guide will walk you through the process, from preparing your work area to applying primer.
Preparing Your Work Area
Before starting your project, it’s essential to prepare your work area. Begin by removing any furniture near the wall you’re working on. Lay a dust sheet to protect your floor and furniture from dust, drips, and spills. Secure the dust sheet with masking tape to prevent it from shifting while you work. Ensure proper ventilation to protect your health.
Removing Loose and Peeling Paint
Use a scraper or a paint remover to gently remove loose and peeling paint. Be cautious not to gouge the wall surface. For more stubborn areas, use a more aggressive scraping method, but be careful not to damage the underlying surface. Stop scraping when you reach sound paint.

Sanding and Smoothing the Surface
Once you’ve removed the loose paint, sand the area to create a smooth transition between the painted and unpainted sections. Use a fine-grit sandpaper to achieve a smooth surface. Wipe away any dust with a damp microfibre cloth.
| Step | Action | Tools Needed |
|---|---|---|
| 1 | Remove loose paint | Scraper or paint remover |
| 2 | Sand the surface | Fine-grit sandpaper |
| 3 | Fill cracks and holes | Filler, putty knife |
Filling Cracks and Holes
Apply filler to cracks and holes in thin layers, allowing each layer to dry before applying the next. Use a putty knife to achieve a flush finish with the surrounding wall. Sand the filled area to ensure it’s smooth.
Applying Primer to Prepared Areas
Select a primer suitable for your wall condition and apply it according to the manufacturer’s instructions. Use a roller or brush to apply the primer evenly. Allow the primer to dry completely before proceeding.
By following these steps and taking your time, you can successfully fix peeling paint on your walls and achieve a professional-looking finish.
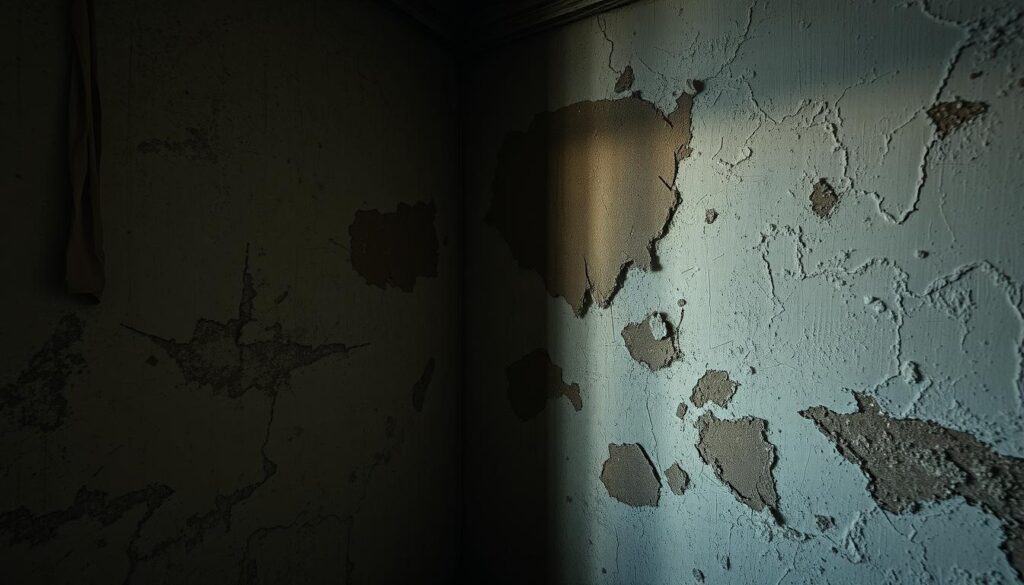
Tackling Peeling Paint in High-Moisture Areas
Peeling paint in high-moisture areas can be particularly problematic, necessitating tailored solutions for UK homeowners. These areas, such as bathrooms and kitchens, are prone to moisture-related issues that can compromise the integrity of the paint.
Bathroom-Specific Paint Peeling Solutions
Fixing peeling paint in bathrooms requires a thorough approach due to the constant exposure to moisture. To effectively address this issue, it’s crucial to start with a clean surface, removing any soap residue and mildew that can prevent proper paint adhesion. Using bathroom-specific paints with anti-mould properties is highly recommended, as these formulations are designed to resist the high humidity conditions typical in UK bathrooms.

Kitchen Paint Peeling Fixes
Kitchens present a unique set of challenges, with the combination of moisture, grease, and temperature fluctuations making kitchen paint particularly prone to peeling. To fix peeling paint in kitchens, it’s essential to thoroughly clean the surface to remove grease and grime. Using a primer before applying paint can also enhance durability.
Dealing with Condensation Issues
Condensation is a significant contributor to peeling paint in high-moisture areas. To address this, both immediate fixes for affected paint and longer-term solutions to reduce condensation formation are necessary. Ensuring proper ventilation systems are in place can dramatically reduce paint peeling problems. Regular maintenance, including prompt attention to early signs of peeling, is also crucial.
By understanding the causes of peeling paint and implementing the right fixes, homeowners can maintain the integrity of their walls in high-moisture areas.
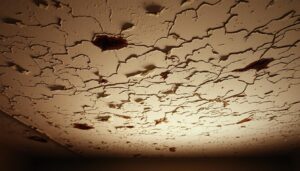
Ceiling Paint Peeling Fix: Special Considerations
Fixing peeling paint on ceilings presents unique challenges that require careful consideration and the right techniques. The gravity-defying nature of the work and the often awkward positions needed can make the task daunting. However, with proper preparation and understanding of the causes, you can achieve a flawless finish.

Working Safely at Height
When working on ceiling repairs, safety is paramount. Ensure you’re using a sturdy ladder or scaffolding that’s appropriate for the task. Always maintain three points of contact, whether it’s two hands and one foot or two feet and one hand. For extensive repairs, consider hiring a professional to avoid accidents.
Techniques for Overhead Repairs
To minimize fatigue and paint drips, adopt specialized techniques for overhead repairs. Use a roller with an extension pole to cover large areas efficiently, and work in sections to maintain even coverage. Keep your work area well-ventilated, and consider using a paint with a slow-drying formula to reduce drips.
Preventing Future Ceiling Paint Problems
Preventing future ceiling paint peeling involves addressing the underlying causes, such as moisture issues. Ensure your attic is well-insulated and ventilated to reduce condensation. Regularly inspect your ceiling for signs of dampness or water damage, and address these issues promptly to prevent paint peeling.
By understanding the challenges and taking the right precautions, you can successfully fix peeling paint on your ceiling and enjoy a durable, attractive finish for years to come.
Choosing the Right Paint After Repairs
Choosing the appropriate paint type and finish is essential to prevent future peeling issues after repairs. The right paint can significantly extend the time between necessary redecorating, making it a crucial decision for homeowners.
Understanding Paint Sheens for Different Surfaces
Different surfaces and rooms require specific paint sheens. Flat sheens are ideal for ceilings and low-traffic areas, while satin and semi-gloss finishes are better suited for high-traffic areas and surfaces that are exposed to moisture, such as bathrooms and kitchens.
The durability and moisture resistance of satin and semi-gloss enamels make them perfect for areas that need frequent cleaning. For instance, a satin enamel sheen creates a pearl-like finish that’s durable and dirt-resistant, making it suitable for virtually all exterior surfaces.
Water-Based vs. Oil-Based Paints
Water-based paints are easier to clean up and dry faster than oil-based paints, making them a popular choice for many homeowners. However, oil-based paints offer a harder, more durable finish, which can be beneficial for certain applications.
When deciding between water-based and oil-based paints, consider the surface you’re painting and the desired finish. For example, water-based paints are suitable for most interior surfaces, while oil-based paints are often used for trim work and exterior surfaces.
Specialist Paints for Problem Areas
Specialist paints are available for problem areas such as bathrooms, hallways, and radiators. Moisture-resistant formulations are ideal for damp-prone areas, while scuff-resistant options are perfect for high-traffic areas.
For instance, paints with built-in mould inhibitors can help prevent mould growth in damp areas, ensuring a healthier and more durable finish.
Preventing Future Paint Peeling Problems
To keep your walls looking their best, preventing paint peeling is crucial. This involves a combination of proper surface preparation, effective moisture control, and regular maintenance.
Proper Surface Preparation Techniques
Preparing your surface correctly is the first step in preventing paint peeling. This includes thoroughly cleaning the wall to remove dirt, grease, or mould. For different wall materials, specific preparation methods are necessary. For instance, plaster walls may require a coat of primer to create a smooth surface for painting. Ensuring the surface is dry and free from defects before applying paint will significantly extend its lifespan.
Moisture Control in UK Homes
Moisture is a significant contributor to paint peeling in UK homes. To combat this, it’s essential to implement effective moisture control strategies. This can include improving ventilation, using dehumidifiers, and addressing issues like condensation, rising damp, and penetrating damp. By reducing moisture levels, you can prevent paint failure and maintain the integrity of your walls.
Maintenance Tips for Lasting Results
Regular maintenance is key to extending the life of your paintwork. This includes gentle cleaning routines to remove dirt without damaging the paint, prompt attention to minor damage, and regular inspections for early signs of problems. Creating a home maintenance calendar that includes regular paint condition assessments, particularly after extreme weather events, will help you stay on top of potential issues before they become major problems.
Professional vs DIY: When to Call in the Experts

Understanding when to DIY and when to call in the experts is crucial for effectively fixing peeling paint issues in your UK home. While DIY repairs can be cost-effective for minor issues, more complex problems may require professional expertise.
Signs Your Peeling Paint Indicates Bigger Problems
If you notice extensive peeling, especially in conjunction with other signs like dampness, mould, or structural cracks, it may indicate underlying issues that need professional assessment. Structural damage or extensive damp can compromise the integrity of your walls and ceilings, making it essential to address these problems promptly.
Cost Comparison: DIY vs Professional Repair
When comparing DIY and professional repairs, consider not just the cost of materials but also the value of your time and the quality of the finish. While DIY might seem cheaper upfront, professional services often provide a longer-lasting solution, potentially saving you money in the long run.
For complex issues or if you’re unsure about the extent of the problem, it’s wise to consult with a professional. They can provide a detailed assessment and quotation, helping you make an informed decision.
When hiring a professional, look for reputable painting and decorating experts in the UK, checking for relevant certifications and trade associations. Effective communication is key; ensure they understand your specific concerns and requirements.
Consider a hybrid approach where you handle simpler tasks while bringing in experts for more technical elements. This can be a cost-effective way to manage your project while ensuring complex issues are addressed properly.
Conclusion
Tackling peeling paint effectively involves more than just covering up the problem; it requires a thorough understanding of the underlying causes. Throughout this article, we’ve explored the various reasons behind paint peeling in UK homes, from the impact of British weather and humidity to common causes in different rooms. By understanding these factors and following our step-by-step guide, you can achieve a flawless finish on your walls and maintain the overall appearance and value of your home.
Successful paint peeling fixes require proper diagnosis, preparation, and execution. By addressing the root causes rather than just the symptoms, you can ensure a long-lasting result. The UK’s climate presents unique challenges for paint durability, making it crucial to select the right materials and techniques. By following our guide and taking preventative measures, you can avoid future peeling paint issues and enjoy a beautiful, professional-quality finish.
We encourage you to assess your own home for early signs of peeling and address them promptly. With the right approach and materials, even persistent peeling paint problems can be resolved. By maintaining your walls and taking on projects like this, you can enjoy the satisfaction of a job well done and the cost savings of DIY projects.