Have you ever struggled with unsightly water stains on your walls, only to find that painting over them doesn’t make the problem disappear?
Water stains are a common issue in many homes, often resulting from leaky roofs, burst pipes, or plumbing issues. Simply applying a fresh coat of paint may not be enough to eliminate these stubborn stains.
In this article, we will guide you through the process of effectively painting over water stains on your walls, ensuring a flawless finish that lasts.
Key Takeaways
- Identify and address the source of the water stain
- Prepare the affected area properly before painting
- Use specialised products to block stains effectively
- Follow the right techniques to achieve a flawless finish
- Permanently eliminate water stains from your walls
Understanding Water Stains and Their Causes
Understanding the causes of water stains is crucial to effectively addressing them. Water stains on walls are often a result of underlying issues that need to be identified and resolved.
What Causes Water Stains on Walls?
Water stains typically occur due to the presence of water-soluble contaminants on the surface. When these contaminants come into contact with water-based paint, they can migrate through the paint layers, causing discoloration.
Common Sources of Water Damage
Common sources include leaks from pipes, roofs, or appliances, as well as flooding. These incidents can lead to water seeping into walls, resulting in stains.
Why Water Stains Have That Tea-Coloured Appearance
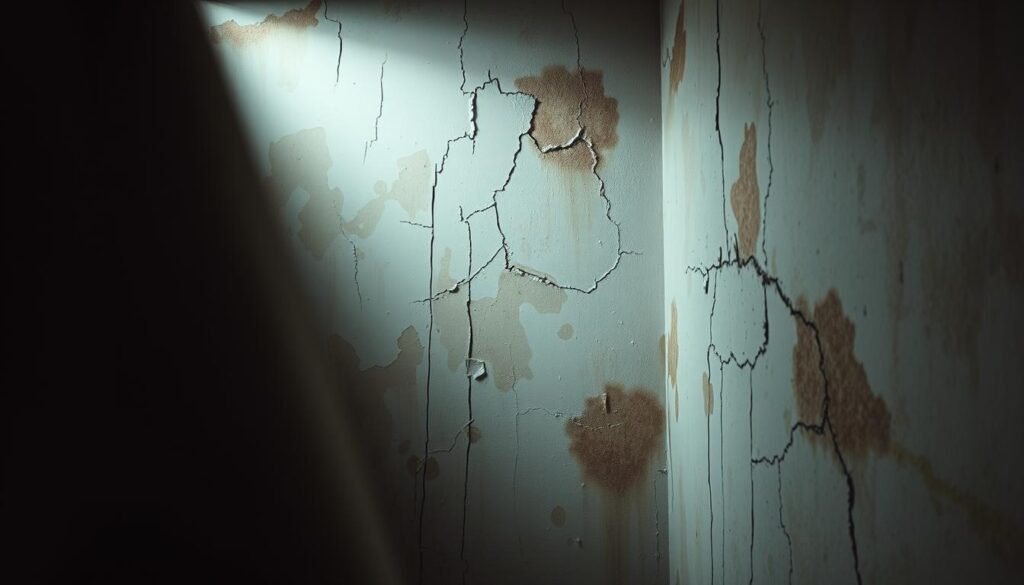
The characteristic tea-coloured appearance of water stains is often due to the presence of rust or dirt carried by the water. As the water evaporates, it leaves behind these substances, which can stain the surface.
Why Simply Painting Over Water Stains Doesn’t Work
Simply applying a new coat of paint over water stains is ineffective because the underlying contaminants can continue to bleed through the new paint layers. This is due to the water-soluble nature of the stains, which reactivate when they come into contact with water-based paint.
- Applying standard emulsion paint directly over water stains typically fails because the stains contain water-soluble compounds that reactivate when fresh paint is applied.
- The water-soluble nature of these stains requires specialized treatment with stain-blocking primers to prevent the stain from bleeding through.
Using a stain blocker is essential to cover the stain effectively. A stain blocker creates a barrier that prevents the stain from migrating through the new paint layers, ensuring a flawless finish.

Essential Preparation Before You Paint Over Water Stains on Walls
To effectively cover water stains on walls, a thorough preparation process is necessary. This involves several key steps to ensure that the stain is fully addressed and that your new paint job lasts.
Addressing the Source of the Problem First
You need to identify and fix the source of the water leak to prevent further damage. To find the source of a water leak in a wall, inspect areas around pipes, windows, and roofs for signs of moisture or damage.

Ensuring the Wall is Completely Dry
It’s crucial that the wall is completely dry before you start painting. Using a moisture meter can help you check the moisture levels.
Using a Moisture Meter to Check
A moisture meter is a handy tool for determining if the wall is dry enough for painting. It helps you avoid painting over damp areas, which can lead to mould growth and paint failure.
Cleaning and Treating the Stained Area
Clean the stained area thoroughly to remove dirt, grime, or mould. For areas with mould, use a mould-killing solution to treat the area before painting.
Dealing with Mould Growth
Mould growth is a common issue in areas with water damage. Use a solution of bleach and water to kill mould, and ensure the area is well-ventilated.
Repairing Damaged Plaster and Flaking Paint
For areas with damaged plaster or flaking paint, scrape away loose material and apply a coat of Zinsser Peel Stop to stabilise the surface. Then, fill any cracks or holes with a suitable filler and sand smooth.
By following these steps, you can ensure that your wall is properly prepared for painting, providing a smooth, long-lasting finish.
Step-by-Step Guide to Paint Over Water Stains on Walls
The key to painting over water stains lies in proper preparation and the right painting techniques. To achieve a flawless finish, follow this step-by-step guide.
Tools and Materials You’ll Need
Before you start, ensure you have the necessary tools and materials. For effectively covering water stains, you’ll need a stain-blocking primer. You can find various options available online or at your local hardware store.

Applying Stain-Blocking Primer or Sealer
Applying a stain-blocking primer is crucial for covering water stains. It prevents the stain from bleeding through the new paint.
Oil-Based vs Water-Based Stain Blockers
When choosing a stain blocker, decide between oil-based and water-based options. Oil-based stain blockers are more effective for severe stains, while water-based options are easier to clean up.
Application Techniques for Best Results
Apply the stain-blocking primer using a roller or brush, depending on the size of the stained area. Ensure you cover the entire area evenly.
Choosing the Right Paint for the Final Coat
For the final coat, select a paint that suits the room’s conditions. For high-moisture areas like kitchens and bathrooms, consider using a mould-resistant paint.
Best Paints for Different Room Types
Different rooms have different requirements. For instance, a matt emulsion is often preferred for living rooms and bedrooms due to its non-reflective finish.
Painting Techniques for a Flawless Finish
To achieve a flawless finish, apply paint using the “W” technique—rolling in a W pattern then filling in. This ensures even coverage and minimizes visible roller marks.
Tips for Seamless Blending with Existing Paint
For seamless blending, feather the edges of your painted area by applying slightly less pressure at the boundaries. This creates a gradual transition rather than a hard line.
For more detailed information on preparing walls for painting, visit Family Handyman for expert advice.
Conclusion: Maintaining Your Newly Painted Walls
Once you’ve successfully painted over the water stains on your walls, it’s essential to maintain your newly painted surfaces. This involves implementing a regular maintenance routine to prevent future staining and damage.
To keep your home looking its best, consider the following tips: Regularly inspect potential water sources to catch any issues early. In areas prone to moisture, such as bathrooms and kitchens, apply additional protective coats using specialised products like Crown Trade Clean Extreme Mould Inhibiting Scrubbable Matt.
Maintaining good ventilation is also crucial. Use extractor fans, open windows regularly, and consider using dehumidifiers during damp weather to prevent condensation that can lead to new water stains. If you notice any new water marks, address them immediately by identifying and fixing the source, then treating the affected area promptly.
It’s also a good idea to keep records of the specific products used in your project, including the exact paint colours, primers, and techniques. This will make any future touch-ups much easier and ensure a consistent finish throughout your home.
By following these tips, you can enjoy your newly painted walls for a long time. Remember, while painting over water stains effectively resolves the aesthetic issue, ongoing vigilance regarding potential water ingress is essential for maintaining both the appearance of your walls and the structural integrity of your home over time.