Are you tired of cluttered garages, kitchens, or craft rooms? Do you struggle to find the right storage solution that is both functional and aesthetically pleasing? A pegboard organisation system could be the answer, providing an efficient way to store and display your tools, kitchen items, or craft supplies.
Pegboard systems are versatile and customisable, allowing you to transform cluttered spaces into well-organised areas. By installing a pegboard on your wall, you can maximise your storage capacity while keeping your belongings easily accessible.
Key Takeaways
- Discover how a pegboard can revolutionise your storage solutions.
- Learn the steps involved in installing a pegboard organisation system.
- Understand the different types of pegboards available and how to choose the right one.
- Find out the tools and materials needed for a successful installation.
- Maximise your space with an efficient pegboard organisation system.
Understanding Pegboard Organisation Systems
For those seeking to revolutionise their storage and organisation, pegboard systems offer a versatile and efficient solution. A pegboard organisation system is designed to transform cluttered spaces into organised, visually appealing storage areas.
What Is a Pegboard System?
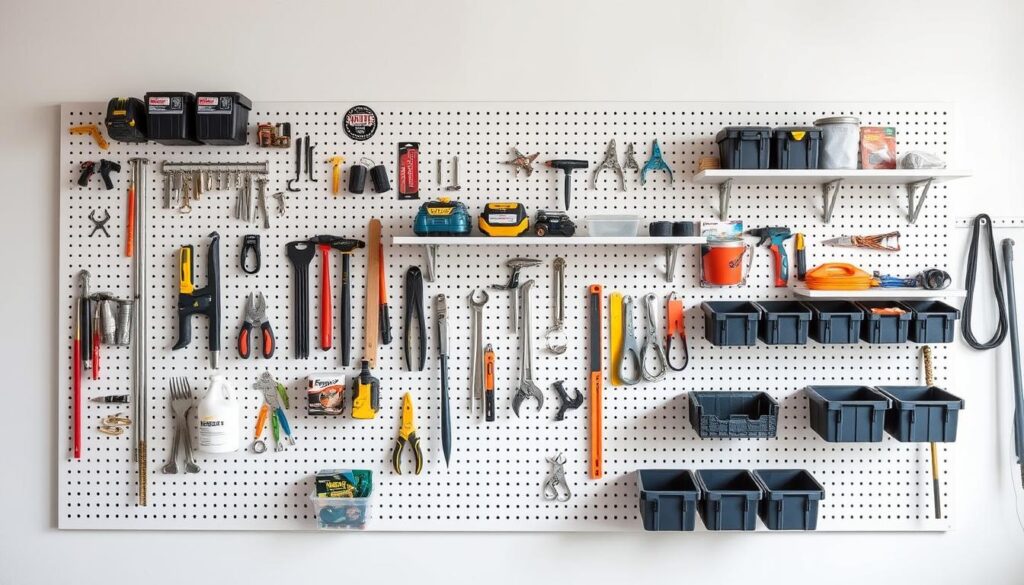
A pegboard system consists of a board with evenly spaced holes where you can insert hooks, bins, and other accessories to hang and store your tools and items. This system allows for a high degree of customisation, making it easy to adapt to your specific needs.

Benefits of Using Pegboard for Organisation
Pegboards offer several benefits, including:
- Saving time by providing at-a-glance visibility of all your tools and supplies.
- Maximising your available space by utilising wall areas that would otherwise go unused.
- Keeping frequently used items within easy reach.
By implementing a pegboard organisation system, you can create a more efficient and organised workspace in a way that suits your needs. The flexibility of pegboard systems allows you to rearrange your layout as needed, making it an ideal solution for evolving storage requirements.
| Benefits | Description |
|---|---|
| Time Efficiency | Saves time by providing easy access to tools and supplies. |
| Space Maximisation | Utilises wall space, keeping floors and work surfaces clear. |
| Flexibility | Allows for easy rearrangement as needs change. |
Choosing the Right Pegboard for Your Needs

To maximise the efficiency of your pegboard organisation system, you need to start with the right pegboard. The type of pegboard you choose depends on your specific needs and the items you plan to store.
Different Pegboard Materials
Pegboards are available in various materials, including wood, metal, and plastic. Metal pegboards are durable and suitable for heavy-duty use, while wooden pegboards offer a more traditional look. Plastic pegboards are another option, often more affordable and lightweight.
Pegboard Sizes and Hole Dimensions
Pegboards come in different sizes and hole dimensions. Standard pegboards typically have holes spaced 1 inch apart, with diameters of either 3/16 inch or 1/4 inch. When choosing a pegboard, consider the size of the items you need to store and the space available on your wall.
- Standard pegboards come in 2×4 foot panels, with custom sizes available.
- Hole sizes are usually 3/16-inch or 1/4-inch in diameter.
- Hole spacing is standardised at 1 inch apart.
Essential Tools and Materials for Installing Pegboard Organisation System

To successfully install a pegboard organisation system, you’ll need to gather the right tools and materials. Having everything on hand will make the installation process smoother and more efficient.
Required Tools Checklist
You’ll need a few basic tools to start your installation. These include a drill, screwdriver, level, and measuring tape. Ensuring you have these tools ready will help you avoid delays during the installation process.
Materials You’ll Need
The pegboard itself is your primary material, available in wood, metal, or plastic. Other essential materials include:
- Furring strips or spacers (typically 1×2 inch wood strips) to create the necessary gap between the board and wall.
- Hooks and accessories tailored to the items you plan to hang, including straight hooks, curved hooks, and specialised holders.
- Screws of appropriate length to secure both the furring strips to the wall studs and the pegboard to the furring strips.
- Washers to help distribute the pressure of the screw heads on the pegboard surface.
Having the right supplies is crucial for a successful installation. Make sure to check your list twice to avoid missing any essential items.
Planning Your Pegboard Layout
To get the most out of your pegboard, you need to plan its layout thoughtfully. A well-planned layout ensures that you maximise your storage space and make the most of your wall area.
Selecting the Ideal Wall Space
When selecting the ideal wall space, consider the height at which you will install the pegboard. For instance, installing it roughly 3 feet from the floor can provide clearance for items like an art cart underneath. Ensure you measure the space between any existing fixtures or shelves. In one installation, a 24 inch x 48 inch piece of pegboard fit perfectly between two sets of shelves.
Measuring and Marking Your Installation Area
Use a measuring tape to determine the exact dimensions of your available wall space, taking into account any obstacles. Mark the desired height of your pegboard, considering both accessibility and the height of items that might be stored beneath it. Use a level and pencil to draw a straight line where the top of your pegboard will sit. “Taking your time during this planning phase will save you considerable time and frustration during the actual installation process,” as precise measurements are crucial.
- Measure the exact dimensions of your available wall space.
- Mark the desired height, considering accessibility and storage needs.
- Use a level to ensure your pegboard will hang perfectly horizontal.

Step-by-Step Guide to Installing Pegboard Organisation System
Now that you’ve planned your pegboard layout, it’s time to start the installation process. Installing a pegboard organisation system can significantly enhance your workspace by providing a structured way to store tools and supplies.
Finding and Marking Wall Studs
To securely mount your pegboard to the wall, you need to locate the wall studs. Use a stud finder to identify the studs behind your wall and mark their locations with a pencil. This step is crucial for ensuring that your pegboard is firmly attached.
Installing Spacers for Proper Hook Clearance
To provide clearance for your hooks and other accessories, you’ll need to install spacers between the wall and the pegboard. Attach scrap wood to the wall studs, creating a spacer that allows for sufficient clearance.
Mounting the Pegboard Securely
Position your pegboard against the installed spacers, ensuring it’s level and aligned with your planned layout. Pre-drill holes through the pegboard at your marked locations, then use washers with your screws to distribute pressure and prevent the screw heads from pulling through the pegboard holes.
Tighten all screws securely, but avoid over-tightening, which could damage the pegboard material or cause it to warp over time.
Selecting and Installing Pegboard Accessories

Choosing the right pegboard accessories is essential for creating a functional and efficient storage system. With a variety of options available, you can tailor your pegboard to meet your specific needs.
Types of Pegboard Hooks and Holders
Pegboard hooks and holders come in different shapes and sizes to accommodate various items. You can find hooks for hanging tools, baskets for storing bulkier items, and cup holders for keeping small objects organised. For instance, pegboard baskets in various sizes provide excellent storage for collections of smaller objects that need to be kept together.
Specialised Accessories for Different Needs
For kitchen pegboards, specialised accessories include pot lid holders, spice racks, and utensil hooks designed to maximise your culinary storage. Consider your specific needs when selecting accessories—craft rooms might benefit from ribbon holders and small bins, while workshops might need heavy-duty tool holders and parts bins. Using a variety of baskets and hooks can help you stay organised.
Organising Your Items on the Pegboard
A well-organised pegboard can significantly enhance your workflow and productivity. To achieve this, you need to thoughtfully arrange your tools and supplies.
Arranging Tools and Supplies Efficiently
Arrange your most-used tools in easily accessible locations. For instance, if you frequently bake, consider dedicating a section of your pegboard to baking gear. This might include hooks for utensils and holders for mixing bowls.
Creating Zones for Different Categories
Divide your pegboard into distinct zones based on activity or category. For example, in a kitchen pegboard, you might create separate areas for cooking utensils, baking tools, and food preparation equipment. Use visual cues like coloured hooks or background paint to distinguish between zones. Incorporating baskets or containers within these zones can help group smaller related items together, maintaining organisation while maximising storage.
| Zone | Ideal for | Example Items |
|---|---|---|
| Cooking | Utensils and cookware | Spatulas, whisks, pans |
| Baking | Baking gear and ingredients | Mixing bowls, measuring cups, baking sheets |
Conclusion: Maintaining Your Pegboard Organisation System
You’ve taken a significant step towards a more organised and productive workspace with your new pegboard system. To maintain its effectiveness, regularly review and adjust your organisation system to meet your changing needs. Clean your pegboard and accessories periodically to remove dust and debris. Consider taking a photo of your optimised layout for easy reference. Explore new pegboard products and accessories to enhance your storage solutions. By doing so, you’ll ensure your workspace remains efficient and clutter-free over time.