Are you looking to enhance your home’s electrical setup with a sleek and efficient solution? Are fused spurs a necessity for your new appliance installations? Understanding the role of a fused spur in your electrical circuit is crucial for safety and functionality.
A fused spur, or fused connection unit, serves as a vital link between your electrical cable and appliance, eliminating the need for traditional plugs and sockets. This not only streamlines your wiring but also enhances safety by providing an additional layer of protection against electrical faults.
With the increasing demand for discreet and modern electrical solutions, low-profile fused spurs have become particularly popular. They offer a neat and unobtrusive alternative to standard models, making them ideal for contemporary homes where aesthetics are a priority.
Key Takeaways
- Understand the function and benefits of using a fused spur in your electrical installations.
- Learn how to select the appropriate fused spur for your specific needs.
- Discover the importance of adhering to UK electrical regulations during installation.
- Gain insights into the safety precautions necessary for working with electrical circuits.
- Explore the advantages of low-profile fused spurs in modern home settings.
What is a Low-Profile Fused Spur?
Low-profile fused spurs are specialised devices that provide a direct and safe connection between your mains electrical circuit and appliances. They feature a slimmer design than standard models, making them ideal for modern homes where aesthetics and safety are paramount.
Understanding Fused Connection Units
Fused connection units serve as a safety mechanism by incorporating a fuse that breaks the circuit if excessive current is detected, thus protecting your appliance and property from potential electrical hazards. This is particularly important for high-demand appliances like ovens and dishwashers.
Benefits of Low-Profile Design
The low-profile design offers aesthetic benefits by sitting more flush against the wall, making these units less obtrusive in modern home settings. This design maintains all the functionality of standard fused spurs while enhancing the visual appeal of your home’s electrical installations.
Common Applications in UK Homes
These units are commonly used for permanent installations of appliances such as washing machines and other kitchen equipment that require a dedicated power supply without using conventional plug sockets. Fused spurs provide a dedicated and protected power supply to high-demand appliances, ensuring safety and efficiency.
Safety First: Before You Begin
Before installing a low-profile fused spur, it’s crucial to consider safety measures to avoid potential risks. Electrical work can be hazardous if not done correctly, and understanding the necessary precautions is vital.
Legal Requirements in the UK
In the UK, electrical installations are governed by the Building Regulations Part P. This regulation dictates that certain electrical work, especially in domestic properties, must be carried out by a qualified electrician or notified to building control. Familiarizing yourself with these regulations is essential before starting your project.
When to Call a Qualified Electrician
You should consider hiring a professional if you’re installing a completely new fused spur, as this involves complex wiring and potential modifications to your existing circuits. A qualified electrician can ensure that the work is done safely and to the required standards.
Essential Safety Precautions
Always turn off the power at the consumer unit before beginning any work. Use appropriate tools with insulated handles, and test circuits before and after installation. Double pole fused spurs offer enhanced safety by disconnecting both live and neutral wires when switched off. Never work on electrical installations when tired or under poor lighting conditions, as these factors increase the risk of accidents.
Tools and Materials Needed
The key to a successful low-profile fused spur installation lies in having the correct tools and materials at your disposal. Ensuring you have everything needed before starting will make the process smoother and safer.
Essential Tools for Installation
For a successful installation, you’ll need specific tools including a voltage tester, screwdrivers (both flathead and Phillips), wire strippers, wire cutters, and a spirit level. If you’re mounting to a solid wall, you may also require a drill with appropriate bits.
Choosing the Right Fused Spur
When selecting your low-profile fused spur, consider factors such as the current rating (typically 13A for most household appliances), whether you need a switched or unswitched model, and whether it should be surface-mounted or flush-fitted. Your choice will depend on the specific requirements of your appliance and the aesthetics of your home.
Additional Materials You’ll Need
Essential materials include the fused spur unit itself, an appropriate back box, electrical cable of suitable gauge, and the correct fuse rating for your intended appliance. You may also need wall plugs, screws, cable clips, and potentially conduit or trunking if the cable will be exposed. Don’t forget safety equipment like insulated gloves and safety goggles.

Understanding Fused Spur Ratings and Types
To ensure safety and efficiency, it’s essential to comprehend the various fused spur ratings and types. Fused spurs are designed to provide a safe and controlled connection for appliances, and understanding their specifications is crucial for a successful installation.
Current Ratings Explained
Fused spurs are available in different current ratings to suit various appliances. The most common ratings are 3A, 5A, and 13A, corresponding to the power requirements of different devices. For instance, a 3A fuse is suitable for lighting circuits, while a 13A fuse is used for high-power appliances like ovens and dishwashers.
Switched vs. Non-Switched Fused Spurs
Switched fused spurs feature an integrated on/off switch, allowing you to isolate the connected appliance without unplugging it or turning off the entire circuit. Non-switched fused spurs, on the other hand, lack this switch and are typically used for appliances that should remain powered continuously, such as refrigerators.
Single Pole vs. Double Pole Options
Single pole fused spurs disconnect only the live conductor when switched off, whereas double pole fused spurs disconnect both live and neutral conductors, providing enhanced safety. Double pole fused spurs are particularly recommended for high-power appliances or installations in wet areas.
Preparation Steps
Before installing a low-profile fused spur, it’s essential to complete the necessary preparation steps to ensure a safe and successful installation. This involves several critical tasks that must be undertaken to minimize risks and ensure compliance with electrical safety standards.
Turning Off the Power Supply
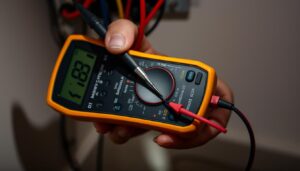
The first and most crucial step is to switch off the power supply at the consumer unit (fuse box). Remove the relevant circuit fuse or switch off the appropriate circuit breaker to ensure your safety while working on the electrical circuit. Always verify that the power is off using a reliable voltage tester before touching any wires or electrical components, as working on live circuits poses a serious risk of electric shock.
Selecting the Ideal Location
When selecting the ideal location for your low-profile fused spur, consider factors such as accessibility, proximity to the appliance it will power, and aesthetic considerations. Typically, fused spurs should be positioned at the same height as other switches and sockets in the room. “The placement of electrical fittings should always be carefully planned,” as emphasized in the IEE Wiring Regulations, “to maintain safe distances from water sources in kitchens and bathrooms.”
Checking Existing Wiring
If you’re connecting to an existing circuit, take time to examine the current wiring to ensure it’s in good condition and has sufficient capacity to handle the additional load of the new spur. Use a cable/pipe detector to check for any obstacles within the wall, such as pipes or existing wiring, before drilling or cutting into it. This careful planning will help avoid potentially dangerous or costly damage.
How to Install a Low-Profile Fused Spur

Understanding how to install a low-profile fused spur is essential for ensuring the safe and efficient operation of your electrical circuit. This process involves several key steps that must be executed correctly to avoid any potential hazards.
Removing the Existing Fixture (If Applicable)
If you’re replacing an existing fixture, start by carefully removing it. Unscrew the faceplate, disconnect the wires (noting their connections), and remove the back box if necessary.
Installing the Back Box
For a new installation, mark the position of your low-profile fused spur on the wall, ensuring it’s level and at an appropriate height. Then, cut out the required aperture for a flush-mounted installation or attach a surface-mounted back box.
Connecting the Wiring
When connecting the wiring, identify the supply and load terminals within the fused spur. Connect the live wire (brown) to ‘L’, neutral (blue) to ‘N’, and earth (green/yellow) to the earth terminal.
Supply Terminals Connection
For the supply terminals, ensure all connections are tight and secure, connecting to the mains circuit.
Load Terminals Connection
For the load terminals, follow the same colour coding, connecting wires to the appliance, ensuring no exposed copper.
Securing the Faceplate
Before securing the faceplate, double-check all connections and ensure the correct fuse is installed. Secure the faceplate with the provided screws, ensuring it sits flush and operates smoothly.
Wiring Configuration Guide
To ensure your fused spur operates safely, it’s vital to understand the wiring configuration. A fused connection unit has specific terminals for live, neutral, and earth connections, which must be correctly wired to ensure safe and effective operation.
Understanding Live, Neutral and Earth Connections
In modern UK wiring, the three essential connections are live (brown), neutral (blue), and earth (green/yellow). The live wire carries current to the appliance, while the neutral wire provides the return path. The earth wire is a critical safety feature that prevents electric shock by providing a path for fault currents to flow to ground.
Correct Cable Selection
When selecting cables for your fused spur installation, consider the current rating required. Typically, 1.5mm² cable is suitable for lighting circuits, while 2.5mm² is used for power circuits with a 13A rating. For most domestic installations, 2.5mm² twin and earth cable is the standard choice, providing sufficient capacity for household appliances.
Securing Wires in Terminals
When securing wires, strip the insulation back approximately 10mm, being careful not to damage the conductor. Insert the bare wire fully into the terminal and tighten the screw firmly but not excessively. Ensure no bare copper is visible outside the terminals to prevent safety hazards.
- Correctly connect live, neutral, and earth wires to their respective terminals.
- Use the correct cable size based on the circuit’s current rating.
- Secure wires properly in terminals to prevent strain and maintain integrity.
Testing Your Installation
Once you’ve installed your low-profile fused spur, thorough testing is necessary to verify that all connections are secure and the circuit is functioning as expected. This step is crucial for ensuring the safety and reliability of your electrical installation.
Visual Inspection Checklist
Before restoring power, conduct a thorough visual inspection. Check for loose connections, exposed wires, damaged insulation, or any signs of potential problems. Use the following checklist:
- Verify all terminal screws are tight
- Ensure the correct fuse is installed
- Check that cable clamps are securing the outer sheath of cables
- Confirm the back box is securely fixed
- Ensure the faceplate is properly attached
Restoring Power Safely
When restoring power, return to the consumer unit and switch on the circuit breaker or replace the fuse for the relevant circuit. Then, return to the fused spur location to continue testing. Use an electrical tester to ensure all connections are secure and the circuit has been correctly installed.
Functional Testing Procedures
For functional testing, first use a voltage tester to confirm power is reaching the fused spur. Check between live and earth, and between live and neutral to verify correct voltage (approximately 230V in the UK). If your fused spur has a switch, test its functionality by turning it on and off several times.
Troubleshooting Common Issues
When issues arise with your fused spur, knowing how to troubleshoot can save time and ensure safety. Fused spurs are designed to provide a safe and controlled connection for appliances, but like any electrical component, they can sometimes malfunction.
Issues with Fuses
If the fuse in your fused spur keeps blowing, it typically indicates an overload or short circuit. Check that the appliance’s power rating doesn’t exceed the fuse rating. Inspect for damaged wiring and ensure there are no short circuits in either the appliance or the spur wiring. For more detailed guidance on fuse issues, consider consulting resources like The Spruce.
No Power to Connected Appliances
When there’s no power to the connected appliance, first check that power is reaching the fused spur by testing the supply terminals with a voltage tester. Verify that the fuse is intact, the switch (if present) is in the on position, and all connections are secure.
Switch Malfunction
Switch malfunctions in fused spurs are often caused by mechanical wear or damage. If the switch feels loose, sticks, or doesn’t make a definitive ‘click’ when operated, it may need replacement. Over time, internal contacts in switches can become corroded or worn, resulting in intermittent function or complete failure.
| Issue | Cause | Solution |
|---|---|---|
| Fuse keeps blowing | Overload or short circuit | Check appliance power rating, inspect wiring |
| No power to appliance | Faulty fuse or connections | Test supply terminals, check fuse and connections |
| Switch malfunction | Mechanical wear or damage | Replace switch or fused spur unit |
For persistent issues or if you’re unsure about how to proceed, it’s always best to consult a qualified electrician to ensure your safety and the integrity of your electrical system.
Special Applications for Fused Spurs
Fused spurs play a crucial role in ensuring safe and efficient electrical connections throughout your home. Their versatility makes them suitable for a variety of applications, from kitchen appliances to outdoor installations.
Kitchen Appliance Connections
In kitchen environments, fused spurs are essential for safely connecting high-power appliances such as ovens, dishwashers, and washing machines. They provide dedicated circuits that prevent overloading your main ring circuit. Switched fused spurs are particularly beneficial, allowing for easy isolation of appliances during cleaning or maintenance.

Bathroom Installations
Bathroom installations have specific requirements under UK regulations. Fused spurs need to be located outside the bathroom or in specified zones, depending on their IP rating and proximity to water sources. They are used to connect electric towel rails, underfloor heating systems, and extractor fans, providing a safe and compliant power supply.
Outdoor and Garden Applications
For outdoor and garden applications, weatherproof fused spurs with appropriate IP ratings are necessary to withstand exposure to the elements. These are commonly used for garden lighting, pond pumps, and outdoor heating systems. When installing fused spurs outdoors, consider using RCBO protection at the consumer unit for additional safety.
Conclusion
With the knowledge gained from this article, you are now equipped to safely and effectively install a low-profile fused spur in your home. Throughout this guide, we’ve covered the essential steps and considerations for this task, from understanding the different types of fused spurs to troubleshooting common issues.
Remember, safety should always be your top priority when working with electrical systems. If you’re ever in doubt, it’s best to consult a qualified electrician. Properly installed fused spurs not only enhance the functionality of your electrical system but also provide an additional layer of safety by protecting specific appliances and preventing circuit overloads.
By following this guide, you should now have the confidence to select and install the appropriate fused spur for your needs, ensuring a safe and efficient electrical supply to your important appliances.