Are you tired of cluttered garages and workshops? Are you looking for a way to maximise your storage space effectively?
Utilising your ceiling for storage can be a game-changer. A French cleat system is a versatile and secure method to hang items from your ceiling, keeping your floors and walls clear.
This comprehensive guide will walk you through the process, ensuring you can transform your cluttered areas into organised spaces with accessible overhead storage. Suitable for DIYers with moderate woodworking skills, this project requires basic tools.
Key Takeaways
- Maximise your unused overhead space with a French cleat ceiling storage system.
- Easily reconfigure your storage as your needs change over time.
- Create custom storage containers for secure ceiling installation.
- Transform cluttered areas into organised spaces.
- Suitable for DIYers with moderate woodworking skills.
Understanding French Cleat Storage Systems
To maximise your storage potential, it’s essential to understand the mechanics of French cleat storage systems. French cleats are a simple yet effective method for creating versatile and adjustable storage solutions.
What Are French Cleats?
French cleats are a type of bracket used to hold items in place, typically against a wall or ceiling. They consist of two parts: one part attaches to the item being stored, and the other to the wall or ceiling. This setup allows for easy adjustment and reconfiguration as your storage needs change.
Benefits of Ceiling Storage
Ceiling storage using French cleats offers numerous benefits, including the utilisation of often-wasted overhead space. By installing a French cleat system on your ceiling, you can store seasonal items, rarely used tools, or bulky equipment out of the way yet still accessible when needed.
| Benefits | Description |
|---|---|
| Optimised Space | Ceiling storage utilises often-wasted overhead space, freeing up valuable floor and wall areas. |
| Flexibility | Unlike permanent shelving, French cleat systems can be reconfigured as your storage needs change. |
| Protection | Ceiling-mounted storage keeps items away from moisture, pests, and accidental damage. |
Tools and Materials Needed
The success of your French cleat ceiling storage project depends on having the right tools and materials. To ensure a smooth installation process, it’s crucial to gather everything you need beforehand.
Essential Tools

To install French cleats, you’ll need a set of essential tools. These include a cordless drill and impact driver for driving screws, a circular saw or table saw for making precise cuts in your plywood or wood, and a drill press for creating accurate screw holes.
Required Materials

For a sturdy French cleat system, you’ll need high-quality materials. These include:
- High-quality ¾” plywood for the cleats, due to its strength, stability, and reasonable cost.
- Heavy-duty wood screws, typically 3-inch screws, to secure the cleats to the ceiling joists.
- Additional plywood pieces for creating storage containers and boxes.
- Spacer blocks cut to the same thickness as your cleats to ensure level hanging.
- Wood glue to reinforce joints in your storage containers.
- Optional finishing materials like paint or sealant for a polished look.
By gathering these tools and materials, you’ll be well-prepared to install your French cleat ceiling storage system efficiently and effectively.
Planning Your Ceiling Storage Layout
Before installing your French cleat ceiling storage, careful planning is essential. A well-planned storage system ensures that you maximise your ceiling space efficiently.
Measuring Your Space
Accurate measurements are crucial. Measure your ceiling’s dimensions and identify the location of ceiling joists. This step ensures that your cleat wall is securely attached. Consider the height and accessibility of your storage to avoid future complications.
Designing Your Storage System
When designing your storage system, consider your current and future needs. Think about creating zones for different categories, such as tool storage or seasonal decorations. Plan for a mix of container sizes and consider staggering cleats for larger containers. Draw detailed sketches to ensure your design
Preparing for Installation
To ensure a smooth installation, you’ll need to prepare your ceiling by locating the joists and marking the installation points. This step is crucial for a successful French cleat ceiling storage system.
Finding Ceiling Joists
Start by locating the ceiling joists using a stud finder. This tool helps you identify the wooden beams that make up the structural framework of your ceiling. Accurate joist location is critical for secure cleat attachment. Once you’ve identified the joists, you can proceed to mark the installation points.
Marking Installation Points
After locating the ceiling joists, use a chalk line to create straight reference lines that align with the joists. This ensures perfect cleat placement. You can also use a laser level to project straight lines across your ceiling for more accurate marking. Consider marking both the position and length of each cleat to ensure proper alignment during installation.
- Mark clear installation points where your cleats will be attached.
- Use a chalk line or laser level for accurate marking.
- Double-check all measurements before proceeding.
Cutting French Cleats for Ceiling Installation
Cutting your French cleats with precision is vital for a secure and functional ceiling storage solution. To achieve this, you’ll need to make accurate cuts using the right tools and techniques.
Setting Up Your Table Saw
To start, you’ll need to configure your table saw for making precise cuts. Mark the center point on the end grain edge of your board, ensuring it’s centered from both edges and faces. Then, adjust your fence so the table saw blade passes over this center point. When you make the cut, you should get two roughly equally wide pieces. Use a featherboard and push stick to rip the board safely and accurately.
Making the Perfect 45-Degree Cuts
Creating perfect 45-degree cuts is essential for French cleats that interlock securely and support heavy loads. To achieve this, feed the plywood through the saw blade at a steady, consistent pace to ensure clean cuts without burning or splintering. For ceiling applications, cut slightly wider cleats than you might for wall applications to provide additional support. After cutting, check that both pieces have complementary 45-degree angles that fit together snugly. Sand any rough edges or splinters from your cut pieces to ensure smooth installation and prevent injuries.
- Feed the plywood through the saw at a steady, consistent pace.
- Cut slightly wider cleats for ceiling applications.
- Check that both pieces have complementary 45-degree angles.
- Sand any rough edges or splinters.
- Cut all your cleats in one session for consistency.
- Test-fit your cut cleats together before installation.
Creating Spacer Blocks
Spacer blocks play a vital role in ensuring the stability of your ceiling storage system. They provide the necessary gap between the storage container and the ceiling, allowing for a level and secure installation.
Why Spacers Are Essential
Spacers are crucial because they ensure that your storage containers hang perfectly parallel to the ceiling. The thickness of the spacers should match that of your cleats to maintain even spacing. This is vital for distributing the weight of the containers evenly and preventing any tilt or wobble.
Cutting and Preparing Spacers
To create spacers, rip a piece from the same plywood sheet used for your cleats. The width should be sufficient to accommodate a few screws. You can either use a single long spacer or multiple smaller ones at the corners. When cutting, ensure the edges are smooth to prevent splintering.
| Spacer Type | Description | Use Case |
|---|---|---|
| Single Long Spacer | Spans the back of the storage container | Ideal for smaller containers |
| Multiple Small Spacers | Placed at corners or distributed evenly | Suitable for larger or heavier containers |
How to Install French Cleat Ceiling Storage
Effective installation of French cleat ceiling storage involves several key steps, starting with securing the cleats to the ceiling joists. This process ensures a sturdy foundation for your storage system.
Securing Cleats to Ceiling Joists
Begin by locating the ceiling joists using a stud finder. Once identified, mark their positions. Use a laser level to project a straight line across your ceiling that aligns with your marked joist positions. This line will guide the placement of your cleats.

Ensuring Everything Is Level
To place the cleat correctly, start by securing one end to the ceiling joist. Then, use a level to check that it’s perfectly level. Adjust as necessary before securing the other end. For longer cleats, consider having a helper support the loose end while you make adjustments. Once satisfied, drive screws through the cleat into the joists, ensuring a secure attachment.
By following these steps, you can achieve a professional-looking and functional French cleat ceiling storage system that maximises your storage potential.
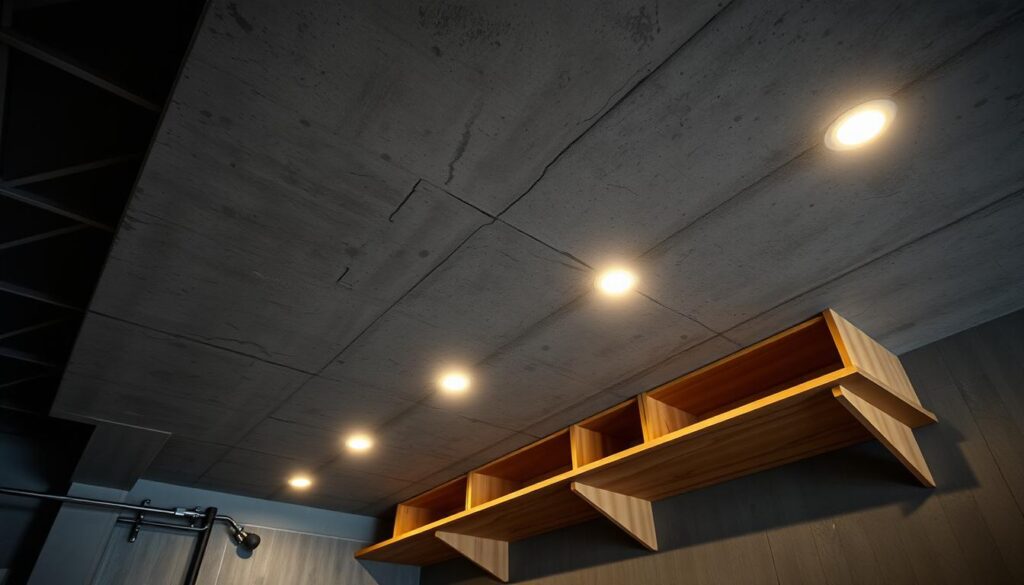
Building Storage Containers for Ceiling Systems
Building storage containers for your ceiling storage system involves more than just assembling boxes; it requires a thoughtful approach to design and construction. To ensure that your storage containers are both functional and safe, you need to pay attention to their design and how they attach to the ceiling-mounted cleats.
Basic Storage Box Design
When designing your storage boxes, consider the size and weight of the items you plan to store. The boxes should be sturdy enough to hold the weight without compromising the structural integrity. You can use a simple box design, but ensure it is well-constructed. The cleats will play a crucial role in supporting these boxes on your ceiling.
Attaching Cleats to Storage Containers
To attach cleats to your storage containers, position them on the top of the container with the 45-degree angle facing upward. This allows the cleat to interlock with the ceiling-mounted cleat securely. For maximum strength, especially for heavier items, use both wood glue and screws. Ensure the cleat spans at least 75% of the container’s width for proper weight distribution. Pre-drill pilot holes to prevent splitting the wood when attaching cleats with screws. Position screws approximately 4-6 inches apart along the length of the cleat. It’s also advisable to attach spacer blocks to the opposite side of the container to ensure it hangs level and flush against the ceiling.
| Attachment Method | Advantages |
|---|---|
| Wood Glue | Provides a strong bond, easy to apply |
| Screws | Offers mechanical strength, adjustable |
| Glue and Screws | Combines the benefits of both, maximum strength |
By following these guidelines, you can create storage containers that are not only functional but also safe and secure when attached to your ceiling storage system. Remember to allow any glue to fully cure before hanging the containers to ensure maximum strength and safety.
Creating Specialized Tool Holders
Maximising your workshop’s storage potential involves creating specialized tool holders that integrate seamlessly with your French cleat ceiling storage system. This approach not only enhances the functionality of your storage but also ensures that your tools are securely and conveniently stored. For instance, you can add an extended top to one of your French cleat boxes to create a home for your drill press, providing a temporary yet effective storage solution.
Clamp Storage Solutions
When it comes to storing clamps, you can design custom holders that keep them organised and within easy reach. Consider creating a dedicated storage area with individual slots for different clamp sizes, ensuring they are easily accessible and do not get in the way. You can also incorporate features like retention clips or hooks to prevent clamps from falling or getting misplaced.
Power Tool Holders
power tools, it’s crucial to design holders that provide extra security and protection. You can create custom-fitted cradles with padding or rubber lining to prevent damage and reduce vibration. Additionally, consider incorporating positive retention features like straps or partial enclosures to prevent tools from falling. For cordless tools, combination holders that store both the tool and its batteries/chargers together can be particularly convenient.
Weight Considerations for Ceiling Storage
Effective ceiling storage isn’t just about maximizing space; it’s also about managing weight effectively. When you install a French cleat ceiling storage system, you need to consider how the weight of your stored items will impact the overall structure.
Understanding Load Limits
Every ceiling has its load-bearing limits. It’s essential to understand these limits to avoid overloading your ceiling storage system. You should be aware of the maximum weight your ceiling can support and plan your storage accordingly.
Distributing Weight Effectively
To ensure your ceiling storage is safe and secure, you need to distribute the weight effectively. This involves arranging heavier items directly above ceiling joists, placing the heaviest items in the center of storage containers, and using multiple cleats to spread the load. By doing so, you’ll maintain the structural integrity of your ceiling storage system.

Troubleshooting Common Installation Issues
To guarantee a smooth and secure French cleat ceiling storage installation, it’s crucial to be aware of potential problems and know how to address them. Issues such as uneven ceilings and loose or wobbly attachments can compromise the safety and functionality of your storage system.
Dealing with Uneven Ceilings
Uneven ceilings can pose a challenge when installing French cleat storage. To address this, you may need to adjust the cleats to accommodate the uneven surface. This can involve custom-cutting the cleats or using adjustable spacers to ensure a level installation.
Fixing Loose or Wobbly Attachments
Loose or wobbly attachments can be secured by checking that all screws have properly penetrated the ceiling joists. If a cleat feels loose, consider replacing stripped screws with slightly larger ones or adding additional screws between existing ones. For cleats that have pulled away from the ceiling, reapplying construction adhesive before reinstalling can help. Ensuring storage containers have securely attached cleats is also crucial, as loose container cleats are a common source of wobble.
Conclusion
As you complete your French cleat ceiling storage installation, you’ll appreciate the extra space and the flexibility it offers. Installing a French cleat ceiling storage system is a rewarding project that dramatically increases your usable space. The versatility of the french cleat allows you to customise your storage solution to perfectly fit your needs. With proper planning and careful installation, your ceiling storage system will provide years of reliable service. Regular inspections will ensure it remains safe and functional. You’ve not only created more space but also a more organised and functional environment.