Are you aware of the potential vulnerabilities in your home’s security? With the rise in property crimes, it’s crucial to consider effective measures to safeguard your property and loved ones.
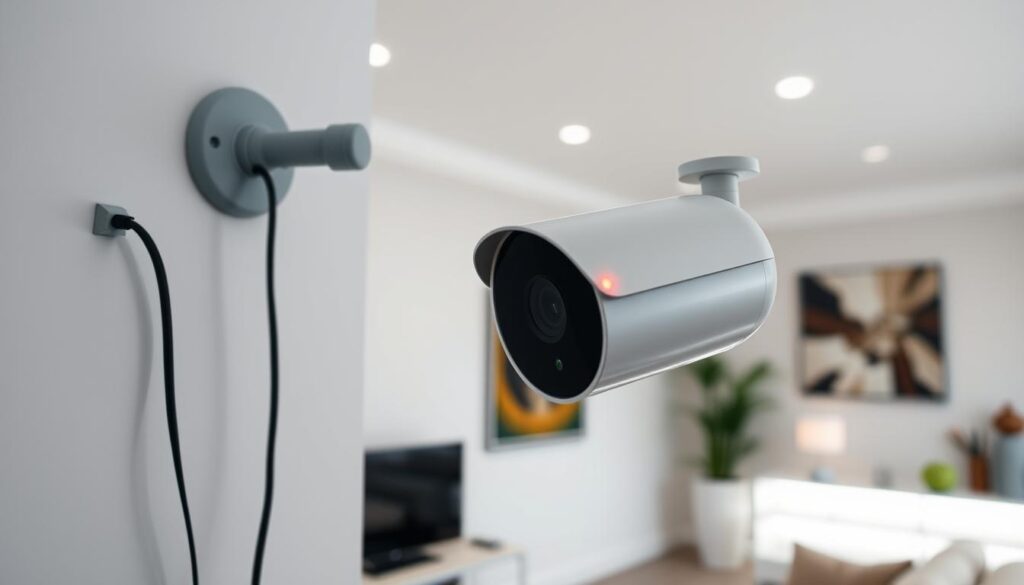
Installing security cameras can be a significant step towards enhancing your home’s security, but it requires careful planning. To maximise the effectiveness of your security system, it’s essential to strategically position cameras to cover critical areas around your property.
By thinking like a potential intruder, you can identify the most susceptible spots and place cameras accordingly. This comprehensive guide will walk you through the process of selecting, positioning, and installing security cameras around your home, ensuring you get the most out of your system.
Key Takeaways
- Understand the different types of security cameras and their uses.
- Learn how to identify vulnerable areas around your property.
- Discover the best locations for camera placement.
- Gain insights into the tools and step-by-step procedures for installation.
- Understand how to configure your system for optimal performance.
Understanding Home Security Camera Systems
When it comes to securing your home, understanding the different types of home security camera systems is crucial. Modern home security camera systems come in various types, each with specific features designed for different security needs and environments.
Types of Security Cameras Available
The market offers a range of security cameras, including dome cameras, bullet cameras, pan-tilt-zoom (PTZ) cameras, and fish-eye cameras. Dome cameras offer a discreet surveillance option with a wide viewing angle, while bullet cameras provide a visible deterrent with longer-range capabilities.
PTZ cameras allow remote control of camera movement, making them ideal for monitoring large areas. Fish-eye cameras, on the other hand, provide 360-degree coverage without moving parts.
Wired vs Wireless Security Cameras
When choosing between wired and wireless security cameras, consider that wired systems offer more reliable connections and don’t require battery changes, but installation is more complex and less flexible. Wireless cameras provide easier installation and more placement options, but may suffer from connectivity issues and require regular battery maintenance or proximity to power outlets.
Power over Ethernet (PoE) cameras combine the reliability of wired connections with simplified installation, as they receive both power and data through a single Ethernet cable.
Planning Your Home Security Camera Installation
To ensure effective surveillance, you need to plan your home security camera installation strategically. This involves several key considerations to ensure your home security system meets your needs.
Assessing Your Home Security Needs
Before purchasing any equipment, it’s crucial to assess your specific home security needs. Identify vulnerable entry points and valuable areas that require monitoring. Consider factors such as property size and neighbourhood security concerns.
You should also determine whether you need indoor coverage, outdoor coverage, or both. This assessment will help you plan a comprehensive security system.
Determining Camera Quantity and Budget
When determining the number of cameras needed, balance comprehensive coverage with your budget constraints. Most homes can be adequately secured with 3-8 strategically placed cameras.
| Number of Cameras | Typical Coverage Area | Estimated Budget |
|---|---|---|
| 3 | Front door, back door, driveway | £500-£1,000 |
| 5 | Add coverage of ground floor windows | £1,000-£2,000 |
| 8 | Comprehensive coverage including common areas inside your home | £2,000-£3,500 |
Creating a Camera Placement Map
Creating a detailed camera placement map of your property will help you visualise coverage areas and identify potential blind spots before installation begins. Consider the field of view for each camera and how they can be positioned to maximise coverage.
Best Locations to Install Security Cameras
The strategic placement of security cameras can significantly enhance the security of your home. By installing cameras in the right locations, you can deter potential intruders and improve the overall safety of your property.
Front Door and Main Entrance
The front door and main entrance are prime locations for security camera installation. Statistics show that approximately 34% of burglars enter through the front door. Installing a camera here can help deter intruders and provide valuable footage. Ensure the camera is positioned to capture clear facial details of anyone approaching.
Ground Floor Windows and Back Doors
Ground floor windows and back doors are vulnerable entry points that should be monitored. These areas often provide less visible access points for potential intruders. Installing cameras here can help prevent break-ins and improve home security.
Driveway and Garage
Installing cameras to monitor your driveway and garage not only protects valuable vehicles but also provides early detection of anyone approaching your property with suspicious intent. This can be a crucial aspect of home security, helping to prevent theft and vandalism.
Common Areas Inside Your Home
Common areas inside your home, such as main hallways, living rooms, and staircases, serve as natural bottlenecks that intruders must pass through. Installing cameras in these areas can help monitor and deter intruders, improving overall home security.
| Location | Security Benefit |
|---|---|
| Front Door | Deters intruders, captures facial details |
| Ground Floor Windows and Back Doors | Monitors vulnerable entry points |
| Driveway and Garage | Protects vehicles, detects suspicious activity |
| Common Areas Inside Home | Monitors intruder pathways |
When positioning outdoor cameras, aim to place them at a height of 8-10 feet to prevent tampering while ensuring they capture clear facial details of anyone approaching. Proper lighting around camera locations also enhances night-time footage quality.
Places to Avoid Installing Security Cameras
To maintain both security and privacy, it’s essential to choose the right locations for your security cameras. When deciding where to place cameras, you must consider not only the areas you want to monitor but also the potential impact on others’ privacy and the technical limitations of your equipment.
Privacy Concerns and Legal Considerations
When installing security cameras, it’s vital to respect people’s reasonable expectation of privacy. Avoid installing cameras in areas like bedrooms and bathrooms, where individuals expect privacy. Additionally, be mindful of your neighbors; ensure your cameras are not capturing footage of their properties without their consent. Local regulations may also dictate where you can and cannot install surveillance equipment, so it’s crucial to familiarize yourself with these laws to avoid any legal repercussions.
- Be aware of and comply with local laws regarding surveillance.
- Avoid pointing cameras at neighbors’ properties.
Technical Limitations to Consider
Besides privacy and legal issues, there are technical considerations to keep in mind when installing cameras. Avoid placing cameras in direct sunlight or facing bright lights, as this can cause glare and reduce image quality. Also, be cautious of areas with high moisture or extreme temperatures, as these conditions can damage your cameras if they’re not specifically rated for such environments. Furthermore, avoid installing cameras behind glass or at extreme angles, as these placements can significantly impair their effectiveness.
- Avoid direct sunlight and extreme temperatures.
- Do not install cameras behind glass.
Essential Tools and Materials for Installation

The right tools and materials are vital for a hassle-free security camera installation. Proper preparation is essential to ensure a smooth installation process.
Basic Tools Required
You’ll need a range of basic tools, including a power drill with various bits, screwdrivers, wire cutters/strippers, a stud finder, measuring tape, and a sturdy ladder for reaching higher installation points.
Additional Materials You Might Need
For outdoor camera installation, consider weatherproof sealant, outdoor-rated mounting hardware, and possibly conduit to protect cables from the elements. You may also need Ethernet cables (Cat5e or Cat6) for wired systems, power supplies, and adapters specific to your camera model.
Home Security Camera Installation Guide: Step-by-Step Process
Enhancing your home’s security with cameras requires careful planning and installation. To help you through this process, we’ve outlined a step-by-step guide on how to install security cameras effectively.
Preparing for Installation
Before you start the camera installation process, it’s essential to test each camera to ensure it powers on and connects properly to your network or recording device. This initial step helps identify any faulty cameras or connectivity issues early on.
Mounting Cameras Properly
When mounting cameras, use the provided template to mark drill holes accurately. Ensure you’re attaching the camera to a solid surface, such as a stud for wooden walls, or use appropriate anchors for drywall. For outdoor cameras, apply silicone sealant around the mounting holes and cable entry points to prevent water ingress.

Running and Concealing Cables
For wired systems, plan routes that minimise exposure and vulnerability when running cables. Use cable conduit or raceways to protect wiring from environmental damage and tampering. For a professional-looking installation, conceal cables within walls where possible, or use cable covers that match your wall colour.
Connecting Power and Network
When connecting power, ensure all connections are secure and protected from the elements. Use weatherproof junction boxes for outdoor installations. For network connections, avoid sharp bends in Ethernet cables and keep them away from sources of electrical interference.
After mounting and connecting each camera, adjust the angle and field of view while watching the live feed on your smartphone or monitor to ensure optimal coverage. For more detailed guidance, you can refer to resources like Reolink’s home surveillance system installation guide.
| Installation Step | Description | Tips |
|---|---|---|
| Preparing for Installation | Test cameras before mounting | Identify faulty cameras early |
| Mounting Cameras | Use provided template for accurate drilling | Apply silicone sealant for outdoor cameras |
| Running and Concealing Cables | Plan routes to minimise exposure | Use cable conduit or raceways |
| Connecting Power and Network | Ensure secure and protected connections | Use weatherproof junction boxes outdoors |
Setting Up Your Camera System
After physically installing your security cameras, setting up your camera system is vital for effective home security. This involves configuring various settings to ensure your cameras work seamlessly and provide the desired level of security.
Configuring Network Settings
To start, you need to connect your cameras to your home network. For wired cameras, this involves direct Ethernet connections, while wireless cameras require configuring Wi-Fi settings. Ensuring your cameras are connected to the network is crucial for remote viewing and receiving alerts. You can use a dedicated mobile application provided by the manufacturer to streamline this process.
Setting Up Remote Viewing
Setting up remote viewing allows you to monitor your property from anywhere using a smartphone, tablet, or computer. To do this, download the manufacturer’s app, launch it, and enter the unique ID number (UID) of your camera device. This enables you to view live streams over the internet outside your home network, enhancing your ability to monitor your home remotely.
Configuring Motion Detection and Alerts
Configuring motion detection settings is crucial to balance between capturing important events and avoiding false alerts. Customise notification preferences to receive alerts via push notifications, email, or text messages when motion is detected. Additionally, set up recording schedules and storage options based on your security needs, choosing between continuous recording, motion-activated recording, or a combination of both.
By following these steps, you can maximise the effectiveness of your security camera system, ensuring it provides the desired level of security and peace of mind.
Maintenance and Troubleshooting Tips
To keep your security cameras functioning optimally, regular maintenance is crucial. A well-maintained system ensures continuous surveillance and extends the lifespan of your equipment.
Regular Maintenance Schedule
Creating a quarterly maintenance schedule is essential. This should include cleaning camera lenses with microfibre cloths, checking for loose connections, and clearing debris. For outdoor security cameras, inspect weatherproofing seals annually and reapply silicone sealant as needed to prevent water damage, particularly before winter months.

Common Issues and Solutions
Common issues with security cameras include night vision problems, often resolved by cleaning infrared LEDs or adjusting camera positioning. Connectivity problems with wireless cameras can be addressed by relocating the router or adding Wi-Fi extenders. For poor image quality, check focus settings, clean lenses, and ensure adequate lighting. Software issues can often be resolved by updating firmware or restarting the system.
Conclusion
Your home is now more secure with the installation of a comprehensive security camera system, providing you with a sense of safety and security. By following this guide, you’ve learned how to select the right cameras and install them effectively. Remember, the effectiveness of your security system depends on both the quality of the equipment and thoughtful placement. Regular maintenance and firmware updates will ensure your system continues to function optimally. Consider your camera system as a living solution that may need adjustments as your security needs evolve.
The time and effort you’ve invested in installing your security cameras will pay dividends in enhanced home security. If you encounter complex issues, don’t hesitate to consult professionals. We hope this guide has empowered you to take control of your home security through effective camera installation and configuration.