Are you frustrated with a gas burner that refuses to ignite? You’re not alone. Many homeowners face this issue, and it can be both inconvenient and puzzling.
A faulty igniter or clogged stove burner might be the culprit. Understanding the root cause is crucial to resolving the problem efficiently.
This comprehensive guide will walk you through the steps to diagnose and fix the issue, potentially saving you from costly service calls. By understanding the basic components of your gas stove and how they work together, you’ll be better equipped to tackle the problem.
Key Takeaways
- Diagnose common issues preventing your gas burner from lighting.
- Learn simple DIY solutions using basic household tools.
- Understand the importance of safety when working with gas appliances.
- Discover how proper maintenance can prevent future issues.
- Identify when to seek professional help for complex problems.
Understanding Gas Stove Burner Issues
To effectively troubleshoot your gas stove, understanding how its burners work is crucial. Your gas stove’s burners operate through a system where gas flows through valves and mixes with air before being ignited.
How Gas Stove Burners Work
Gas stove burners function by allowing gas to flow through a valve that opens when you turn the control knob. This gas then mixes with air in the correct proportion for efficient combustion. The ignition system, whether a pilot light or electric igniter, provides the necessary spark or flame to ignite the gas-air mixture.
Common Signs of Burner Problems
Common issues with gas stove burners include weak or yellow flames, clicking sounds without ignition, and uneven heating. A properly functioning gas stove should produce a blue flame; any deviation may indicate a problem, such as incomplete combustion or reduced gas flow.
| Issue | Description | Possible Cause |
|---|---|---|
| Yellow or Orange Flames | Incomplete combustion | Partially clogged burner, reducing gas flow |
| Weak Flames | Insufficient gas supply | Clogged burner or gas valve issue |
| Clicking Sounds without Ignition | Ignition system malfunction | Faulty igniter or spark module issue |
Regular maintenance and proper cleaning can prevent many common burner issues before they develop into more serious problems. Ensuring your gas stove burners are clean and functioning correctly is vital for both performance and safety.
Safety Precautions Before Troubleshooting
Safety should always be your top priority when troubleshooting gas appliances to prevent potential gas leaks, fires, or carbon monoxide poisoning. When dealing with your gas stove, it’s essential to be aware of the risks involved.
Ensuring Proper Ventilation
Before beginning any troubleshooting work, make sure your kitchen is well-ventilated by opening windows and turning on exhaust fans to disperse any gas that might be released. This simple step can significantly reduce the risk of gas accumulation.
When to Turn Off the Gas Supply
You should immediately turn off the gas supply to your stove if you detect a strong gas smell, hear hissing sounds indicating a gas leak, or if you need to access gas lines or connections. To do this, locate your gas shut-off valve, typically found behind the stove or on the supply line, and rotate the valve handle perpendicular to the gas line to shut off the supply. Always check gas connections for signs of wear or damage and ensure gas lines are not kinked or obstructed.
- Be aware of your surroundings and keep a fire extinguisher nearby.
- Avoid wearing loose clothing or jewellery that could catch fire.
- If you’re unsure about any aspect of gas stove troubleshooting, consult a professional.
Essential Tools for Gas Stove Troubleshooting

To effectively diagnose and repair issues with your gas stove, you’ll need a specific set of tools. Having the right equipment on hand will make the troubleshooting process more efficient and effective.
Basic Cleaning Supplies
Basic cleaning supplies are essential for maintaining your gas stove. You will need warm soapy water, a microfibre cloth, and non-abrasive scrubbing pads to remove grease and food debris. An old toothbrush can also be useful for cleaning hard-to-reach areas.
Specialised Tools You Might Need
For more complex troubleshooting, you may require specialised tools. A multimeter can help test electrical components, while needle-nose pliers can access tight spaces. A small wire brush is useful for cleaning burner ports, and a can of compressed air can blow out debris without damaging components.
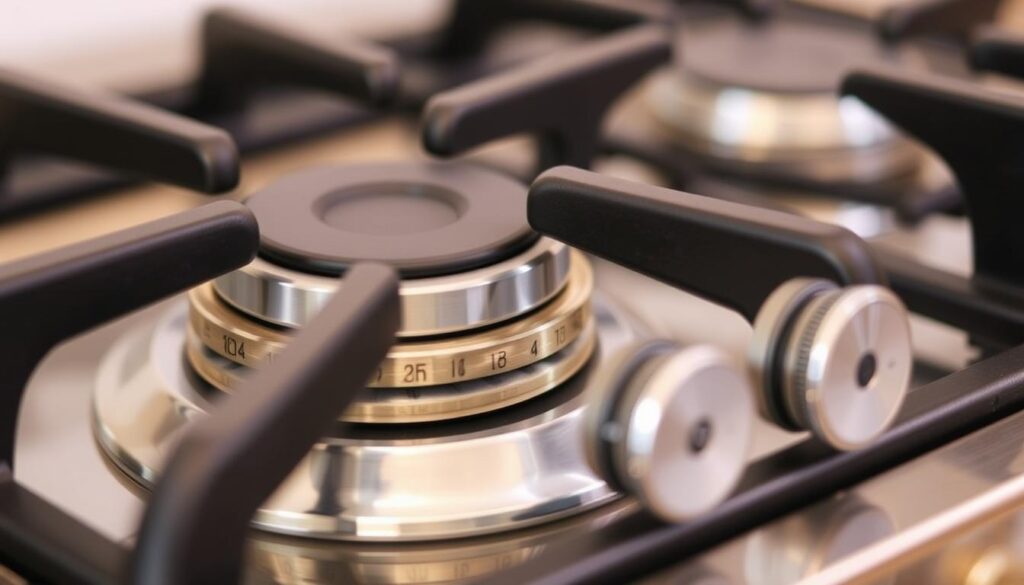
Checking for Misaligned Burner Caps
If your gas stove burner fails to ignite, the problem might be as straightforward as a misplaced burner cap. A misaligned cap can disrupt the gas flow, preventing the burner from lighting. This issue often arises after cleaning the stove and incorrectly replacing the cap.

To resolve this, ensure that each burner cap is correctly positioned on its burner base. The cap should sit evenly without any wobbling or tilting.
How to Properly Position Burner Caps
To properly position a burner cap, align it with the burner base, ensuring it fits snugly and is properly aligned. Some caps have notches or grooves that must match corresponding features on the burner base, so check that these are correctly aligned to ensure the cap is in the right position.
Signs of Damaged Burner Caps
A cap that is damaged may not distribute gas evenly, affecting the burner’s performance. Signs of damage include visible cracks, chips, warping, or discolouration that cleaning cannot remove. If you notice any of these issues, consider replacing the cap with the exact manufacturer’s recommended part to ensure a proper fit and function.
Cleaning Clogged Burners and Food Debris
Clogged gas stove burners are usually the result of food particles and grease obstructing the gas ports. To resolve this issue, a thorough cleaning is necessary.
Step-by-Step Burner Cleaning Process
Begin by removing the grate covering the troubled burner. Next, remove the burner cap, which should lift off with ease. The sealed burner base may require removing a couple of screws before it can be taken out. Clean the surrounding area with a warm, soapy wash cloth. Soak the sealed burner base in vinegar or warm water and use a stiff brush to remove any debris. Finally, clean any remaining debris out of the burner holes with a toothpick, sewing needle, or compressed air.
Dealing with Stubborn Grease and Residue
For stubborn grease deposits, create a paste of baking soda and water, apply it to the affected areas, let it sit for 20 minutes, then scrub gently. Ensuring all components are thoroughly dried before reassembly is crucial to prevent future ignition problems.
Gas Stove Burner Won’t Light Troubleshooting: Igniter Problems
Igniter problems are a common culprit when your gas stove burner won’t light. Issues with the igniter can manifest in various ways, including no clicking sound, clicking without sparking, or sparking without ignition.
Testing if Your Igniter is Working
To test if your igniter is working properly, turn off the lights in your kitchen and turn the burner knob to the ignition position. You should see a bright bluish-white spark at the igniter. If the spark appears weak, yellow, or orange, it may indicate that the igniter is failing.
Cleaning and Drying Wet Igniters
If you’ve recently cleaned your stove or had a spill, it’s possible that the igniter got wet, preventing it from sparking correctly. To dry a wet igniter, remove the burner cap and gently blot around the igniter with a lint-free cloth. Allow it to air dry completely for at least 30 minutes before attempting to use the gas burner again. Be cautious not to use a hair dryer or other heat source, as this can damage the igniter’s electronic components due to excessive heat or water residue.
Addressing Gas Supply Issues
If you’re having trouble lighting your gas stove burners, checking the gas supply is essential. Gas supply issues can prevent your burners from lighting even when all other components are functioning properly.
Checking if Gas is Turned On
To check that the gas is on, look at the supply valve behind the stove. The valve handle should be in line with the gas line. Ensure that the main gas valve to the stove is fully open, which is indicated by the valve handle being parallel to the gas supply line (not perpendicular).
Inspecting for Kinks in Gas Lines
If your stove has been recently installed or moved, check that the flexible gas supply line hasn’t been kinked or crimped, which can restrict gas flow. Be gentle when repositioning your appliance to avoid kinking the line and ensure sure gas flow to the burners.
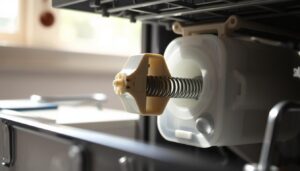
Fixing Loose Connections and Wiring Problems
Loose electrical connections are a common issue that can cause your gas stove‘s ignition to fail. Before attempting any repairs, ensure you disconnect power to the appliance by unplugging it or switching off the circuit breaker.
Safely Accessing Electrical Connections
To access the electrical connections, you may need to remove the cooktop or control panel. This process typically involves removing knobs, grates, burner caps, and several screws. Be cautious when handling delicate components to avoid damage.
Reconnecting Loose Wires
Once you have accessed the electrical connections, inspect for loose or disconnected wires. Secure any loose connections and reconnect disconnected wires according to your stove‘s wiring diagram. Ensure all wiring is secure and away from hot components and gas lines before reassembling the stove and restoring power.
| Step | Action | Precaution |
|---|---|---|
| 1 | Disconnect power to the appliance | Unplug or switch off circuit breaker |
| 2 | Remove cooktop or control panel | Handle delicate components with care |
| 3 | Inspect and secure electrical connections | Refer to stove’s wiring diagram |
Troubleshooting Faulty Spark Modules
Troubleshooting a faulty spark module involves understanding its role in your gas stove’s operation and identifying the signs of malfunction. The spark module is the central component of the electronic ignition system in modern gas stoves, providing the electrical current needed to create sparks at the igniters. When it’s broken or not functioning properly, you probably won’t hear the stove clicking and have no spark.
Signs of a Defective Spark Module
A defective spark module can manifest in several ways. Some common signs include:
- No clicking sound when turning burner knobs
- All burners failing to spark simultaneously
- Intermittent sparking or continuous clicking without stopping
A faulty spark module often affects multiple or all burners at once, whereas problems with individual burners usually indicate issues with that specific igniter or burner assembly.
Replacement Options for Spark Modules
Testing a spark module typically requires a multimeter to check for proper voltage output when the ignition system is activated. If you find that your spark module is faulty, it will need to be replaced. Replacement spark modules must be compatible with your specific stove model, as using an incorrect module can result in ignition failure or potential safety hazards.
While some experienced DIYers may be able to replace a spark module themselves, this repair often requires accessing components deep within the stove and working with electrical connections. For most homeowners, having a qualified appliance technician replace the spark module is the safest option, especially since improper installation can create fire or shock hazards.
Dealing with Thermocouple Issues
If your gas stove burner won’t stay lit, the thermocouple could be the problem. The thermocouple is a safety device that detects whether a flame is present and shuts off the gas supply if no flame is detected, preventing dangerous gas leaks.
Testing the Thermocouple
To test a thermocouple, you’ll need a multimeter. When heated by a flame, a functioning thermocouple should produce a millivolt output. Readings below 25 millivolts indicate a failing thermocouple. Ensure the gas supply is turned off and the burners are cool before testing to prevent burns or gas leaks.
Replacing a Defective Thermocouple
If your thermocouple is faulty, it may need to be replaced. Use the exact replacement part recommended by the manufacturer to ensure proper fit and function. When replacing, position the thermocouple correctly in relation to the burner flame – directly in the flame path but not so close that it’s damaged by excessive heat. 
When to Call a Professional Gas Engineer

Knowing when to seek professional help for your gas stove is crucial. While many issues can be resolved through DIY troubleshooting, certain problems require the expertise and specialised tools of a professional gas engineer.
Some scenarios that necessitate calling a professional include detecting a persistent gas smell, dealing with complex issues involving the gas supply line or gas valve, and when your troubleshooting efforts haven’t resolved the issue.
- If you smell gas even after turning off the stove, it could indicate a dangerous leak.
- Complex issues involving the gas supply or internal gas lines should be handled by certified professionals.
- Regular professional maintenance can prevent many common problems and extend the lifespan of your appliance.
When selecting a gas engineer, verify they are properly certified and registered with the appropriate regulatory bodies for gas work in your area.
Conclusion
With a systematic approach, you can identify and fix common problems that prevent your gas stove burner from lighting. Regular maintenance is key to preventing many issues, including routine cleaning of burners and caps, checking gas connections, and ensuring igniters remain free of debris and moisture. Most gas stove burner problems can be fixed without professional help, potentially saving you significant repair costs. For more detailed information on common stove burner problems and their solutions, you can visit this guide. By understanding how your stove works and following proper maintenance procedures, you can enjoy efficient cooking and minimal disruptions in your kitchen routine.