Are you tired of finding ice building up in your fridge or freezer? This common problem can lead to increased energy bills and potentially spoil your food. Excessive moisture is often the fundamental cause of ice build-up in your appliance.
Understanding the reasons behind this issue is crucial to resolving it. In this article, we’ll explore why your fridge or freezer is icing up and provide you with practical troubleshooting tips to get your appliance back to its optimal functioning state.
Key Takeaways
- Identify the root cause of ice build-up in your freezer.
- Learn practical DIY fixes to resolve the problem.
- Understand when to seek professional help for your appliance.
- Discover preventative measures to avoid future icing issues.
- Explore how different freezer models may experience icing issues.
Understanding Why Your Freezer Ices Up
Freezer icing up is typically caused by excessive moisture entering the freezer compartment. This moisture then freezes on surfaces such as walls, shelves, and bars, as well as on or around components like coils and vents.
The Science Behind Freezer Frost Formation
Frost formation occurs when warm, moist air enters the freezer and condenses on cold surfaces. At sub-zero temperatures, water vapour transforms directly from gas to solid, creating frost. This process is known as deposition or desublimation.
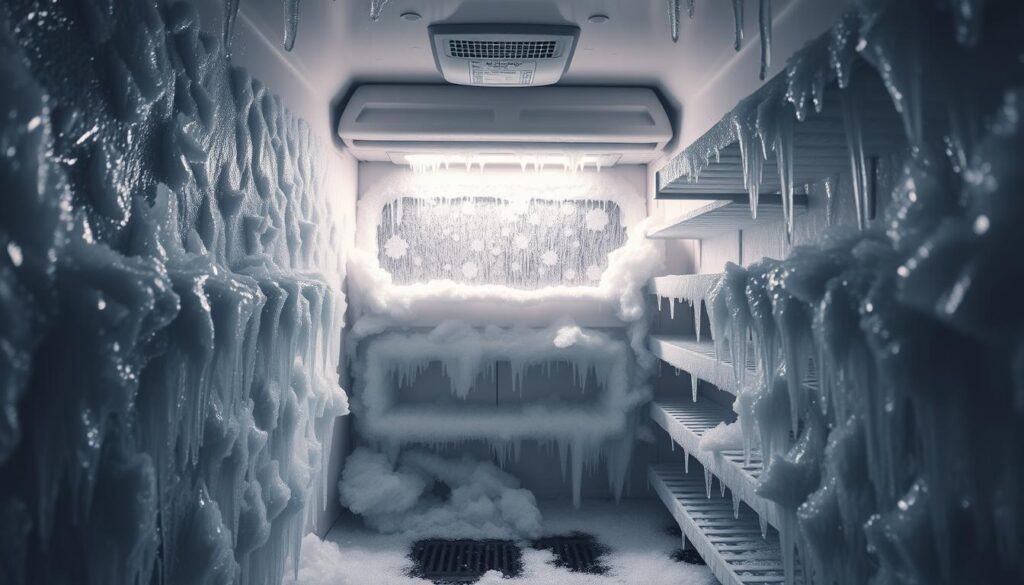
Common Signs of Excessive Ice Build-Up
You can identify excessive ice build-up through visible thick frost on walls and shelves, reduced storage space, and difficulty closing the freezer door. Other signs include the freezer working harder than usual and ice accumulation around the door seal, indicating abnormal moisture entry.
| Causes | Signs |
|---|---|
| Excessive moisture | Visible thick frost |
| Warm air entry | Difficulty closing the door |
| Sub-zero temperatures | Ice accumulation around the door seal |
Door Seal Issues: A Primary Culprit
One of the primary reasons for excessive ice build-up in your freezer is a compromised door seal. A faulty door seal, also known as a gasket, allows warm, humid air to enter the freezer continuously, causing the appliance to work harder than required.
Checking for Faults
To check if your door seal is faulty, use the simple paper test: place a thin piece of paper between your refrigerator door frame and the gasket. If the paper comes out easily without resistance, the seal is faulty and needs replacing.
A faulty door seal is one of the most common reasons for freezer icing problems. Inspect the entire perimeter of your freezer door for visible cracks, tears, or areas where the seal has hardened and lost its flexibility.
Replacing a Damaged Gasket
When replacing a damaged freezer door gasket, ensure you purchase the correct model-specific part for a proper fit. The replacement process typically involves removing the old gasket, which may be held in place by screws or simply fitted into a channel.
Installing the new gasket requires careful alignment and ensuring it sits properly in the channel around the entire door perimeter. A properly functioning door seal not only prevents ice build-up but also improves energy efficiency by maintaining cold air inside the freezer.
Temperature Settings and Their Impact
Maintaining the right temperature in your freezer is crucial for preventing ice build-up. The ideal operating temperature of your freezer, as stated in your appliance’s manual, is designed to minimise humidity levels.
Optimal Freezer Temperature Settings
The optimal temperature for most freezers is -18°C (0°F), striking a balance between food preservation, energy efficiency, and minimising ice formation. Setting your freezer’s thermostat too low (i.e., warm) or too high (i.e., cold) can cause excess ice to form. If the thermostat is set too warm, water molecules escape from food, increasing the air’s humidity.
- Using a separate freezer thermometer can help verify that your appliance maintains the set temperature.
- Many modern fridge freezers have digital displays for precise temperature control.
- When adjusting your freezer’s thermostat, make small changes and allow 24 hours for the temperature to stabilise.

How to Properly Adjust Your Freezer Thermostat
To adjust your freezer’s thermostat, first, consult your appliance’s manual. For fridge freezers with numbered dials, adjustments are typically made in small increments. It’s essential to check the temperature with a freezer thermometer to ensure it’s at the optimal -18°C.
Humidity Management: Effective Freezer Icing Up Solutions
Excessive humidity can lead to ice build-up in your freezer, making humidity management a vital task. When you introduce hot foods into the freezer, you inadvertently increase the moisture levels inside it. To prevent this, it’s advisable to cool your food to room temperature before placing it in the freezer.
Reducing Moisture Introduction
To minimise moisture introduction, use your refrigerator as an intermediate step for cooling hot food before transferring it to the freezer. This helps in controlling the moisture levels effectively. Additionally, limiting the frequency of opening your freezer door can prevent warm, humid air from entering the freezer.
Proper Food Storage Techniques
Storing food in airtight, freezer-safe containers or high-quality freezer bags is another effective strategy. This prevents moisture from escaping into the freezer environment. You can also consider using silica gel packets to absorb any excess moisture, particularly in areas prone to condensation. Regularly checking and discarding frost-covered or freezer-burned items will also help in maintaining optimal humidity levels.
By implementing these strategies, you can significantly reduce the risk of ice build-up in your freezer, ensuring it operates efficiently.
Freezer Usage Habits That Cause Ice Build-Up
How you access and manage your freezer affects ice build-up. Your daily freezer usage habits significantly impact ice formation, with frequent or prolonged door openings being a major contributor to frost build-up.
Impact of Frequent Door Opening
Every time you open your freezer door, you create an exchange of air where cold air escapes and warm, humid air enters the compartment. This temperature fluctuation forces your freezer to work harder, creating conditions favourable for ice formation. To minimize this, make sure to reduce the number of times you open the door.
Organising Your Freezer to Reduce Access Time
Implementing an organised storage system with clearly labelled containers or designated zones for different food types can dramatically reduce search time. Consider using stackable, uniform containers that maximise space efficiency and make items more visible and accessible. You can also create an inventory list kept on the outside of your fridge freezer to help plan retrieval, minimising door openings.
| Freezer Organisation Tips | Benefits |
|---|---|
| Use labelled containers | Easy to find items |
| Designate zones for food types | Reduces search time |
| Keep an inventory list | Minimises door openings |
For more information on managing frost build-up, visit https://www.bajajfinserv.in/frost-build-up-in-a-freezer. Organising your freezer and being mindful of your door-closing habits can significantly reduce ice build-up in your home.

Step-by-Step Guide to Manually Defrosting Your Freezer
Manually defrosting your freezer is a straightforward process that can help maintain its efficiency. When ice build-up exceeds 6mm (¼ inch) in thickness or begins to impair your freezer’s functionality, it’s time to defrost.
Preparation and Safety Precautions
Before you start, turn off and unplug your appliance to ensure safety during the defrosting process. Prepare your kitchen by placing towels around the base of the fridge freezer to catch water and have containers ready for food storage.
- Transfer frozen food to a cooler with ice packs or to another freezer if available; work quickly to prevent thawing.
- Remove all removable parts such as drawers and shelves to allow better access for cleaning and defrosting.
The Defrosting Process
You can speed up the defrosting process using bowls of hot water placed inside (never use sharp objects to chip at ice). Wait for the ice to melt completely.
Cleaning and Restarting Your Freezer
Once the ice has melted, thoroughly clean the interior surfaces with a solution of baking soda and warm water to remove odours. Dry all surfaces completely before replacing shelves and drawers to prevent immediate re-freezing and ice formation.
- Allow your freezer to run for at least 30 minutes before returning food to ensure it reaches the optimal temperature.
- Check that all food is still frozen solid before returning it; discard any items that have fully thawed for safety reasons.
By following these steps, you can ensure your freezer is properly defrosted and maintained, making sure it continues to run efficiently.
Modern Solutions: Frost-Free Technology
The advent of NoFrost technology has revolutionised freezer maintenance. This innovative technology prevents the buildup of frost in your freezer, eliminating the need for manual defrosting. By constantly circulating cool air around the appliance, NoFrost technology prevents moisture from accumulating on the walls of your freezer.
How NoFrost Technology Works
NoFrost systems work by circulating cold, dry air throughout the freezer compartment, preventing moisture from settling and forming ice. These systems typically include a hidden evaporator with a heating element that periodically activates to melt any frost that forms.
Benefits of Upgrading to a Frost-Free Freezer
Upgrading to a frost-free fridge freezer saves significant time and effort previously spent on manual defrosting. These advanced models typically offer more consistent temperatures throughout the freezer compartment, improving food preservation. You can find the best frost-free models on various websites, comparing features and prices to suit your needs and budget.
Conclusion: Maintaining an Ice-Free Freezer
Ensuring your freezer remains ice-free is a matter of regular maintenance and good usage habits. To prevent icing problems, it’s crucial to check your door seal monthly and replace it when necessary. Establishing good habits, such as minimising door opening time and allowing hot food to cool before freezing, can also help.
Additionally, setting a reminder to check your thermostat settings seasonally and keeping a thermometer in your freezer can help monitor temperature fluctuations. By following these guidelines and maintaining your appliance, you can enjoy an efficiently running fridge freezer that preserves food better and consumes less energy, saving you money at home.