Are you tired of dealing with clogged drains and messy kitchen waste? Installing a waste disposal unit under your sink can be a game-changer for your kitchen’s cleanliness and efficiency.
A disposal unit grinds soft waste into a pulp, allowing it to flow smoothly into the drain, reducing the risk of blockages and making kitchen cleanup a breeze.
In this comprehensive guide, we’ll walk you through the process of fitting a waste disposal unit under your kitchen sink, covering everything from initial preparations to final testing, ensuring a successful installation.
Key Takeaways
- Understand the benefits of installing a waste disposal unit in your kitchen.
- Learn how to prepare your sink for a disposal unit installation.
- Discover the tools needed for a successful installation.
- Follow step-by-step instructions for fitting a disposal unit.
- Ensure optimal performance and longevity of your waste disposal unit.
What You Need to Know Before Starting
To ensure a smooth installation process, it’s essential to understand what you need to get started. Fitting a waste disposal unit under your sink can be a relatively straightforward task if you’re well-prepared.
Tools and Materials Required
To install a waste disposal unit, you’ll need specific tools and materials. These typically include a disposal unit, mounting assembly, discharge tube, and waste pipe. You may also require a pipe wrench, pliers, and screwdrivers. For a comprehensive list, refer to the manufacturer’s instructions.

Sink Compatibility Considerations
When it comes to fitting a waste disposal unit, the compatibility largely depends on the type of sink you have. Most standard sinks can accommodate waste disposal units, whether you have a stainless steel, porcelain, or composite sink. However, it’s crucial to check your sink’s specifications before purchasing a disposal unit.
- Not all kitchen sinks are equally compatible with waste disposal units, so it’s essential to check your sink’s specifications before purchasing.
- The outlet size is a critical factor—most disposal units require an 89mm (3½ inch) sink outlet rather than the standard 38mm (1½ inch) outlet.
- Stainless steel sinks typically offer the best compatibility with disposal units, while porcelain or composite sinks may require special consideration.
- Double sinks often have different sized outlets in each bowl, making one side more suitable for installing waste disposal units.
- If your sink has an overflow, you’ll need to ensure it can be properly connected to the plumbing system after the disposal unit is installed.
Preparing Your Kitchen Sink for Installation
Preparing your kitchen sink is a crucial step in the installation process of a waste disposal unit. To begin, you need to clear and measure the under-sink space to ensure it can accommodate the new unit.
Clearing and Measuring the Under-Sink Space
Clear out any clutter or stored items from under the sink. Measure the space to confirm that your new waste disposal unit will fit. Check for any obstructions that could interfere with the installation.
Turning Off Water and Electrical Supply
Before starting the installation, turn off the water supply by locating the shut-off valves under the sink and turning them clockwise. Also, switch off the electrical supply to the sink area at your consumer unit.
Removing Existing Drainage Components
Disconnect the existing drainage pipe from the sink’s drain opening using an adjustable wrench to loosen the slip nut. Place a bucket underneath to catch any water or debris. Clean off any old sealing compound from inside and under the sink.

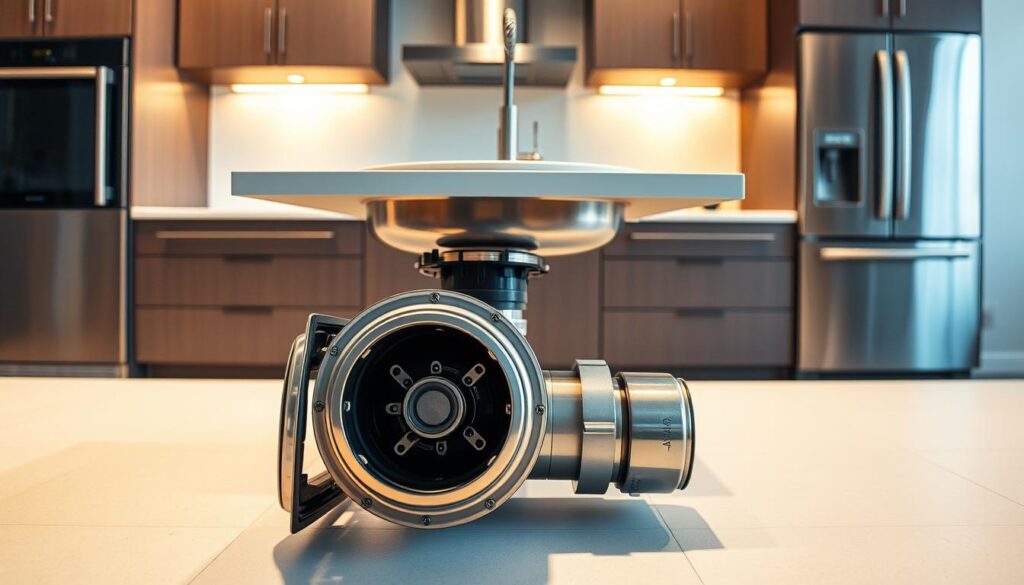
How to Fit Waste-Disposal Unit Under Sink
Enhancing your kitchen with a waste-disposal unit is simpler than you think, and starts with understanding the installation process. To successfully fit a waste-disposal unit under your sink, you need to follow a series of steps that involve plumbing and electrical connections.
Installing the Mounting Assembly
The first step involves installing the mounting assembly. This requires you to place the mounting assembly into position under the sink and secure it according to the manufacturer’s instructions. Ensure it is tightly fixed to support the weight of the disposal unit.

Connecting the Waste Disposal Unit
Once the mounting assembly is secure, you can proceed to connect the waste disposal unit. Align the unit with the mounting assembly and twist it into place until it clicks or is otherwise secured as per the manufacturer’s guidelines.
Setting Up the Discharge Tube and Waste Pipe
The next step involves setting up the discharge tube and waste pipe. Connect the discharge tube from the disposal unit to the waste pipe, ensuring a secure and watertight connection. Use appropriate fittings and seals to prevent leaks.
Making Proper Electrical Connections
The final step involves making safe and compliant electrical connections. Ensure the power supply is off at the circuit breaker before starting. Most disposal units require a dedicated electrical supply, typically fused at 13 amp in the UK. The electrical connections must comply with Part P of UK building regulations.
When making electrical connections, consider the control options available for your disposal unit, such as a wall switch, air switch, or automatic operation. Complete the wiring according to your preferred method of operation, ensuring all connections are secure and meet the necessary safety standards.
| Component | Requirement | Notes |
|---|---|---|
| Electrical Supply | 220/240 Volt, dedicated supply | Fused according to installation instructions |
| Control Options | Manual switch, wireless remote, or automatic | Choose based on preference and wiring |
| Wiring Compliance | Part P of UK building regulations | May require a qualified electrician |
By following these steps and ensuring compliance with all relevant regulations, you can successfully install a waste-disposal unit under your sink, enhancing your kitchen’s functionality and waste management capabilities.
Conclusion
Now that you’ve fitted your waste disposal unit, you can appreciate the convenience it brings to your kitchen. This step-by-step guide has walked you through the process, from choosing the right unit for your sink to making the final connections. A properly installed disposal unit helps divert food waste from landfills, contributing to a more sustainable home. Regular maintenance will ensure its longevity. If you’re unsure about any part of the installation, consider consulting a professional to ensure safety and performance. With your new waste disposal unit in place, you’ll enjoy a cleaner, more efficient kitchen.