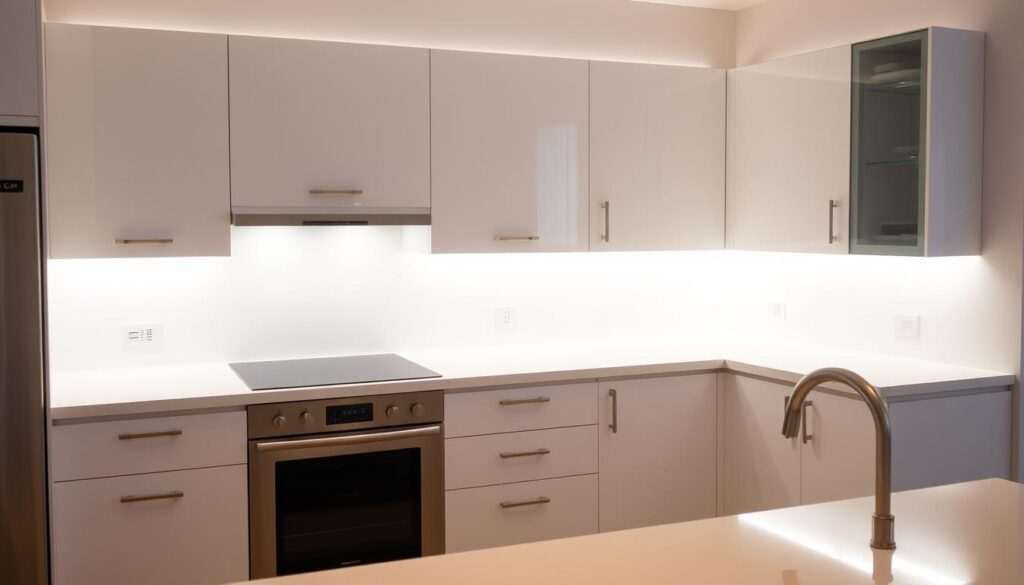
Enhancing your kitchen’s functionality and aesthetics can be achieved with the simple installation of LED strip lighting under your cabinets. This versatile and practical solution provides improved task lighting, enhanced ambience, and energy efficiency. By installing LED lights under your kitchen cabinets, you can create a warm and inviting atmosphere while also increasing the overall brightness of your kitchen.
This comprehensive guide will walk you through the process of planning, selecting, installing, and controlling your LED strip lights. Suitable for DIY enthusiasts with basic skills and minimal tools, this guide will cover everything from measuring and choosing the right LED strips to connecting them to power and controlling them effectively.
Key Takeaways
- Understand the benefits of installing LED strip lighting under your kitchen cabinets.
- Learn how to plan and select the right LED lights for your kitchen.
- Discover the steps involved in installing LED strip lights under your cabinets.
- Find out how to control your LED lighting effectively.
- Transform your kitchen space with a cost-effective and relatively simple DIY project.
Understanding the Benefits of Under-Cabinet LED Lighting
When it comes to kitchen lighting, LED strip lights offer a multitude of benefits that make them an ideal choice for under-cabinet illumination. LED strip lights are not just about aesthetics; they are also energy-efficient, easy to install, and completely customisable.
Enhanced Task Lighting for Food Preparation
One of the primary benefits of under-cabinet LED lighting is the enhancement of task lighting for food preparation. By providing a clear and focused light source, LED strips help reduce eye strain and improve visibility when chopping ingredients or reading recipes.
Creating Ambience and Visual Appeal
LED strip lights can also significantly enhance the ambience and visual appeal of your kitchen. With a range of colour temperatures available, you can create a warm and inviting atmosphere or a bright and modern look, depending on your preference.
Energy Efficiency and Cost Savings
In terms of energy efficiency, LED strip lights consume significantly less power than traditional lighting options. Typically using between 4-15 watts per metre, LED strips are not only eco-friendly but also cost-effective in the long run. With a lifespan of up to 50,000 hours, they require less frequent replacement, resulting in additional cost savings.
| Lighting Option | Energy Consumption (Watts per Metre) | Lifespan (Hours) |
|---|---|---|
| LED Strip Lights | 4-15 | Up to 50,000 |
| Fluorescent Lighting | 20-40 | Up to 10,000 |
| Halogen Lighting | 30-60 | Up to 2,000 |
As shown in the table, LED strip lights offer a significant reduction in energy consumption and a substantial increase in lifespan compared to traditional lighting options. This makes them an attractive choice for homeowners looking to reduce their energy bills and environmental impact.
Planning Your Under-Cabinet Lighting Project
To achieve professional-looking results, it’s vital to plan your under-cabinet LED lighting project meticulously. Effective planning ensures that your lighting meets your needs and is installed efficiently.
Measuring Your Cabinet Space
Accurate measurements are crucial for determining the length of LED strips you’ll need. Measure the width and depth of your cabinets to ensure you have enough lighting coverage. Consider the layout of your kitchen and any obstacles that might affect the installation, such as electrical outlets or uneven surfaces.
Determining Optimal Light Placement
The placement of your LED strips significantly affects their performance and the overall ambiance of your kitchen. Typically, LED strips are placed under upper cabinets to illuminate countertops. However, you might also consider lighting inside glass-front cabinets or under islands for added visual appeal. “The key to effective under-cabinet lighting is to create a balance between task lighting and ambient lighting,” says a renowned lighting designer.
Considering Power Source Options
You have several options for powering your under-cabinet LED lighting, including plug-in adapters, hardwired connections, and battery-powered solutions. The type of LED power supply you need depends on whether you want to control your lights with a dimming system. For instance, if you’re using a Lutron dimmer, you’ll need a Zurik dimmable driver. Consider factors like installation complexity, aesthetics, and functionality when choosing your power source. Ensure you determine the required power supply capacity based on the total length and type of LED strips being installed.
When planning, also consider voltage considerations (12V vs 24V) and how they affect your installation options and strip performance. Strategies for hiding power supplies and managing cables are crucial for a clean, professional-looking installation. Always address safety considerations related to electrical connections in kitchen environments.
Choosing the Right LED Strip Lights

The right LED strip lights can transform your kitchen, but how do you choose the best ones for your under-cabinet lighting needs? With various options available, understanding the key factors that influence your decision is crucial.
Brightness Levels Explained
Brightness is a critical factor when selecting LED strip lights. Measured in lumens per metre, it determines how much light your LED strips emit. For under-cabinet lighting, a moderate brightness level is often sufficient, but this can vary depending on your kitchen’s layout and your personal preferences.
Colour Temperature Options
LED strip lights come in a range of colour temperatures, from warm white (2700K-3000K) to cool white (3500K-5000K). Warm white creates a cosy ambiance, while cool white provides a brighter, more energising light. Choosing the right colour temperature depends on the overall aesthetic you want to achieve in your kitchen.
Waterproof vs Standard Strips
If your kitchen is prone to moisture or you’re planning to install LED strips near a sink, consider waterproof LED strip lights. These are designed to withstand exposure to water and humidity, ensuring durability and safety.
Voltage Considerations: 12V vs 24V
When it comes to voltage, you have options: 12V and 24V are the most common for under-cabinet lighting. 24V LED strips are more popular due to their ability to support longer runs without significant voltage drop. However, the choice between 12V and 24V also depends on your power supply and wiring requirements. A higher voltage like 24V can reduce the current for the same power, potentially simplifying your wiring.
Understanding the implications of voltage on your LED strip lighting project is crucial. A 24V system can mitigate voltage drop issues that occur with longer LED strip runs, ensuring consistent lighting across your kitchen. When choosing your voltage, consider the complexity of your installation and the total length of your strip light setup.
Ultimately, the right LED strip lights for your kitchen will depend on a combination of factors, including brightness, colour temperature, waterproofing, and voltage. By considering these elements, you can create a well-lit kitchen that is both functional and aesthetically pleasing.
Essential Tools and Materials for Installation
To ensure a smooth installation process, you’ll need to prepare the right tools and materials for your LED strip lighting project. Having everything on hand will make the task less daunting and help you achieve professional-looking results.
Required Tools Checklist
Before starting, gather the necessary tools, including a measuring tape, scissors or a craft knife for cutting the LED strips, and a screwdriver for securing any additional components. You may also need a drill if you’re using aluminium channels or profiles to house your LED strips. Ensure your tools are in good condition to avoid any complications during the installation.
Additional Materials You’ll Need
Beyond the LED strips themselves, you’ll need power supplies, connectors, mounting clips, and cable management solutions. Cleaning supplies are also crucial for preparing the surface where the strips will be affixed. Optional materials like aluminium channels can enhance the appearance and performance of your LED strips. When selecting connectors, consider the complexity of your installation and the type of strip you’re using. Additionally, materials like heat-shrink tubing and electrical tape will help ensure safe and durable connections. It’s wise to purchase extra materials to account for any mistakes or future repairs.
How to Fit LED Strip Under Cabinets: Step-by-Step Guide
Fitting LED strip lights under your kitchen cabinets can significantly enhance the ambiance and functionality of your cooking space. This guide will walk you through the process, ensuring a professional-looking result.
Preparing the Installation Surface
Before installing LED strip lights, it’s crucial to prepare the surface. Thoroughly clean the underside of your cabinets to remove grease, dust, and any other debris. This step ensures a strong bond between the LED strip’s adhesive backing and the cabinet surface.
Use a gentle cleaning product and a soft cloth to avoid damaging the cabinet finish. Once clean, dry the area completely with a lint-free cloth.
Cutting LED Strips to Size
Measure the length of your cabinets to determine how much LED strip you’ll need. Most LED strips can be cut at designated points, usually marked with a scissor icon. Use sharp scissors or a craft knife to cut the strip cleanly.
When cutting, ensure you leave enough slack for any corners or transitions between cabinet sections.

Mounting Options: Adhesive Backing vs Aluminium Channels
You have two primary options for mounting your LED strip: using the adhesive backing provided or installing aluminium channels. The adhesive backing is simpler and less expensive, but aluminium channels offer additional heat dissipation and a more finished look.
For kitchens with high humidity or where the LED strips will be subject to significant temperature fluctuations, consider using aluminium channels for added durability.
Securing the LED Strips in Place
To install LED strip lights, start by peeling back a small section of the protective cover over the adhesive backing. Align the strip carefully, then press it firmly onto the cabinet underside. Work in small sections to prevent air bubbles from forming.
For added security, especially in humid environments, consider using supplementary mounting clips. These can be particularly useful for corners and transitions between cabinet sections.
By following these steps, you can achieve a professional-looking installation that enhances your kitchen’s strip lights ambiance and functionality.
Connecting and Wiring Your LED Strip Lights
To bring your under-cabinet LED lighting to life, you need to connect and wire the LED strips correctly. This involves understanding the connectors, linking multiple strips, and wiring them to a power supply.
Understanding LED Strip Connectors
LED strip connectors are crucial for linking your LED strips to the power supply and to each other. These connectors come in various types, including solderless connectors that make the installation process easier. When choosing connectors, ensure they are compatible with your LED strip’s specifications.
Key Considerations for LED Strip Connectors:
- Compatibility with your LED strip type
- Ease of installation (e.g., solderless)
- Current rating to match your LED strip’s requirements
Connecting Multiple Strips Together
When connecting multiple LED strips together, it’s essential to maintain the correct polarity to avoid damaging the LEDs. You can connect strips either in series or in parallel, depending on your lighting design and power supply capacity.
Tips for Connecting Multiple Strips:
- Ensure correct polarity (+ to +, – to -)
- Choose the right connection method (series or parallel) based on your power supply
- Use appropriate connectors or soldering techniques
Wiring to Power Supply
To calculate the size of the power supply needed, you must determine the total watts used by your LED strip lights. First, find out the watts per foot (W/ft) of your strip, then multiply this by the total feet you’re installing. Add an additional 20% to this total to prevent overloading the power supply.
| Watts per Foot (W/ft) | Total Feet | Total Watts | Recommended Power Supply Capacity |
|---|---|---|---|
| 2.5 W/ft | 10 ft | 25 W | 30 W (25 W + 20%) |
| 4 W/ft | 15 ft | 60 W | 72 W (60 W + 20%) |
When wiring to the power supply, ensure you use the correct wire gauge based on the current requirements and the length of the wire run. Maintaining proper polarity is also crucial to prevent damage to your LED strips.
Control Options for Your Under-Cabinet Lighting
To get the most out of your LED strip lights, you need to consider the various control options available. These controls allow you to adjust the lighting to suit different tasks, moods, and occasions, enhancing both the functionality and ambiance of your kitchen.
Dimmer Switches and Controllers
Dimmer switches and controllers offer a straightforward way to adjust the brightness of your LED strip lights. Using a dimmer, you can create the perfect lighting level for various activities, from food preparation to entertaining guests. Dimming capability also helps in prolonging the lifespan of your LED strips by reducing the energy consumption when full brightness is not required.
Smart Home Integration
Integrating your LED strip lights with smart home systems opens up a world of convenience and advanced control. You can control your lights remotely using your smartphone or through voice commands with assistants like Alexa or Google Home. This integration allows for customised lighting scenes and schedules, enhancing your home’s automation and energy efficiency.
Remote Control Options
Remote controls provide a convenient way to adjust your LED strip lights without needing to access a wall switch. Options include IR, RF, and Bluetooth remotes, each with its own range and functionality benefits. For instance, the Touch RF Remote Controller allows you to choose your favourite colour temperature using radio frequency. When selecting a remote, consider factors like battery life and the ability to programme presets or scenes.
| Control Method | Key Features | Benefits |
|---|---|---|
| Dimmer Switches | Brightness adjustment | Energy saving, prolonged LED lifespan |
| Smart Home Integration | Remote access, voice control, custom scenes | Convenience, enhanced automation |
| Remote Controls | IR, RF, Bluetooth options, programmable presets | Flexibility, ease of use |

Conclusion
By following this comprehensive guide, you’re now equipped to enhance your kitchen with under-cabinet LED lighting. You’ve learned how to plan, select the right LED strips, and install them effectively. This DIY project not only improves task lighting but also adds to your kitchen’s ambience and value. Remember to follow safety guidelines when working with electrical components. With proper installation and maintenance, your under-cabinet LED lighting will provide long-lasting performance.