Are you tired of cluttered workshops and homes with limited storage capacity? You’re not alone. Many of us struggle to keep our tools, supplies, and equipment organised, leading to inefficiency and wasted time. French cleat wall storage systems offer a versatile and efficient solution to this common problem.
A French cleat system provides a flexible, modular storage solution that can be easily reconfigured as your needs change. This approach is not only cost-effective compared to pre-made storage solutions but also highly adaptable for organising various items in workshops, garages, and even living spaces.
By implementing a French cleat wall, you can maximise your space and keep your belongings organised. In this comprehensive guide, we’ll walk you through everything you need to know about planning, building, and customising your French cleat wall storage system.
Key Takeaways
- Efficiently maximise your workshop or home storage space with a French cleat system.
- Benefit from a flexible, modular storage solution that adapts to your changing needs.
- Enjoy a cost-effective alternative to pre-made storage solutions.
- Organise your tools, supplies, and equipment with ease in various settings.
- Discover a comprehensive guide to planning, building, and customising your French cleat wall storage.
Understanding French Cleat Systems
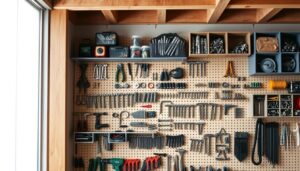
To maximise your workspace, understanding the French cleat system is crucial. A French cleat system is a wall-mounted storage solution that utilises near-flat vertical lengths of timber with a 45-degree angle cut. These angled cuts are used to hook on accessories that have a compatible 45-degree hook attached, allowing you to tidy your workspace and organise your tools effectively.
What Is a French Cleat System?
A French cleat system is defined by its use of angled wooden strips that interlock to create secure hanging points on a wall. The mechanics of the 45-degree angle cuts create a secure, gravity-assisted locking mechanism, ensuring that your storage accessories remain firmly in place.
Benefits of French Cleat Storage
The French cleat system offers several benefits, including its modular nature, which allows for easy rearrangement without tools. It also boasts a high weight-bearing capacity and stability when properly installed. Additionally, the system’s versatility and expandability make it superior to fixed shelving or pegboard systems.
| Feature | Description | Benefit |
|---|---|---|
| Modular Design | Easily rearrange storage without tools | Flexibility in organising your workspace |
| Weight-bearing Capacity | High stability when properly installed | Secure storage for heavy tools and equipment |
| Versatility | Adaptable to various storage needs | Expandable storage solution |
Planning Your French Cleat Wall
To maximize the potential of your French cleat wall, thorough planning is crucial. This involves understanding your available space and deciding how to utilize it effectively.
Measuring Your Available Space
Start by measuring the dimensions of your wall space accurately. Consider the height, width, and any obstacles such as electrical outlets or windows. Accurate measurements will help you determine the size and number of cleats you can accommodate.
Determining Cleat Spacing
The spacing between cleats typically ranges from 6 to 8 inches, depending on the types of tools and storage accessories you plan to use. Consider the weight and size of the items to be stored when deciding on the spacing. Proper spacing ensures that your tools are organized and easily accessible.
Sketching Your Layout
Sketch a preliminary layout that organizes your tools by frequency of use, placing the most-used items at eye level. Consider creating zones for different categories of tools or activities to improve workflow efficiency. Leave some empty cleats or space for future expansion to keep your system flexible.
Essential Tools for Building French Cleat Storage

The right tools are crucial for constructing a functional French cleat storage system. Having the appropriate equipment not only makes the process easier but also ensures a professional finish.
Power Tools
For building French cleat storage, you’ll need several key power tools. A table saw or circular saw is essential for making precise 45-degree cuts. A reliable drill with appropriate bits is necessary for creating pilot holes and fastening cleats to the wall. Optional power tools like a brad nailer, mitre saw, and sander can enhance the project’s quality and efficiency.
Hand Tools and Measuring Equipment
In addition to power tools, several hand tools are vital for the project. A measuring tape, carpenter’s square, and level ensure accurate layout and installation. Don’t forget a pencil for marking measurements. Safety equipment, including eye protection, hearing protection, and dust masks, is also crucial.
For those without access to all power tools, alternatives are available. For instance, a circular saw with a guide can substitute for a table saw, making the project more accessible to DIYers.
Materials Needed for Your Project

When building a French cleat wall storage system, selecting the right materials is crucial for durability and functionality. You will need plywood as the primary building material for both the cleats and storage accessories.
Choosing the Right Plywood
For a sturdy French cleat system, consider using hardwood plywood for its strength, stability, and resistance to warping. You will need 3-4 sheets of 4’x8′ plywood, mixing 1/2″ and 3/4″ thickness to accommodate different components.
Fasteners and Adhesives
In addition to wood for the plywood, you’ll require various fasteners and adhesives. This includes 1″ brad nails, 1 1/4″ screws, and quality wood glue to reinforce joinery. If necessary, use wall anchors to secure the cleats to the wall.
Preparing Your Wall Surface
To ensure your French cleat system functions correctly, wall preparation is key. A straight and true wall surface is essential for the system to work effectively.
Assessing Wall Structure
You need to assess your wall’s structure to determine its suitability for a French cleat system. Check if the wall is level, plumb, and structurally sound. Locate the wall studs to ensure secure mounting of the cleats. Different wall materials, such as drywall, concrete, or brick, require different fasteners.
Installing Backing Boards (If Necessary)
If your walls are uneven, consider installing a backing board or furring strips to create a flat mounting surface. Use matching plywood or large sheet timber for a uniform look. This step is crucial for ensuring that your French cleat system hangs properly and remains level.

Cutting and Creating Your French Cleats
Cutting your French cleats to the right size is the first step in setting up your wall storage. To achieve this, you’ll need to make precise cuts using a table saw or circular saw.
Setting Up for Precise 45-Degree Cuts
To make the 45-degree cuts required for French cleats, you’ll need to adjust your table saw blade accordingly. Ensure the blade is set to 45 degrees and securely locked in place to avoid any inaccuracies during the cutting process.
Ripping Plywood Strips
Begin by ripping the plywood into strips that are twice their final width using a 90-degree blade. Then, tilt the table saw blade to 45 degrees and rip the strips down the center to form two French cleat strips. The final size should be roughly 2½” wide by 48″ long.
| Cutting Step | Blade Angle | Strip Width |
|---|---|---|
| Initial Cut | 90 degrees | Twice the final width |
| Final Cut | 45 degrees | Roughly 2½” |
Sanding and Finishing Cleats
After cutting, sand all edges of the cleats to prevent splinters and achieve a professional finish. It’s advisable to batch process all cleats at once to ensure consistency in size and angle across the entire system.
Mounting the French Cleat System to Your Wall
Attaching your French cleat system to the wall is the crucial step that will provide the foundation for your storage. To begin, you need to locate the wall studs to ensure a secure attachment.
Finding Wall Studs
You can use a stud finder or the traditional knock test method to identify the wall studs. Mark the stud locations with a pencil to guide your screw placement. This step is essential for securing the cleats firmly to the wall.
Proper Spacing Techniques
To achieve optimal spacing, mark a line every 6 inches along the wall, starting from the top. This will help you align your French cleat strips accurately. Use a drywall square to ensure the strips are square during attachment.
Securing Cleats to the Wall
Use glue and 1″ brad nails to attach the cleats to the panel. For added security, use screws that penetrate into the wall studs. For concrete walls, consider using Tapcon concrete anchors to place the cleats securely.
| Wall Type | Recommended Fasteners |
|---|---|
| Drywall | Screws into studs |
| Concrete | Tapcon concrete anchors |
| Brick or Metal Studs | Specialised anchors or screws |
Designing French Cleat Wall Storage for Maximum Efficiency
A thoughtfully designed French cleat wall can significantly enhance your workshop’s efficiency. By organising your tools and storage in a logical and accessible manner, you can streamline your workflow and reduce time spent searching for necessary tools.

Organising by Tool Type
Grouping similar tools together is a fundamental principle of efficient workshop organisation. By categorising your tools, such as cutting tools, measuring tools, and fastening tools, you can improve your workflow and reduce the time spent searching for specific tools. This approach also makes it easier to identify when a tool is missing or needs maintenance.
Creating Zones for Different Activities
Creating dedicated zones on your French cleat wall for different activities or tool categories can further enhance your workshop’s efficiency. For example, you might designate a zone for cutting tools, another for measuring tools, and a third for fastening tools. This zoning strategy helps to minimise movement around the workshop and maximises productivity.
Planning for Future Expansion
When designing your French cleat wall storage, it’s essential to plan for future expansion. Leaving some empty space on your wall allows you to add new tools or storage solutions as your needs evolve. Consider the vertical space available and how you can utilise it effectively with storage accessories. This forward-thinking approach ensures your workshop remains organised and adaptable.
By implementing these strategies, you can create a French cleat wall storage system that is not only efficient but also ergonomically friendly, reducing strain and improving overall workshop efficiency.
Building Custom Tool Holders
To keep your tools organised and within reach, building custom tool holders is essential. This not only enhances the functionality of your French cleat wall storage but also ensures that your tools are stored safely and efficiently.
Simple Solutions for Hand Tools
For hand tools like screwdrivers and chisels, you can create simple yet effective holders. Drill a series of holes in scrap pieces of plywood to fit your tools snugly. Then, attach two French cleat offcuts to the back of the plywood, ensuring they are angled to match your wall cleats. The extra strip of ½” plywood adds stability to the tool holders, making them more durable.
Sturdy Holders for Power Tools
When it comes to power tools such as drills and sanders, you’ll need to design holders that can support their weight. Use sturdy materials and consider the frequency of use when designing these holders. Attaching a backing cleat to each holder and angling it to match your wall cleats will provide additional support.
Specialised Storage for Unique Tools
For tools with unusual shapes or sizes, you may need to create specialised storage solutions. Assess the tool’s dimensions and design a holder that fits it perfectly. Using scrap materials efficiently can help you create these custom holders without incurring additional expenses.
By considering the weight and frequency of use of your tools, you can design tool holders that are both practical and durable. This approach ensures that your French cleat system remains organised and functional, supporting your projects effectively.
Creating a French Cleat Clamp Rack
To maximise your workshop’s storage capacity, creating a French cleat clamp rack is an essential project. This will help you keep your clamps organised and within easy reach.
When designing your clamp rack, you’ll need to create angled support wedges that will hold your clamps in place. To do this, cut a series of wedges using a crosscut sled on the table saw. These wedges will attach to the back panel of the clamp rack and will support the clamps.
Designing Support Wedges
The support wedges are crucial in holding your clamps at the correct angle. To ensure that your clamps are properly supported, you need to design the wedges carefully. Cut the support pieces that will ensure the clamps are spaced correctly, allowing for easy access and removal.
- Cut the wedges using a crosscut sled on the table saw.
- Attach the wedges to the back panel using wood glue and 1″ brad nails.
- Reinforce the attachment with 1¼” screws.
Assembling the Clamp Rack
To assemble the clamp rack, start by attaching the support pieces to the back panel. Use wood glue and 1″ brad nails to secure them in place. Then, reinforce the attachment with 1¼” screws. Verify that the spacing between the clamps is correct, allowing them to slide on and off easily.
Finally, attach a strip of French cleat to the back of the rack using glue, brad nails, and screws. This will enable you to mount the clamp rack securely to your wall, keeping your clamps organised and within reach.
Building Storage Boxes and Shelves
With a French cleat system in place, constructing storage boxes and shelves becomes a simple and rewarding task. You can create custom storage solutions that fit your specific needs, enhancing your workshop’s organisation and efficiency.
Basic Box Construction
To build basic storage boxes, start by cutting 3/4″ plywood into the required dimensions. Assemble the pieces using both glue and screws for added stability. Ensure that the corners are secure and the box is sturdy enough to hold its intended contents.
Attaching Cleats to Storage Units
Once your storage box is assembled, attach a cleat to the back to enable it to be mounted on the French cleat system. Use screws to secure the cleat firmly in place. Make sure the cleat is properly aligned with the French cleat on the wall to ensure a snug fit.
For heavier items, consider reinforcing your storage boxes with additional supports or using thicker plywood. You can also add adjustable shelving within the boxes to maximise versatility. Finishing the boxes with a protective coat can enhance their durability and appearance.
Creative Applications Beyond the Workshop
French cleat storage isn’t just for workshops; it’s versatile enough for any room in your home. The system’s adaptability makes it an excellent choice for various living spaces where storage and aesthetics are both important.
French Cleats in Living Spaces
You can easily integrate French cleats into your living areas, such as kitchens, home offices, or craft rooms, to create a functional and stylish storage solution. For instance, in a kitchen, French cleats can be used to hang utensils, pots, and pans, keeping them within easy reach while cooking. In a home office, they can store office supplies, keeping your workspace organized.
Adapting the System for Different Rooms
To adapt the French cleat system for different rooms, consider the specific storage needs of each space. For example, in a laundry room, you might use French cleats to hang cleaning supplies or ironing boards. In a living room, you could use them to create a display area for decorative items or to hang plants. The key is to assess the room’s needs and design your French cleat system accordingly.
When adapting the system, you should also consider the aesthetic appeal. You can paint or stain the cleats to match the room’s décor, or add decorative facing to enhance their appearance. This flexibility allows you to integrate French cleat storage seamlessly into your home’s design.
By incorporating French cleats into your living spaces, you not only gain additional storage but also create a unique and functional element that can be tailored to your needs.
Conclusion
By implementing a French cleat wall storage system, you’re taking a significant step towards a more organised space. This versatile system not only maximises your available wall space but also keeps your tools and supplies organised and accessible, making it ideal for your shop or home.
The key benefits of a French cleat system include its flexibility and adaptability, allowing you to adjust your storage configuration as your needs and tool collection evolve. If you’re hesitant about committing to a full system, consider starting with a small section of wall. You can learn more about the advantages of similar systems, such as Z-bar hanging systems, to further enhance your storage solutions.
Having a well-organised shop space not only brings satisfaction but also significantly improves efficiency. As you document the process of building and using your French cleat system, you’ll be able to track the improvements in your workshop organisation over time. Consider how your newly organised space will enhance your productivity and enjoyment of projects.