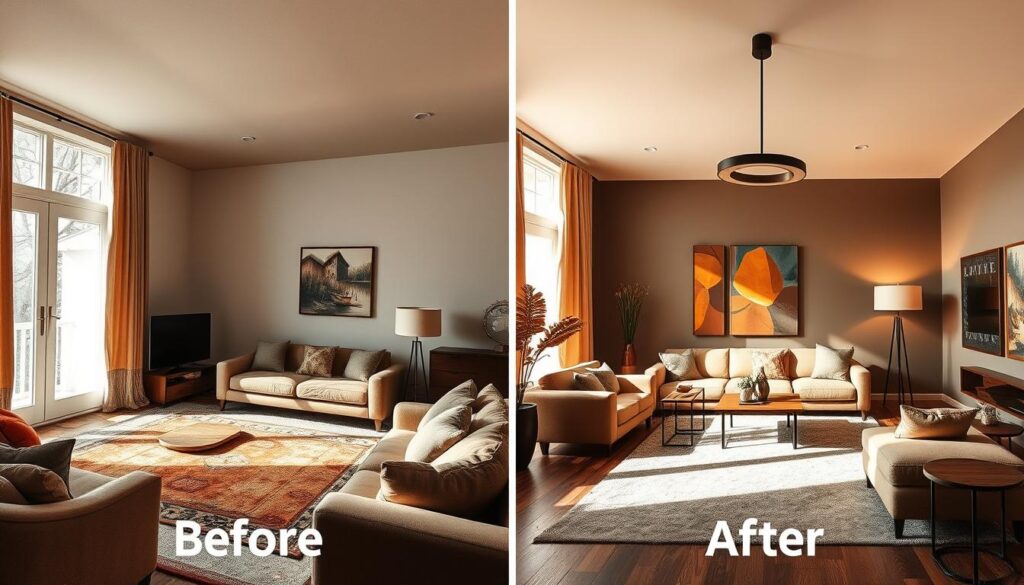
Can a single image convey the full extent of your work’s impact? For many professionals, the answer lies in before-and-after project photos, a powerful tool for showcasing transformations and demonstrating value.
Imagine being able to visually tell the story of a project’s success, from the initial state to the final result, highlighting the changes and improvements made along the way.
This comprehensive guide will walk you through the process of capturing compelling transformation images, from basic smartphone photography to more advanced techniques using professional equipment.
Key Takeaways
- Learn how to capture impactful before-and-after photos that showcase your work effectively.
- Understand the importance of before-and-after photography for businesses and professionals.
- Discover the equipment and techniques required to create professional-looking comparison photos.
- Find out how to build trust and demonstrate value through visual storytelling.
- Gain the knowledge to create compelling transformation images regardless of your photography experience.
The Power of Before-and-After Photography
The use of before-and-after photos is revolutionizing the way businesses demonstrate their work and impact. By showcasing dramatic transformations, companies can effectively communicate the value they bring to their clients. This powerful visual storytelling tool is being adopted across various industries, from home renovation and fitness training to beauty treatments and product marketing.
Why Transformation Photos Matter
Transformation photos serve as compelling visual evidence that instantly conveys the impact of your work. These images tap into the human brain’s preference for visual information, making your results more memorable and compelling than text descriptions alone. In today’s digital marketplace, visual content is increasingly important for standing out on social media platforms and websites.
As noted by industry experts, “Before-and-after photos create an emotional connection with viewers by showing tangible progress and positive change.” This emotional resonance is particularly effective for services like home renovation, fitness training, or beauty treatments, where the transformation is not just about aesthetics but also about improving the quality of life.
Building Trust and Credibility with Visual Evidence
Before-and-after images build credibility by providing visual proof of your capabilities and the effectiveness of your products or services. The contrast between the starting point and end result creates a narrative that potential clients can envision for their own projects or transformations. As a result, well-executed before-and-after photos can significantly increase engagement rates on social media and conversion rates on websites.
By leveraging before-and-after photography, businesses can tell a compelling story that showcases their work and demonstrates the difference they can make. This visual guide helps potential clients understand the value proposition, fostering trust and credibility in the process.
Essential Equipment for Creating Before-and-After Photos
Creating stunning before-and-after photos requires more than just a good eye; it demands the right tools. The equipment you choose can significantly impact the quality of your images, making it essential to select the right device for your needs.
Smartphone vs. Professional Camera Options
When deciding on equipment, one of the primary considerations is whether to use a smartphone or a professional camera. Modern smartphones are capable of producing excellent results, thanks to advancements in camera technology. However, professional cameras offer more manual controls and better image quality, especially in challenging lighting conditions.
The key differences between smartphone and professional camera options include sensor size, lens quality, manual controls, and image processing capabilities. While smartphones are convenient and often sufficient for many projects, professional cameras provide more flexibility and better results in certain situations.
| Feature | Smartphone | Professional Camera |
|---|---|---|
| Sensor Size | Smaller | Larger |
| Lens Quality | Good | Excellent |
| Manual Controls | Limited | Extensive |
Helpful Accessories to Improve Your Photos
Regardless of whether you choose a smartphone or a professional camera, there are several accessories that can enhance your before-and-after photos. These include tripods for stability, external lighting solutions, lens cleaning supplies, and remote triggers.
For smartphone photographers, consider investing in clip-on lenses that can provide wide-angle or macro capabilities. Additional helpful accessories include colour calibration cards, measuring tools for consistent framing, and portable backdrops for smaller projects.
By choosing the right equipment and accessories, you can significantly improve the quality of your before-and-after photos, making them more impactful and effective in showcasing your work.
Planning Your Before-and-After Photo Shoot
A well-planned photo shoot is the foundation of creating before-and-after images that captivate your audience. To make sure your photos are effective, you need to plan carefully, considering several key factors that will enhance the impact of your images.
Setting Clear Objectives
Effective before-and-after photography begins with clearly defined objectives that align with what you’re trying to demonstrate about your project or transformation. You should identify the key changes or improvements you want to highlight and determine the best angles and perspectives to showcase these changes. This will help you create a compelling narrative that engages your audience.
Creating a Shot List and Timeline
Creating a detailed shot list ensures you capture all necessary “before” images that will pair effectively with your “after” shots. Your timeline should account for the complete project duration, with specific photo sessions scheduled at strategic points. Consider whether you need to document intermediate stages of the project, which can be valuable for showing the process and not just the end result.
| Planning Aspect | Description | Importance |
|---|---|---|
| Clear Objectives | Define what you want to demonstrate through your before-and-after photos. | High |
| Shot List | Create a list of shots you need to capture, including “before,” “during,” and “after” images. | High |
| Timeline | Schedule photo sessions at strategic points throughout your project. | Medium |
| Consistent Lighting | Ensure lighting is consistent across all photos to make comparisons valid. | High |
By following these simple steps and considering the key aspects of planning, you can create a guide for your before-and-after photo shoot that yields high-quality, impactful images.
Preparing the Subject or Space
When it comes to creating compelling before-and-after photos, the preparation of your subject or space is paramount. Proper preparation ensures that the transformation is accurately represented, making the comparison between the before and after states meaningful and impactful.

Cleaning and Staging Tips
To capture a great photo, you need to make sure your subject or space is clean and well-staged. For spaces like rooms or landscapes, decide whether to show them “as is” in the before photos or to remove clutter that might distract from the core elements being transformed. Cleaning both the subject and the surrounding area is important, but avoid over-cleaning the “before” state unless that’s part of your normal preparation process.
- Consider what elements should remain consistent between before and after shots to provide reference points.
- For product transformations, use consistent backgrounds or surfaces.
- When photographing people, provide clear guidance on clothing, positioning, and expression.
What to Remove vs. What to Keep in Frame
Strategic staging can help emphasise the transformation without misrepresenting the actual changes. To achieve this, consider what to remove and what to keep in frame. For a home renovation project, for instance, you might want to keep certain elements consistent to highlight the transformation effectively.
| Element | Before | After |
|---|---|---|
| Clutter | Leave as is or remove distracting elements | Minimize to showcase changes |
| Background | Use a consistent background | Maintain the same background for comparison |
| Lighting | Natural or artificial, be consistent | Match the before shot’s lighting |
By following this guide and paying attention to these details, you can create before-and-after photos that tell a compelling story of transformation.
Mastering Lighting for Consistent Results
The right lighting can elevate your before-and-after comparisons, making them more engaging and effective. To achieve this, you need to understand how to work with different light sources to produce consistent results.
Working with Natural Light
Natural light provides a soft, flattering illumination that works well for many subjects. However, it varies throughout the day and with weather conditions, requiring careful planning. To get the best out of natural light, aim to photograph at the same time of day for both before and after shots, ideally during the “golden hours” shortly after sunrise or before sunset.
For indoor spaces, understand how light enters the room and how it interacts with surfaces to create the most flattering and consistent illumination. The best time to snap those pics is on a sunny afternoon when natural light is your best buddy.
Artificial Lighting Techniques
When natural light is not available, artificial lighting gives you more control over the lighting conditions. However, it requires an understanding of basic lighting principles, including direction, diffusion, and colour temperature. Simple artificial lighting setups using affordable LED panels or ring lights can dramatically improve the quality of your before-and-after photos.
To achieve consistent results, document your lighting setup for “before” photos so you can precisely replicate it for the “after” shots, including light positions, power settings, and diffusion methods. Avoid mixed lighting sources with different colour temperatures, which can create unnatural colour casts that are difficult to correct.
By mastering both natural and artificial lighting techniques, you can create high-quality before-and-after comparisons that showcase your work in the best possible light, ultimately leading to best results.
Capturing the Perfect “Before” Photos
To create a compelling before-and-after comparison, capturing the perfect ‘before’ photo is crucial. This foundational image sets the stage for showcasing your work or transformation.
As part of this comprehensive guide, we’ll explore the best practices for documenting your starting point effectively. “Before” photos are the foundation of your comparison and deserve as much attention and care as your “after” images.
Documenting the Starting Point Effectively
Documenting the initial state thoroughly is vital. This involves capturing both overview shots and detailed close-ups of areas that will undergo significant changes. Take more “before” photos than you think you’ll need, from multiple angles and distances, to ensure comprehensive documentation.
Consider creating a systematic approach to your “before” photography, perhaps moving clockwise around a space or subject to ensure complete coverage. As the saying goes, “A picture is worth a thousand words,” and in the context of before-and-after comparisons, it’s worth even more.
“The right photograph can tell a story that words cannot.”
Taking Multiple Angles and Perspectives
Taking multiple photos from various viewpoints is essential. This approach helps in capturing the full scope of the project or transformation. For renovation or makeover projects, ensure you capture any problem areas or features that will be specifically addressed in the transformation, aiming for that perfect shot.
By following this guide and taking the time to capture high-quality “before” photos, you’ll be able to showcase your work effectively, building credibility with your audience.
Maintaining Consistency Between Shots
To create impactful before-and-after photos, maintaining consistency between shots is crucial. This consistency ensures that the comparison between the “before” and “after” states is fair and clearly demonstrates the transformation.
Using Reference Points and Markers
Using fixed reference points in your composition helps ensure that your framing remains consistent. You can use static objects like a room corner or a window as reference points. Most phone cameras have a grid setting that you can use to line up your shots, making it easier to maintain the same angle and perspective for both photos. For spaces undergoing significant changes, identify multiple reference points that will remain unchanged.
- Use architectural features or permanent fixtures as reference points.
- Consider using physical markers or measurements to record exact camera positions.
- Grid overlays in your camera app or viewfinder can help align key elements consistently.
Camera Position and Settings
Maintaining consistent camera settings is vital for ensuring that your “before” and “after” images have similar depth of field and exposure characteristics. This includes keeping the focal length, aperture, and ISO consistent. When photographing people, use consistent posing guidance, including foot position, posture, and facial expression, to ensure a fair comparison.
- Document camera height, distance from the subject, and angle of view for “before” shots to replicate them for “after” images.
- Maintain consistent camera settings for both shots.
- Use consistent posing guidance when photographing people for before-and-after comparisons.
By following these guidelines, you can create before-and-after photos that effectively showcase transformations and are visually compelling, making your photos look professional and engaging.
Creating Before-and-After Project Photos That Tell a Story

Effective before-and-after photos go beyond mere documentation, aiming to captivate the viewer with a visual narrative of transformation. To achieve this, you need to focus on telling a story that highlights the most significant changes and improvements in your project.
Highlighting the Most Dramatic Changes
To create compelling before-and-after photos, identify and highlight the most dramatic or impressive changes in your project. Ensure these elements are prominently featured in your comparison images. Use composition techniques to draw the viewer’s eye to the most significant changes or improvements in your “after” photos. For complex projects, consider including explanatory elements or focusing on specific aspects in separate comparison sets to tell a more complete story.
Capturing Details That Showcase Your Work
Capturing details that showcase your craftsmanship, technique, or the quality of materials used in the transformation is crucial. Consider creating a series of before-and-after comparisons that guide viewers through the transformation journey, perhaps moving from overview shots to specific details. You can utilise tools like the free construction before-after photo maker to enhance your comparison images.
Remember, the most effective before-and-after photos create an emotional response by showing not just physical changes but improvements in functionality, atmosphere, or quality. When appropriate, include human elements or context that helps viewers understand how the transformation impacts real-world use or enjoyment of the subject.
Essential Photo Editing Techniques
Now that you’ve captured your before-and-after photos, it’s time to refine them through photo editing. Effective editing can make a significant difference in showcasing your transformation photos. To achieve professional-looking results, it’s crucial to understand the basics of photo editing and how to maintain consistency between your before and after images.

Basic Adjustments for Better Results
Basic adjustments are fundamental in enhancing the quality of your comparison photos. Start by correcting exposure, adjusting white balance, and straightening images. These simple tweaks can significantly improve the overall appearance of your images without compromising their authenticity. Additionally, learn to use cropping effectively to focus attention on the transformation while maintaining consistent framing between before and after photos.
- Correct exposure to balance light and dark areas
- Adjust white balance to ensure accurate colours
- Straighten images to maintain a level horizon
- Crop effectively to highlight the transformation
Maintaining Authenticity in Your Edits
Maintaining authenticity is crucial when editing your before-and-after photos. It’s essential to differentiate between corrective editing, which fixes technical issues, and enhancement editing, which improves appearance beyond reality. Apply identical editing adjustments to both before and after photos to maintain a fair and accurate comparison. Consider using batch editing features to apply consistent adjustments across multiple images, ensuring a cohesive look.
| Editing Technique | Description | Benefit |
|---|---|---|
| Exposure Correction | Adjusts image brightness | Enhances overall image quality |
| White Balance Adjustment | Corrects colour temperature | Ensures accurate colour representation |
| Cropping | Frames the subject | Focuses attention on the transformation |
By mastering these photo editing techniques and maintaining authenticity, you can create compelling before-and-after comparisons that effectively showcase your work. Remember, the goal is to enhance your photos, not misrepresent them.
Tools and Apps for Creating Before-and-After Comparisons
To effectively convey the magnitude of a transformation, you need the appropriate tools and apps for before-and-after comparisons. The right software can make a significant difference in how your message is received, whether you’re showcasing a home renovation, a fitness transformation, or any other kind of change.

Free Photo Collage Options
For those on a budget or with simple needs, free photo collage options are available. Tools like insMind’s Photo Collage Maker offer user-friendly interfaces that require no design skills to create basic side-by-side comparisons. These tools are perfect for small projects or personal use.
Professional Software Solutions
For more sophisticated needs, professional software solutions like Adobe Photoshop are available. These offer advanced features for precise alignment, sophisticated layouts, and high-quality output suitable for commercial use. When choosing professional software, consider factors such as watermarking, text overlay capabilities, and interactive slider effects.
A wide range of tools and applications are available for creating before-and-after comparisons, catering to different needs and skill levels. From simple free online tools to sophisticated professional software, you can choose the one that best fits your project’s requirements. Mobile apps dedicated to before-and-after photography provide convenient options for creating comparisons directly on your smartphone or tablet.
When selecting tools and apps, evaluate them based on their learning curve, output quality, sharing capabilities, and compatibility with your existing workflow. Some industry-specific software includes specialised before-and-after comparison tools tailored to particular fields like interior design or cosmetic procedures.
Side-by-Side vs. Slider Formats
When presenting before-and-after photos, you have two primary options: side-by-side comparisons and slider formats. Each has its advantages and is suited to different purposes and platforms.
The choice between these formats depends on your specific needs and where you plan to display your photos. For instance, side-by-side comparisons are simple and work well across all platforms, including print media and static digital displays.
Choosing the Right Presentation Style
When deciding on a presentation style, consider your distribution channels. Social media platforms, websites, client presentations, and print materials may each benefit from different approaches. Side-by-side formats excel at showing the complete before and after states simultaneously, while sliders are particularly effective at highlighting precise alignment between images.
For websites, interactive before-and-after sliders can increase engagement and time spent on page, potentially improving SEO metrics. Some presentation formats work better for specific types of transformations; for example, sliders are particularly effective for renovations photographed from identical positions.
| Format | Advantages | Best for |
|---|---|---|
| Side-by-Side | Simple, works across all platforms | Print media, static digital displays |
| Slider | Engaging, highlights precise alignment | Websites, dynamic transformations |
Creating Interactive Before-and-After Displays
To create an interactive before-and-after display using a slider format, you can follow a few simple steps. First, ensure you have before and after photos taken from the same spot. Then, use a tool that allows you to align the after photo to match the before photo, crop if necessary, and adjust the slider.
Advanced options include animated transitions, multi-image sequences showing process steps, and split-screen videos that can be particularly effective for dynamic transformations. By choosing the right presentation style and creating interactive displays, you can effectively showcase your transform photos and engage your audience.
Adding Text and Branding to Your Comparisons
Enhancing your before-and-after comparisons with strategic text additions and branding can elevate your visual storytelling. This approach not only provides context but also highlights specific improvements and reinforces your brand identity.
Effective Labelling Techniques
When it comes to labelling your before-and-after photos, simplicity is key. Use clear and concise labels such as “Before” and “After” to guide the viewer’s attention. Consider adding brief descriptive text that highlights key aspects of the transformation, such as “Kitchen Renovation: 3-Week Project” or “6-Month Fitness Journey”.
- Use clear and concise labels like “Before” and “After”
- Add brief descriptive text to highlight key transformation aspects
Incorporating Your Business Identity
Your business branding should be incorporated consistently but subtly, typically through logos, colour schemes, and typography that align with your overall brand identity. Watermarking can help protect your images from unauthorised use while promoting your business. Ensure that your branding is not overwhelming, as this can detract from the visual impact of your transformation photos.
| Branding Element | Purpose | Best Practice |
|---|---|---|
| Logo | Identify your business | Use discreetly in a corner |
| Colour Scheme | Reinforce brand identity | Match your brand colours |
| Typography | Enhance readability | Choose clear, brand-consistent fonts |
Industry-Specific Tips for Before-and-After Photos
Creating before-and-after photos that resonate with your audience requires industry-specific techniques. Different sectors have unique requirements for showcasing transformations effectively. Understanding these nuances can significantly enhance the impact of your visual comparisons.
Home Renovation and Construction Projects
For home renovation and construction projects, capturing the same wide angles is crucial to demonstrate spatial transformations. It’s also essential to document specific feature improvements in detail. Maximising natural light consistently in both before and after shots accurately represents the space. Consider using reference points and markers to ensure consistency between shots.
| Aspect | Before | After |
|---|---|---|
| Lighting | Natural light maximised | Natural light maximised |
| Angles | Wide angles captured | Wide angles captured |
| Details | Specific features documented | Specific features documented |
Fitness and Weight Loss Transformations
Fitness and weight loss transformations benefit from consistent posing, similar clothing, and neutral backgrounds that don’t distract from physical changes. When photographing people for fitness comparisons, consider factors like time of day, hydration levels, and lighting direction to ensure fair and accurate representation. Consistency is key to showcasing progress effectively.
Beauty and Skincare Results
Beauty and skincare before-and-after photos require extremely consistent close-up techniques, with particular attention to lighting that reveals texture changes without creating misleading shadows. Using standardised timeframes for comparisons can help demonstrate the effectiveness of skincare routines or treatments. High-quality images are essential for showcasing subtle changes in skin tone, acne, wrinkles, or hydration.
By tailoring your before-and-after photo approach to your specific industry, you can create more compelling visual comparisons that resonate with your target audience.
Conclusion
With the knowledge gained from this guide, you’re now equipped to produce high-quality before-and-after photos that captivate your audience. Creating effective project photos is a valuable skill that can significantly enhance your marketing efforts, client communications, and portfolio presentations.
To achieve this, it’s essential to pay attention to detail at every stage, from planning and equipment selection to consistent photography techniques and thoughtful presentation. As you develop your before-and-after photography skills, you’ll likely develop a personal style and workflow that works best for your specific industry and project types.
The key points to remember are:
- Plan your photo shoot carefully, setting clear objectives and creating a shot list and timeline.
- Use consistent photography techniques to maintain authenticity in your images.
- Present your before-and-after photos in a way that tells a compelling visual story about the transformation you’ve achieved.
By mastering before-and-after photography, you’ll improve client trust, increase engagement, and enhance your marketing efforts. Consider creating templates or checklists based on this guide to streamline your process for future projects and ensure consistent quality. With practice, your skills will continue to improve, becoming a valuable asset for your business or personal brand, and a great addition to your website.
Remember, authenticity builds long-term credibility—focus on showcasing real transformations rather than creating misleading comparisons. By doing so, you’ll be able to effectively showcase your work in a compelling way that resonates with your audience.