Are you tired of dealing with damp issues in your cellar? Do you struggle to create a dry and usable basement space in your home? If so, you’re not alone. Many homeowners in the UK face the same problem, and it’s often due to dampness seeping into the walls.
The good news is that there’s a solution. By identifying the underlying causes of dampness and using the right treatments, you can create a dry and comfortable space. One effective way to do this is by applying a specialised damp-proof coating to your cellar walls.
Key Takeaways
- Understand the causes of dampness in your cellar
- Learn how to identify the type of damp affecting your walls
- Discover the importance of preparing your walls before applying a damp-proof coating
- Find out how to choose the right materials for the job
- Understand the benefits of using a damp-proof coating to prevent moisture ingress
Understanding Damp-Proofing for Cellar Walls
Understanding the causes and types of dampness affecting cellar walls is essential for effective damp-proofing. Your cellar’s below-ground location makes it particularly vulnerable to moisture-related issues.
Why Cellars Are Prone to Dampness
Cellars are more susceptible to dampness due to their subterranean location, where they’re constantly exposed to soil moisture and groundwater pressure. This environment can lead to various damp-related problems, including peeling paint, mould, and mildew.
Types of Damp Problems in Cellars
There are three primary types of damp problems that can affect your cellar walls: rising damp, penetrating damp, and condensation. Understanding the specific type of damp issue you’re dealing with is crucial for selecting the right treatment approach.
Rising Damp
Rising damp occurs when moisture travels upward from the ground into your cellar walls. This typically happens in the absence of an effective damp-proof course (DPC) or when the DPC is compromised.
Penetrating Damp
Penetrating damp is caused by water entering your cellar from outside, often due to issues like leaking guttering or defective cavity wall insulation. It’s essential to identify and address the source of the water ingress.
Condensation
Condensation happens when moist air comes into contact with cold surfaces, leading to water accumulation on your cellar walls. Improving ventilation is key to mitigating condensation-related dampness.
The Role of Damp-Proof Paint
Damp-proof paint acts as a moisture barrier on masonry surfaces, creating a waterproof membrane that prevents water penetration while allowing some degree of breathability. However, it’s crucial to address the underlying causes of dampness before applying such paint.
By understanding the causes of dampness and the role of damp-proof paint, you can take the first steps towards effectively damp-proofing your cellar walls and ensuring a drier, healthier space.
Essential Materials and Tools for the Job
Before you start painting your cellar walls with damp-proof paint, it’s essential to gather the necessary materials and tools. This preparation will ensure a successful damp-proofing project.
Choosing the Right Damp-Proof Paint
Selecting the appropriate damp-proof paint is crucial. At Permagard, we recommend PermaSEAL Damp Proof Paint, a product designed for various surfaces, including cement, brick, plaster, and concrete. This paint is flexible, UV light, and abrasion resistant.

Additional Tools and Materials Needed
Apart from the right damp-proof paint, you’ll need various tools for surface preparation and application. Ensuring you have these on hand will make the process smoother.
Surface Preparation Tools
For preparing the surface, you’ll need wire brushes to remove dirt and debris, scrapers for old paint or coatings, sandpaper for smoothing out the surface, and cleaning solutions to ensure the wall is clean and dry.
Application Tools
For applying the damp-proof paint, use brushes for cutting in and detailed work, rollers for larger areas, trays to hold the paint, extension poles to reach high areas, and protective equipment like gloves and masks.
By choosing the right damp-proof paint and having the necessary tools, you’ll be well-prepared to tackle your damp-proofing project effectively.
How to Apply Damp-Proof Paint on Cellar Walls
Before you start applying damp-proof paint to your cellar walls, it’s essential to understand the process involved. This will ensure that you achieve the best results and effectively protect your cellar from dampness. Proper application is crucial for the longevity of the paint and the overall health of your cellar.
Assessing and Addressing Underlying Damp Issues
To begin, you must assess your cellar walls for any underlying damp issues. Check for signs of water ingress, such as damp patches or mould growth. Addressing these issues is vital before applying damp-proof paint, as the paint will not be effective if the underlying problem is not resolved. For more detailed guidance on damp-proofing, you can visit this resource.
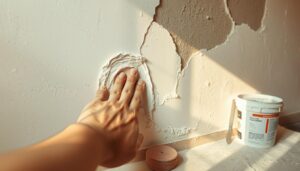
Preparing the Surface Properly
Preparing the surface is a critical step in the application process. This involves several key tasks to ensure the surface is ready for painting.
Cleaning and Removing Debris
First, clean the walls thoroughly to remove any debris, dirt, or old paint. Use a stiff brush and a suitable cleaning solution to scrub away any stubborn dirt or grime.
Treating Mould and Fungi
If you find any mould or fungi, treat the area with an anti-mould solution. Apply the solution, let it sit for a few minutes, and then scrape away the mould and debris.
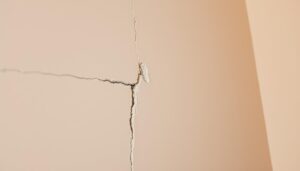
Repairing Cracks and Damage
Next, repair any cracks or damage to the masonry. Use a waterproof filler to fill in any gaps or holes, ensuring a smooth surface for painting.
Application Techniques
The method you choose for applying damp-proof paint will depend on the size and texture of your cellar walls. Here are some common techniques:
- Brush Application: Ideal for precision work and cutting in around edges.
- Roller Application: Suitable for larger areas, providing a quick and even coat.
- Spray Application: Best for very large or textured surfaces, offering comprehensive coverage.
Applying Multiple Coats
Typically, you will need to apply two coats of damp-proof paint for maximum protection. Ensure the first coat is dry before applying the second, following the manufacturer’s instructions for drying times.

By following these steps and using the right damp-proof paint, you can effectively protect your cellar walls from dampness and water damage. Proper preparation and application are key to achieving long-lasting results.
Common Challenges and Solutions
Tackling damp cellar walls with damp-proof paint is a common approach, but it requires careful consideration of several factors. When done correctly, it can provide a effective solution to damp issues, but there are challenges to be aware of.
Dealing with Extremely Damp Surfaces
One of the primary challenges is dealing with extremely damp surfaces. In such cases, applying damp-proof paint directly may not be effective. Instead, consider using a specialized primer designed for damp conditions or employing temporary waterproofing measures to create a suitable surface for painting.

Applying Paint to Different Surface Types
The type of surface you’re dealing with can significantly impact the success of your damp-proofing efforts. Different surfaces require different approaches.
Brick and Concrete Surfaces
Brick and concrete surfaces are highly porous, requiring a damp-proof paint that can penetrate deeply to provide effective protection against moisture. Ensuring the surface is clean and dry before application is crucial.
Plaster and Rendered Surfaces
For plaster and rendered surfaces, it’s essential to be gentle to avoid damaging the surface. A high-quality damp-proof paint that is compatible with these surfaces should be selected.
Previously Painted Surfaces
If the surface has been previously painted, it may require additional preparation, such as sanding or applying a special primer, to ensure the new damp-proof paint adheres properly.
Ensuring Long-Lasting Results
To ensure the longevity of your damp-proofing efforts, it’s crucial to address any underlying issues causing the dampness. This might involve checking for a breached damp proof course or adjusting your garden landscaping to prevent water from directing towards your home. Regular maintenance and monitoring for signs of returning damp or black mould are also essential.
By understanding these challenges and implementing the right solutions, you can effectively protect your cellar walls and maintain a dry, healthy environment.
Conclusion: Maintaining Your Damp-Proofed Cellar
Now that you’ve applied damp-proof paint to your cellar walls, regular maintenance is key to ensuring its effectiveness. To keep your basement dry and secure, it’s crucial to adopt a comprehensive maintenance schedule.
This includes regular inspections for signs of moisture, checking your roof drainage systems to ensure they’re functioning correctly, and monitoring your garden landscaping to prevent water from directing towards your home. Additionally, maintaining proper ventilation and using dehumidifiers can help prevent condensation on walls and timber surfaces.
If damp issues persist, consider hiring a professional to conduct a damp survey to identify underlying problems. In some cases, additional waterproofing measures, such as tanking systems, may be necessary. Protecting other cellar elements like timber joists and flooring from residual moisture is also vital.
As part of your ongoing home maintenance, be aware of the signs that indicate it’s time to reapply damp-proof paint. By adopting a holistic approach to basement waterproofing and moisture control, you can ensure your cellar remains dry and healthy.