Are you tired of cluttered workspaces and disorganised tools in your garage or workshop?
A French cleat system offers a simple, stylish, and practical solution to this common problem. By utilising near-flat vertical lengths of timber with a 45-degree angle cut, you can create a versatile tool storage system that can be customised to suit your needs.
This comprehensive guide will walk you through the process of creating and installing a French cleat system, allowing you to maximise your wall space and keep your tools organised and accessible.
Key Takeaways
- Create a customised tool storage system using a French cleat.
- Maximise your wall space for efficient organisation.
- Learn to build and install a French cleat system.
- Customise your system as your tool collection evolves.
- Achieve a clutter-free workspace with a professional-looking finish.
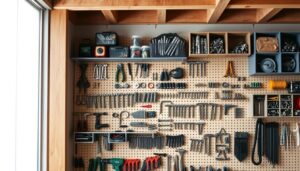
Understanding French Cleat Systems
For a customisable tool storage solution, a French cleat system is ideal. You can use French cleats to hold items in position while securing them to the wall with other fasteners or alone to create a versatile setup that can be adjusted and moved around.
What Are French Cleats?
French cleats are a type of bracket used for storing tools and equipment on walls. They consist of two parts: one part is attached to the wall, and the other part is attached to the item being stored.
Benefits of French Cleat Tool Storage
A French cleat system offers several benefits for tool storage. Some of the key advantages include:
- Modularity, allowing for easy rearrangement of your tool storage configuration.
- Customisation to accommodate tools of any size or shape.
- Maximisation of vertical wall space, freeing up valuable bench and floor space.
The benefits of a French cleat system can be summarised in the following table:
| Benefits | Description |
|---|---|
| Modularity | Easily rearrange your tool storage configuration as your needs change. |
| Customisation | Create specific holders for tools of any size or shape. |
| Maximised Space | Free up valuable bench and floor space by maximising vertical wall space. |
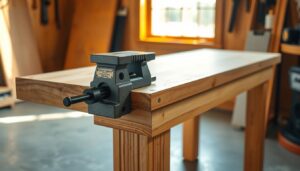
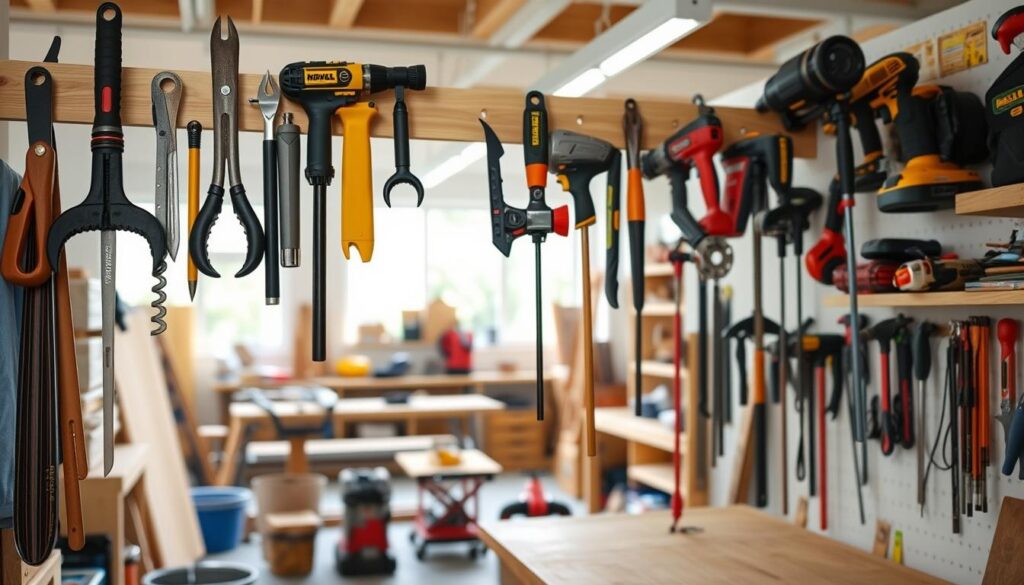
Materials and Tools You’ll Need

To get started with your French cleat system, you’ll need to gather a few essential tools and materials. A French cleat system is a versatile storage solution that can be customised to fit your specific needs.
Essential Materials
The materials required for a French cleat system include sturdy boards for the cleats and brackets. You will also need screws for securing the cleats to the wall and potentially some backing material for added support.
- Sturdy boards (e.g., plywood or MDF) for the cleats
- Screws for securing the cleats to the wall
- Backing material (optional)
Required Tools
To assemble and install your French cleat system, you’ll need a range of tools. A table saw or circular saw with a 45-degree angle capability is ideal for cutting the angled edges of your cleats. Additionally, you’ll need a drill with appropriate bits, measuring tools including a tape measure, square, and level, and a pencil or marking tool.
- Table saw or circular saw with 45-degree angle capability
- Drill with appropriate bits
- Measuring tools (tape measure, square, level)
- Pencil or marking tool
- Stud finder
- Safety equipment (eye protection, hearing protection, dust mask)
- Clamps
- Sandpaper or sanding block
Planning Your French Cleat Wall
Before you start installing your French cleat system, it’s essential to plan your wall space effectively. A straight and true surface is crucial for the system to work properly.
Measuring Your Wall Space
To ensure a smooth installation, measure your wall space accurately. If your walls are uneven, consider cladding the area with a full sheet of plywood to provide a stable backing surface for your cleats.

Determining Cleat Spacing and Layout
When determining the spacing and layout of your cleats, consider the size of your tools and holders. Typically, cleats are spaced 6-8 inches apart, but this can be adjusted based on your specific needs.
| Consideration | Description |
|---|---|
| Cleat Spacing | 6-8 inches apart, adjustable based on tool size |
| Tool Holder Height | Larger items require more vertical space between cleats |
| Horizontal Coverage | Adequate space for current and future tools |
By carefully planning your cleat spacing and layout, you can create a functional and efficient storage system that meets your needs.
Safety Considerations
When working on your DIY French cleat project, safety should always be your top priority. Ensuring a safe working environment involves several key considerations.
Personal Protective Equipment
You must wear appropriate personal protective equipment to prevent injuries. This includes safety glasses and a dust mask when operating power tools like a saw. Inspect your equipment before use to ensure it’s in good condition.
Safe Tool Operation
To operate power tools safely, always follow the manufacturer’s instructions. Check that your materials are securely clamped before making cuts, and ensure the blade is in good condition. Maintaining a clean and clutter-free workspace also enhances safety.
Preparing Your Workshop
The key to a successful French cleat DIY project lies in the preparation of your workshop. Before you begin construction, it’s crucial to have a well-organised workspace.
Setting Up Your Workspace
To efficiently complete your project, you need to set up your workspace effectively. Study the build instructions before construction to allow for measuring and cutting the timber efficiently. You can save time when cutting identical lengths by making a chop saw stop block.

Organising Materials
Organising your materials is vital for maintaining an efficient workflow. To achieve this, sort your materials by type and intended use. Pre-cut your plywood sheet into manageable sizes if working with full sheets in a limited space. Create a cutting diagram to maximise material usage and minimise waste from your plywood. Set aside offcuts that can be repurposed for smaller tool holders or spacer blocks. Organise your fasteners by size and type for easy access during assembly. Consider creating a simple jig or stop block for your saw to ensure consistent sizing when cutting multiple cleats.
How to Cut French Cleats
Cutting french cleats to the correct size is vital for maximising storage space in your workshop. To achieve this, you need to understand the process of cutting 45-degree french cleats.

Setting Up Your Saw for 45-Degree Cuts
To cut 45-degree french cleats, you need to adjust your saw accordingly. Ensure your saw is set to the correct angle to achieve a precise cut.
Cutting Techniques for Perfect Cleats
When cutting cleats, use a stop block on your saw to ensure uniform length. Sand the cut edges to remove splinters or rough spots.
Creating Uniform Cleat Strips
To maximise material usage, plan your cuts carefully. Aim for a consistent width of approximately 5 inches (130mm) for your cleats.
- Aim for a consistent width of approximately 5 inches (130mm) for your cleats, though this can be adjusted based on your specific needs.
- Use a stop block on your saw when cutting multiple cleats to ensure they’re all exactly the same length.
- Sand the cut edges of your cleats to remove any splinters or rough spots that could cause injuries.
- Check each cleat for uniformity after cutting – inconsistent cleats may not fit together properly.
- If cutting multiple cleats from a single sheet, plan your cuts to maximise material usage and minimise waste.
- Consider marking each pair of matching cleats to ensure they’re used together for the best fit.
- For longer walls, you may need to join multiple cleats end-to-end – ensure these joints align with wall studs for proper support.
Installing the French Cleat Wall System
To set up a functional French cleat wall, follow these steps. The process involves several key considerations to ensure a sturdy and versatile storage system.
Finding and Marking Wall Studs
Begin by locating the wall studs using a stud finder. Mark the stud positions with a pencil to guide your screw placement. This step is crucial for securing the cleats firmly to the wall.
Levelling Your Cleats
Use a level tool to ensure your cleats are perfectly horizontal. This prevents tools and holders from sliding off. Accuracy is key in this step to maintain the system’s functionality.
Securing Cleats to the Wall
Attach the cleats to the wall using screws that are long enough to reach the studs. Make sure they are securely fastened to support the weight of your tools and holders.
Spacing Considerations
Consider the size of your tools and holders when determining the spacing between cleats. Typical vertical spacing ranges from 6 to 8 inches.
| Spacing Considerations | Guidelines |
|---|---|
| Vertical Spacing | 6-8 inches |
| Horizontal Spacing | Adjust based on tool holder width |
| Bottom Spacer | Leave space for a spacer block |
Add French Cleat Tool Holders DIY

To maximise the utility of your French cleat wall, you’ll need to create and attach tool holders that are both functional and customised to your tools. This involves designing holders that fit your specific tools and securely attaching them to the cleats.
Basic Tool Holder Designs
Basic tool holders can be simple brackets or compartments that hold your tools. You can use wood or metal to create these holders, depending on the tools you need to store. For instance, you can design holders with separate compartments for different tools or create a simple peg system for hanging tools.
Creating Custom Holders for Specific Tools
For tools with unique shapes or sizes, you’ll need to create custom holders. Measure your tools and design holders that fit them snugly. You can use a combination of wood and screws to create these custom holders. Consider adding features like handles or grips to make the holders easier to use.
Attaching Holders to Cleats
To attach holders to cleats, start by attaching a matching 45-degree cleat to the back of your tool holder, ensuring the angle faces downward. Use both wood glue and screws for a secure connection. Position the cleat near the top of the holder and test the fit on your wall system before finalising the attachments.
Project Ideas for Your French Cleat System
Now that you’ve installed your French cleat wall, it’s time to explore the various project ideas that can enhance your workshop’s functionality. A French cleat system offers a versatile foundation for creating a tailored workspace.
Shelves and Cabinets
You can create custom shelves and cabinets to store your tools and materials. Consider adding storage bins or baskets to keep small parts organised.
Specialised Tool Holders
Design and build specialised tool holders for your most frequently used tools, keeping them within easy reach.
Storage Boxes and Bins
Create custom boxes and bins to store items such as screws, nails, and other fasteners. Consider adding dividers or compartments to keep contents organised.
| Project Idea | Description |
|---|---|
| Sliding Drawer Boxes | Build sliding drawer boxes that can be mounted anywhere on your cleat wall. |
| Tilt-out Bins | Design tilt-out bins for storing bulk items like sandpaper sheets or small offcuts. |
| Transparent-fronted Boxes | Create transparent-fronted boxes for items you need to see but want to keep dust-free. |
Troubleshooting Common Issues
A well-functioning French cleat system requires attention to potential problems that may arise during installation or use. You can ensure your system remains efficient and safe by addressing these issues promptly.
Fixing Uneven Cleats
If your cleats are uneven, it can lead to tools or holders not sitting properly on the wall. To fix this, check that the cleats are level and properly aligned. For more information on setting up your French cleat system, you can visit French Cleat Basics.
- Re-check the levelling of your cleats to ensure they are perfectly horizontal.
- Adjust the cleats if necessary to achieve even spacing.
Addressing Weight Distribution Problems
Weight distribution is crucial when using a French cleat system, especially for heavy tools or collections. To manage weight effectively:
- Use multiple cleats on a single holder to distribute the weight more evenly.
- Consider the overall weight distribution across your entire wall system.
- For particularly heavy items, ensure the wall cleats are securely fastened into multiple studs.
By following these tips, you can prevent overloading any section of your wall and maintain a safe and functional storage system.
Conclusion
As you’ve learned, a French cleat system offers a versatile solution. With this DIY project, create a professional-looking storage system that maximises your workshop space. You can reconfigure tool layouts and add custom holders, making it a highly adaptable DIY solution.