Are you tired of constantly cleaning your workshop only to have it fill with dust again?
Effective dust collection is crucial for both your health and workshop efficiency, but it can be challenging on a limited budget.
You can create a functional system that keeps your workspace clean and your lungs protected, even with financial constraints.
Key Takeaways
- Learn how to prioritise your dust collection needs to maximise your investment.
- Discover practical solutions for creating an effective shop environment.
- Explore both commercial and DIY alternatives for filter and collector options.
- Understand the importance of balancing cost, effectiveness, and space requirements.
- Find out how to achieve sufficient suction power without breaking the bank.
Why Dust Collection Matters for Your Workshop
Effective dust collection is crucial for maintaining a safe and efficient workshop environment. You may have experienced the frustration of trying to assemble a dust extraction system, only to find that connecting the various parts can be a nightmare, not to mention the expense involved.
Health Benefits of Proper Dust Collection
Proper dust collection is vital for your health and wellbeing. When you work with wood, you generate a significant amount of dust, which can become airborne and be inhaled, potentially causing respiratory issues. By implementing an effective dust collection system, you can minimise your exposure to harmful dust particles.
Workshop Cleanliness and Tool Performance
A cleaner workshop not only improves your workflow efficiency but also enhances the performance and longevity of your power tools. Dust accumulation can affect the precision of your tools, from saw blades to router bits, and even infiltrate motor housings and bearings, leading to premature wear. By keeping your workshop clean and dust-free, you can ensure that your tools continue to operate at their best.
Moreover, a well-organised workshop makes it easier to find the tools and materials you need, reducing frustration and improving overall productivity. With a proper dust collection system in place, you’ll be able to see what you’re doing more clearly during cutting operations, enhancing both safety and accuracy in your woodworking projects. You’ll also spend less time cleaning up and more time on the tasks you enjoy.
Understanding Dust Collection Systems on a Budget
Setting up an effective dust collection system in your workshop doesn’t have to break the bank. With careful planning and the right components, you can significantly improve your workshop’s cleanliness and safety.

Types of Budget-Friendly Dust Collection Options
When considering a dust collection system, you have several budget-friendly options. You can start with a basic 2 HP Harbor Freight dust collector, which is an affordable entry-point. Many users upgrade to a Rikon 60-200 impeller for improved performance, but this adds to the cost. A mandatory upgrade for many setups is a better filter, such as the Wynn Filter Upgrade, to improve dust capture efficiency.
A typical setup might include:
- Harbor Freight 2 HP Dust Collector
- Piping & connectors
- Blast Gates
- Thien Baffle
- Galvanized Trash Can
- Wynn Filter Upgrade
The total cost for such a setup can be around $450, making it a relatively affordable initial investment.
| Component | Cost |
|---|---|
| 2 HP Harbor Freight Dust Collector | $150 |
| Piping & Connectors | $100 |
| Blast Gates | $50 |
| Thien Baffle | $50 |
| Galvanized Trash Can | $50 |
| Wynn Filter Upgrade | $100 |
| Total | $450 |
Balancing Cost, Space, and Effectiveness
When designing your dust collection system, it’s crucial to balance cost, available space, and effectiveness. For small workshops, space-saving solutions are essential. Consider wall-mounted systems or dual-purpose storage and collection units to maximize space efficiency.
Prioritizing dust collection for your most frequently used tools is a practical strategy. You can also adopt a staged implementation approach, building your system over time as your budget allows. This might involve starting with a basic setup and gradually adding more components, such as additional blast gates or larger piping, to improve coverage and efficiency.
Essential Components for Setting Up Dust Collection on Budget

A well-functioning dust collection system on a budget hinges on the right components being in place. When setting up your workshop’s dust collection, it’s crucial to understand the essential parts that make it efficient and effective.
Basic Dust Collector Options
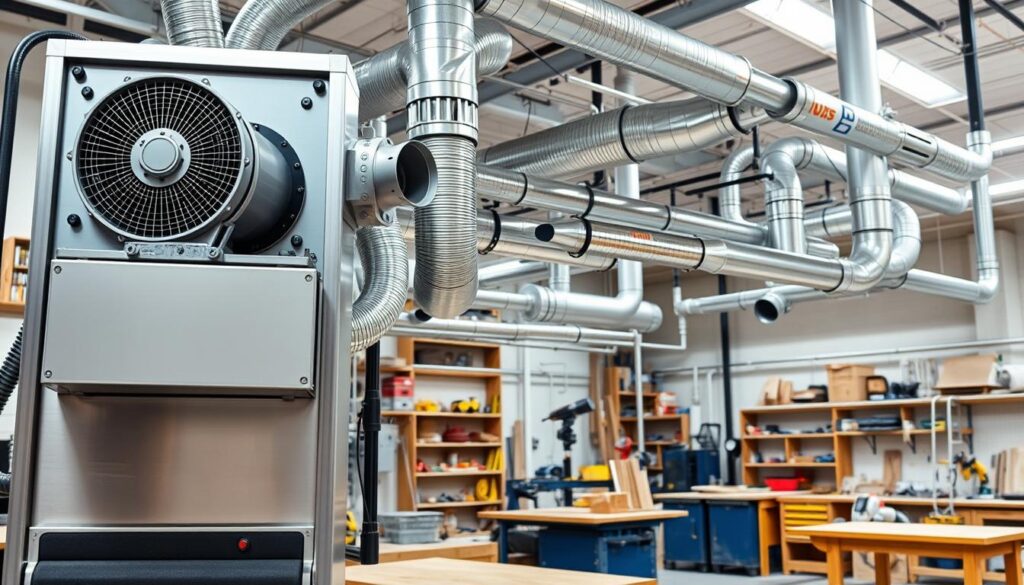
The heart of any dust collection system is the dust collector itself. You have several options to choose from, depending on your specific needs and budget. A basic dust collector can be a good starting point, but consider upgrading to a more advanced model if you plan on doing extensive woodworking.
For instance, upgrading to a dust collector with a better filter, such as a Wynn filter, can significantly improve performance. The Wynn filter’s pleated design increases the surface area, allowing for greater airflow and capturing finer particles.
Piping and Connections
The piping and connections are just as important as the dust collector. You need to ensure that the pipes are the right size and material for your system, and that the connections are secure and airtight. This will help to maintain optimal airflow and prevent dust from escaping.
Separators and Filters
Separators and filters play a critical role in protecting your dust collector and improving system efficiency. A cyclone or Thien baffle separator can be used to separate larger debris from the airflow, reducing the load on your dust collector. When it comes to filters, options range from standard bags to higher-efficiency cartridge filters.
For example, a Wynn filter can be retrofitted to various dust collectors, offering improved filtration efficiency and extended lifespan. Proper separator and filter selection can significantly enhance your dust collection system’s performance.
DIY Solutions to Save Money
To save money on your dust collection system, consider implementing DIY solutions that are both cost-effective and efficient. By taking a hands-on approach to creating certain components, you can significantly reduce the overall cost of your setup.
Building Your Own Blast Gates
Blast gates are essential for controlling airflow in your dust collection system. Instead of purchasing pre-made gates, you can build your own using simple materials like PVC pipes and fittings. This not only saves you money but also allows you to customize the gates to fit your specific needs.
Creating Thien Baffles and Separators
Thien baffles and separators are crucial for separating dust from the airflow, ensuring that your dust collector operates efficiently. You can create your own Thien baffle using a plastic container and some basic DIY skills. This DIY approach can save you a significant amount of money compared to buying a pre-made separator.
Homemade Pipe Brackets and Mounts
Securing your dust collection pipes is vital for maintaining a safe and organized workshop. You can create your own pipe brackets using 2x4s, cutting them out on a band saw, and then sanding and painting them. By placing these brackets roughly every 48 inches, you can ensure that your pipes are securely supported.
Using wire ties to secure flexible hose is another effective DIY solution. By creating custom brackets, you can maintain proper airflow and keep your workshop organized. Additionally, you can design tool-specific collection hoods using inexpensive materials like plastic containers and sheet metal, further enhancing your dust collection system’s efficiency.
| DIY Component | Materials Needed | Cost Savings |
|---|---|---|
| Blast Gates | PVC pipes and fittings | Up to 50% |
| Thien Baffles | Plastic container, DIY skills | Up to 70% |
| Pipe Brackets | 2x4s, band saw, sandpaper, paint | Up to 80% |
By implementing these DIY solutions, you can create a highly effective dust collection system while saving money. The key is to be creative with the materials you have available and to tailor your DIY projects to your specific workshop needs.
Step-by-Step Guide to Installation
Installing a dust collection system can seem like a complex task, but by breaking it down into manageable steps, you can achieve a well-organized and efficient workshop. In this section, we’ll provide a comprehensive guide on how to install a dust collection system, covering everything from planning to connecting your tools.
Planning Your Layout
Before you start installing your dust collection system, it’s crucial to plan your layout carefully. Consider the location of your collector and how the pipework will be routed around your workshop. Think about the tools and machines you need to connect and how you can optimize the layout for efficient dust collection.

Mounting the Collector and Separator
Once you have your layout planned, you can start mounting your collector and separator. Ensure they are securely attached to the wall or a sturdy frame to prevent vibrations and movement during operation. Consider the space constraints, like the example where a galvanized trash can was used to fit the collector in a narrow corner.
Running Pipes and Connecting Tools
With your collector and separator in place, you can begin running the pipework and connecting your tools. Use a combination of rigid and flexible pipe to create a network that efficiently captures dust from your various machines. Ensure all connections are secure and airtight to maximize the system’s effectiveness.
| Component | Purpose | Considerations |
|---|---|---|
| Collector | Captures dust and debris | Size, location, and power |
| Separator | Separates dust from air | Type, efficiency, and maintenance |
| Piping | Transports dust and air | Material, size, and layout |
By following these steps and considering your specific workshop needs, you can create an effective dust collection system that enhances your workshop’s cleanliness and safety.
Space-Saving Solutions for Small Workshops
In small workshops, effective dust collection doesn’t have to mean sacrificing valuable space. You can achieve a clean and safe working environment without compromising on the functionality of your tools or the layout of your shop.
One of the big problems people face with setting up a dust extraction system in a home workshop is the inability to fit in a big system, especially for those renting their premises. However, modular systems that clip together can offer a practical solution. These systems are not only lightweight but also flexible, allowing you to adapt them to your available space.
Wall-Mounted Systems
Utilising wall-mounted systems is an excellent way to save space in your workshop. By installing your dust collection system on the wall, you free up floor space for other essential tools and equipment. This approach also helps in keeping your workshop organised and clutter-free.
Dual-Purpose Storage and Collection
Creating storage solutions that double as dust collection support is another effective strategy. For instance, you can design tool cabinets with built-in collection ports or separator stands with drawer space. This not only maximises the utility of each square foot in your shop but also enhances the overall efficiency of your dust collection system.
| Solution | Benefits | Power Requirement |
|---|---|---|
| Wall-Mounted Systems | Saves floor space, keeps workshop organised | Low power consumption |
| Dual-Purpose Storage | Maximises utility, enhances efficiency | Variable, depending on the system |
By integrating dust collection into your workshop’s layout, you can maintain a clean and safe working environment. Whether you opt for wall-mounted systems or dual-purpose storage solutions, the key is to maximise your space while ensuring effective dust removal.
Conclusion: Maintaining Your Budget Dust Collection System
A well-maintained dust collection system is essential for a clean and safe workshop. As you’ve learned throughout this article, setting up an effective system on a budget requires careful planning and execution.
To keep your system running efficiently, regular maintenance is crucial. This includes cleaning the filter regularly and emptying the separator to maintain optimal suction and airflow. By doing so, you’ll not only improve the performance of your dust collector but also prolong its lifespan.
Troubleshooting common issues, such as suction loss or excessive noise, will also help you maintain your system’s effectiveness. By following these maintenance practices and making incremental improvements as your budget allows, you can significantly enhance both the air quality in your shop and your overall woodworking experience.
By implementing and maintaining a budget-friendly dust collection system, you’ll be able to enjoy a cleaner, healthier workshop, and make the most of your woodworking projects.