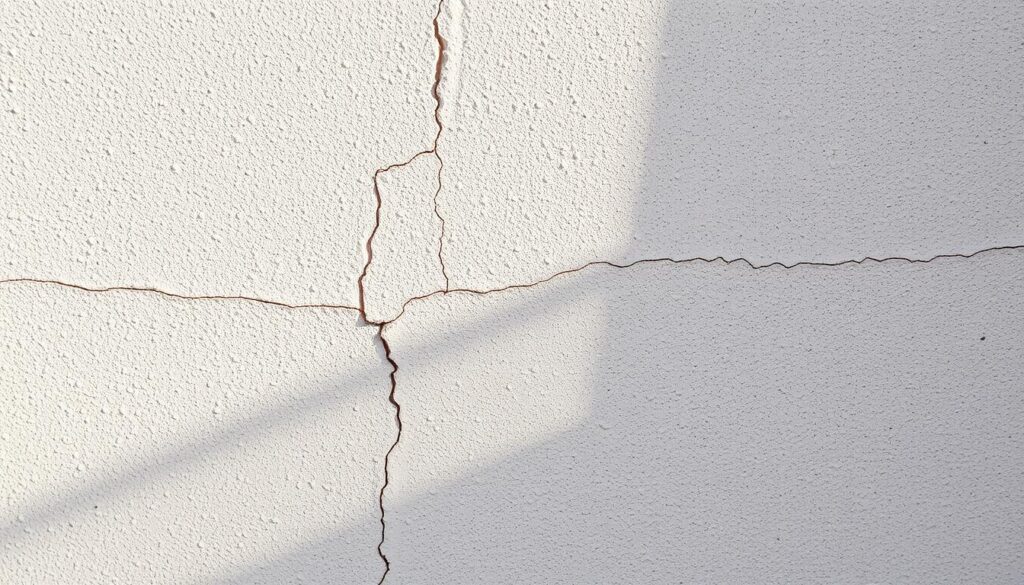
Are you noticing unsightly cracks on your home’s exterior walls and wondering if they’re a sign of a more serious issue? Hairline cracks in stucco can be a common problem, but understanding how to address them is crucial for maintaining your property’s structural integrity and aesthetic appeal.
Stucco is a popular exterior finish, but it’s prone to developing cracks over time due to weather changes, home settling, and other factors. Promptly addressing these cracks can prevent more significant damage and costly repairs down the line.
By learning how to identify and repair different types of stucco cracks, you can ensure your home remains in good condition. This guide will walk you through the process, from simple DIY solutions to more advanced techniques for textured stucco surfaces.
Key Takeaways
- Identify the causes of hairline cracks in stucco to prevent future damage.
- Learn the necessary tools and materials for effective stucco repair.
- Understand the steps involved in repairing different types of stucco cracks.
- Discover how to maintain your home’s exterior walls and prevent costly repairs.
- Explore DIY solutions and advanced techniques for stucco crack repair.
Understanding Hairline Cracks in Stucco
The appearance of hairline cracks in stucco is a common issue that can arise from a combination of factors, including temperature fluctuations and moisture intrusion. As a homeowner, it’s essential to understand the causes of these cracks to address them effectively.

What Are Hairline Cracks?
Hairline cracks are very fine cracks that can appear on the surface of stucco. They are typically less than 1/16 inch wide and can be caused by a variety of factors, including thermal expansion and contraction due to temperature changes. These cracks can be unsightly, but in many cases, they are more of a cosmetic issue than a structural one.
Common Causes of Stucco Cracking
Several factors contribute to the formation of cracks in stucco. Some of the most common causes include:
- Temperature fluctuations causing the stucco to expand and contract, leading to stress that results in hairline fractures.
- Moisture intrusion weakening the stucco material over time.
- Improper installation techniques or materials during the initial application.
- Structural movement, such as shifting foundations or vibrations from nearby construction or traffic.
Understanding these causes is crucial for determining the best approach to repair and prevent further cracking on your home’s wall.
Types of Stucco Cracks You May Encounter
Stucco cracks can vary significantly in size and severity, necessitating a thorough understanding for effective repair. Recognising the different types of cracks is crucial for determining the appropriate repair method.
Hairline Cracks
Hairline cracks are less than 1/16 inch in width and are typically superficial. They often result from minor settlement or shrinkage and can usually be repaired with simple caulking. These cracks are common and generally do not indicate significant structural damage.
Small to Medium Cracks
Cracks that fall between 1/16 and 1/4 inch in width are considered small to medium. These may require more than just caulking, often needing a stucco repair compound. It’s essential to clean out the crack thoroughly before applying any repair material to ensure a lasting fix.
Large Structural Cracks
Cracks greater than 1/4 inch are considered large and often signify significant structural issues. These may result from foundation settlement or improper installation, requiring professional assessment to rectify the underlying cause. Repairing these cracks typically involves reinforcing the area with materials like fiberglass mesh.
| Crack Size | Typical Cause | Recommended Repair |
|---|---|---|
| Less than 1/16 inch | Minor settlement or shrinkage | Caulking |
| 1/16 to 1/4 inch | Moderate settlement | Stucco repair compound |
| Greater than 1/4 inch | Significant structural shifts or improper installation | Reinforced stucco repair with fiberglass mesh |

Essential Tools and Materials for Stucco Repair
The key to a successful stucco repair lies in using the appropriate tools and materials for the job. To achieve a durable and visually appealing repair, you need to be well-equipped.
Basic Tools Needed
To start repairing stucco cracks, you’ll need some basic tools. These include a putty knife, a brush for cleaning the crack, and a caulking gun for applying caulk. Having a bucket of water handy is also useful for mixing repair materials.

Recommended Materials for Different Crack Sizes
The type of material you need depends on the size of the crack. For hairline cracks less than 1/16 inch, elastomeric caulk with silicone is ideal due to its flexibility. For medium cracks between 1/16 and 1/4 inch, pre-mixed stucco patching compounds are recommended. Larger structural cracks exceeding 1/4 inch require professional-grade stucco repair materials, often reinforced with fiberglass mesh.

How to Repair Hairline Cracks in Stucco: Step-by-Step Guide
Hairline cracks in stucco can be effectively repaired with a simple, step-by-step approach. This guide will walk you through the process, ensuring a durable and visually appealing fix.
Preparing the Surface
Before applying any repair material, it’s essential to prepare the surface around the crack. Start by cleaning the area with a brush to remove any debris or dirt that may have accumulated in the crack or surrounding stucco. Use a damp cloth or sponge to wipe down the area, ensuring it’s free from dust and grime. This step is crucial for ensuring a strong bond between the existing stucco and the repair material.
Applying Caulk to Hairline Cracks
Once the surface is prepared, you can proceed to apply caulk to the hairline crack. Choose a caulk that matches the color of your stucco as closely as possible to minimize the visibility of the repair. Using a caulking gun, fill the crack completely, but avoid overfilling. Use a damp sponge or cloth to smooth out the caulk, feathering it out towards the edges so that it blends with the surrounding stucco. This helps in creating a seamless repair.
Immediately after applying and pressing in the caulking, use a damp sponge or rag to carefully wipe away excess material from the surrounding surface while leaving the caulk within the crack itself. Ensure you clean the area around the repair before the caulking begins to dry.
Cleaning and Finishing the Repair
After applying the caulk, allow the repair to dry completely according to the manufacturer’s recommended time, typically ranging from 24 to 48 hours, depending on weather conditions and humidity levels. Inspect the repair after drying to ensure the crack is completely filled. If any shrinkage has occurred, apply a second thin layer of caulking following the same process. For repairs on textured stucco, you may need to recreate the texture while the caulking is still slightly wet by dabbing the surface with a small brush, sponge, or textured roller to match the surrounding area. Use a damp sponge saturated with water to gently clean the area.
Advanced Techniques for Textured Stucco Repair
Achieving a seamless repair on textured stucco involves more than just filling the crack; it requires a careful application technique. When repairing textured stucco, it’s crucial to pay attention to the texture and colour of the surrounding area to ensure a blend that is virtually invisible.
Matching Existing Stucco Texture
To match the existing stucco texture, you need to observe the pattern closely. For heavily textured stucco, using a sanded acrylic caulk or textured stucco patch can be beneficial as these products contain fine aggregates that help replicate the original texture. Take your time to study the texture and choose the right material for the job.
| Texture Type | Recommended Material | Application Tip |
|---|---|---|
| Smooth | Acrylic Caulk | Apply with a flat tool |
| Textured | Sanded Acrylic Caulk or Textured Stucco Patch | Use a texture brush or trowel |
Applying a Second Coat for Better Results
A second coat of repair material is often necessary for achieving the best results. Allow the first coat to dry completely—typically 24 hours or as specified by the manufacturer—before assessing whether a second application is needed. When applying the second coat, focus on building up the texture to match the surrounding wall, using slightly less pressure than with the first coat.
Painting and Finishing Your Stucco Repair
With your stucco repair complete, it’s time to focus on painting and finishing the surface for a uniform appearance. This step is crucial in ensuring that the repaired area blends in seamlessly with the surrounding exterior wall.
Choosing the Right Paint for Stucco
Selecting the best paint for stucco in the UK can be challenging due to the surface’s porous nature and uneven texture. It’s essential to choose a high-quality paint that adheres well to stucco. Consider using a paint specifically designed for masonry surfaces.

Application Techniques for a Seamless Finish
To achieve a seamless finish, use a high-quality masonry roller with a thick nap (at least 3/4 inch) to apply paint to textured stucco surfaces. Maintain a wet edge between application areas to prevent visible lap marks.
- Use a masonry roller with a thick nap for textured surfaces.
- Apply paint using the “wet edge” technique.
- Extend paint application at least 12 inches beyond the repair.
- Apply at least two coats of paint, allowing the first coat to dry thoroughly.
- For highly textured stucco, consider using a paint sprayer followed by back-rolling.
By following these techniques, you can achieve a uniform finish and color that matches the surrounding stucco.
Conclusion
You can significantly extend the life of your home’s exterior by addressing hairline cracks in stucco. Regular inspections allow you to identify and address minor issues before they become major problems. The key to successful stucco crack repair lies in proper preparation and using the right materials. While hairline cracks may seem insignificant, prompt action protects your home from moisture intrusion, preventing more serious structural damage. For more complex repairs or if you’re uncomfortable with DIY, consider hiring professional stucco repair services, as seen in detailed guides like the one on how to repair a stucco crack. Remember, maintaining your stucco exterior is an ongoing process that requires seasonal inspections and timely repairs to maintain your home’s appearance and structural integrity.