Are you tired of dealing with a continuously running toilet or one that refuses to flush properly? A malfunctioning fill valve could be the culprit. Replacing it is a straightforward DIY task that can save you money and reduce water wastage.
You can restore your toilet’s flushing function with the right tools and about 30-45 minutes of your time. This comprehensive guide will walk you through each step, from identifying problems to final adjustments, ensuring you understand how your toilet’s internal components work together.
Key Takeaways
- Diagnose common issues with your toilet’s fill valve.
- Understand the steps involved in replacing the fill valve.
- Learn how to adjust the new valve for optimal performance.
- Discover the benefits of regular toilet maintenance.
- Save money by reducing water wastage and lowering your bills.
Understanding Toilet Fill Valves
The toilet fill valve is a crucial component of your toilet’s flushing system, and understanding how it works is vital for effective maintenance. It is responsible for refilling the cistern with water after each flush.
What Is a Toilet Fill Valve and How It Works
A toilet fill valve typically consists of a float mechanism that rises with the water level to shut off the water supply when the tank is full. Modern fill valves work in conjunction with the flush valve to create the complete flushing cycle.
Signs Your Fill Valve Needs Replacement
Signs of a failing fill valve include continuous running water, slow tank filling, unusual noises, or water leaking into the bowl. When the valve body becomes corroded or damaged, replacement is often more practical than repair.
| Issue | Possible Cause |
|---|---|
| Continuous running water | Faulty float mechanism |
| Slow tank filling | Clogged fill valve or low water pressure |
| Unusual noises | Malfunctioning fill valve or loose parts |

Tools and Materials Needed
Before you start replacing your toilet fill valve, it’s essential to gather the necessary tools and materials.
Essential Tools for the Job
- You’ll need adjustable pliers or a wrench to disconnect the water supply line and remove the old fill valve.
- Purchase a replacement fill valve that matches your toilet model or opt for a universal fill valve that fits most standard toilets.
- A bucket or large sponge will be necessary to collect residual water from the cistern and supply line.
Safety Precautions Before Starting
- Before beginning, always turn off the water supply to the toilet completely and verify it’s off by flushing the toilet.
- Wearing rubber gloves is recommended to protect your hands from both water and potential bacteria inside the toilet tank.
- Consider having plumber’s tape (PTFE tape) on hand to ensure watertight connections, particularly for brass fittings.
- Take a photo of your existing setup before disassembly to use as a reference during installation of the new valve.
Step-by-Step Guide to Replace Toilet Fill Valve
Replacing your toilet’s fill valve can be done in a few easy steps, saving you money on a plumber’s call-out fee. This guide will walk you through the process, ensuring you have all the information needed to complete the task successfully.
Turning Off the Water Supply
Begin by locating the water supply valve, typically found on the wall behind your toilet, and turn it clockwise until it’s fully closed. This step is crucial to prevent water from flowing into the cistern during the replacement process.
Draining the Cistern
Flush the toilet to drain most of the water from the cistern, then remove the cistern lid and place it safely aside. Use a sponge or small cup to remove any remaining water from the bottom of the cistern, creating a dry working environment.
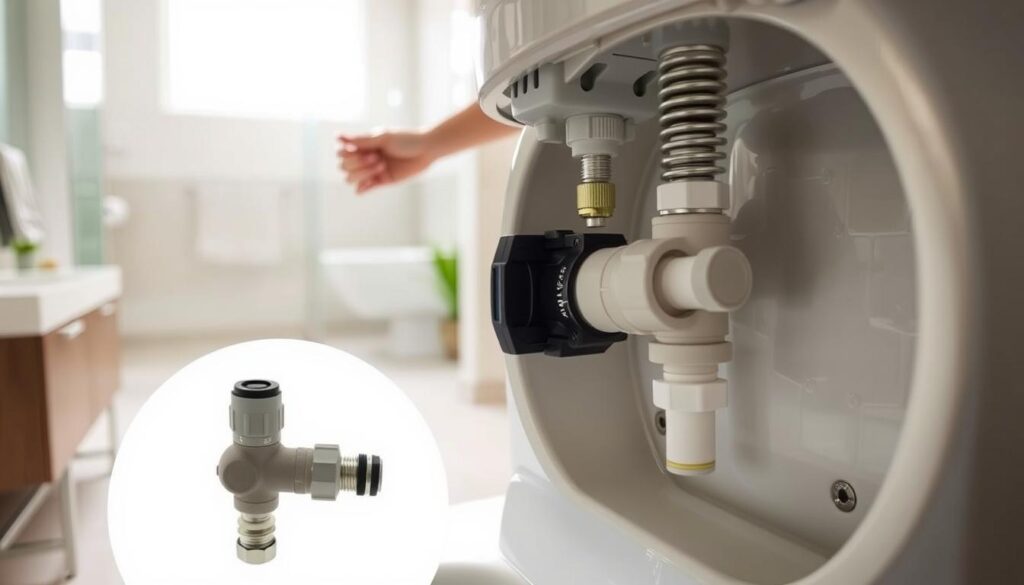
Removing the Old Fill Valve
Disconnect the water supply line from the bottom of the fill valve using an adjustable wrench, being careful not to damage the brass fittings. Remove the locking nut that secures the fill valve to the cistern, typically located underneath the toilet where the fill valve’s brass shank protrudes. Carefully lift the old fill valve body out of the cistern.
Installing the New Fill Valve
Clean the area around the fill valve opening to remove any mineral deposits or debris. Insert the new fill valve into the same hole, positioning the float arm or cup away from other moving parts in the cistern. Adjust the height of the new fill valve according to the manufacturer’s instructions and secure it by tightening the locking nut on the brass shank.
Testing and Adjusting the New Valve
Reconnect the water supply line to the fill valve’s inlet and slowly turn on the water supply. Watch for any leaks around the connections and adjust the water level in the cistern by manipulating the float cup or adjustment screw. Test the pressure and flow by flushing the toilet several times.
By following these steps, you can successfully replace your toilet fill valve, ensuring your toilet operates efficiently and effectively.
Conclusion
By following this guide, you’ve successfully replaced your toilet fill valve, ensuring optimal toilet function. Replacing your fill valve is a straightforward maintenance task that can significantly improve your toilet’s performance and water efficiency. Regular inspection of your toilet fill valve can help identify potential issues before they lead to water wastage or more serious plumbing problems.
To maintain your toilet’s performance, keep the packaging and instructions from your new fill valve for future reference. If you encounter any issues, check the water supply and connections. The skills you’ve learned can be applied to other basic plumbing repairs around your home, helping you reduce water consumption and lower your utility bills over time.