Did you know that nearly 70% of homeowners in the UK face the issue of drywall damage at some point? It’s a common problem that can arise from various factors, including accidental impacts or settling foundations. When you notice holes in your wall, it can be both unsightly and concerning.
Fortunately, repairing these imperfections is a straightforward DIY project that can save you money on professional repairs. By mastering the right techniques and using the appropriate materials, you can maintain the integrity and appearance of your wall in your home.
Key Takeaways
- Understand the common causes of drywall damage and how to prevent them.
- Learn the essential tools and materials needed for drywall repair.
- Discover the step-by-step process for patching drywall holes effectively.
- Gain confidence in achieving professional-looking results with DIY repairs.
- Recognise the importance of prompt repairs to prevent further deterioration.
Understanding Different Types of Drywall Damage
Understanding the nature of drywall damage is essential for effective repairs. Drywall can suffer from various types of damage, ranging from minor cosmetic issues to significant structural problems.
Nail and Screw Holes
Nail and screw holes are among the most common types of drywall damage, often resulting from hanging pictures or installing fixtures. These small holes can usually be repaired with a simple spackling compound. It’s a straightforward DIY task that requires minimal tools.
Doorknob Dents and Small Punctures
Doorknob dents and small punctures are another frequent issue, typically caused by accidental impacts. These can be fixed using a drywall repair kit or by applying a joint compound to smooth out the area. The key is to feather the edges so that the repair blends with the surrounding wall.
Larger Holes and Wall Damage
Larger holes and more extensive wall damage present a greater challenge. These can result from door handles, furniture impacts, or other significant incidents. Assessing the extent of the damage is crucial to determine whether a patch kit, mesh repair, or complete drywall replacement is needed. Structural damage behind the drywall can complicate repairs, and in such cases, professional assistance may be necessary.
Essential Tools and Materials for Drywall Repair
Repairing drywall effectively begins with having the right tools and materials at your disposal. To achieve a seamless finish, you’ll need to understand the basics of drywall repair.

Basic Tools You’ll Need
For most drywall repairs, you’ll require a few basic tools. These include a putty knife, a utility knife, and sandpaper. A drywall repair kit can be particularly useful as it usually contains the necessary materials, including joint compound and a patch.
Materials for Different Sized Repairs
The size of the hole will determine the materials you’ll need. For small holes, spackle or joint compound can be used directly. Larger holes may require a piece of drywall to be cut and fitted over the damaged area, secured with a patch. Understanding when to use spackle versus joint compound is crucial for a successful repair.
Preparing the Area Before Patching
Before you start patching, it’s essential to prepare the damaged area on your drywall. This step is crucial for ensuring a smooth and durable repair.
Cleaning the Damaged Area
Start by cleaning the damaged area around the hole or crack in your wall. Use a soft brush or a vacuum cleaner to remove any loose debris or dust. This will help you assess the extent of the damage and ensure a clean surface for the repair.
Removing Loose Debris and Anchors
When dealing with holes or cracks caused by screws or nails, it’s vital to remove any loose debris and anchors. Use a screwdriver or pliers to carefully extract the screws or nails. If the screws are broken, you may need to use a drill to remove the remaining parts. Ensure the area is clear of any debris to achieve a solid repair.
| Tools Needed | Purpose |
|---|---|
| Soft Brush or Vacuum Cleaner | Remove loose debris and dust |
| Screwdriver or Pliers | Extract screws or nails |
| Drill | Remove broken screw parts |
Patching Small Drywall Holes: The Simple Method
You can easily repair small drywall holes using a simple method that involves basic materials. This approach is effective for maintaining the integrity and appearance of your drywall surface.
Filling Nail and Screw Holes
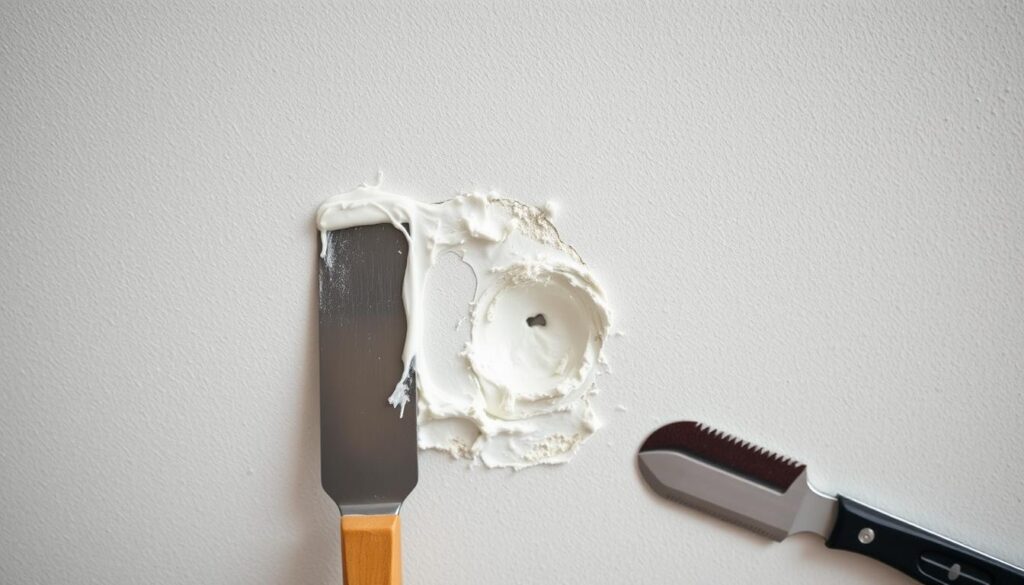
Filling nail and screw holes is a straightforward process. First, apply a small amount of spackle or joint compound to the hole using a putty knife. Smooth the area, ensuring the compound is evenly spread and not protruding beyond the wall surface. Allow it to dry completely before sanding it down to a smooth finish.
Repairing Minor Dents and Dings
For minor dents and dings, assess whether the surface paper is damaged. If not, you can fill the dent with joint compound, applying it with a putty knife. Feather the compound outwards to blend it with the surrounding area, ensuring a seamless repair. It may be necessary to apply multiple thin layers, allowing each to dry before applying the next, to achieve a smooth finish.
To achieve a professional-looking result, it’s crucial to feather the compound around the repair area so that it blends with the surrounding wall. Proper drying time between applications is also vital for the best results. By following these steps, you can effectively repair minor damage to your drywall, maintaining its integrity and appearance.
Using Patch Kits for Medium-Sized Holes

Medium-sized drywall holes require a more robust repair method, such as using a patch kit. These kits usually include a self-adhesive mesh patch and joint compound.
Selecting the Right Patch Kit
When choosing a patch kit, consider the size of the hole and the type of drywall you’re dealing with. Ensure the kit includes a suitable amount of joint compound and a patch that’s large enough to cover the damaged area.
Applying Self-Adhesive Mesh Patches
To apply a self-adhesive mesh patch, peel off the backing and press it firmly over the hole, ensuring it’s centred. Smooth out any air bubbles or wrinkles.
Covering the Patch with Joint Compound
Apply a thin layer of joint compound over the mesh patch using a putty knife. Feather the edges to blend the repair with the surrounding drywall. Allow the compound to dry before sanding.
- Identify the proper technique for applying joint compound over mesh patches.
- Learn how to build up layers of compound for a smooth finish.
- Understand the importance of feathering edges.
- Discover how to avoid common mistakes.
- Recognise when multiple coats are necessary.
- Learn professional techniques for applying compound with different knives.
The California Patch Method for Larger Holes
Larger holes in drywall require a more robust repair method, and the California Patch Method is a tried-and-tested approach. This technique involves creating a custom drywall patch to cover the damaged area, ensuring a strong and durable repair.
Creating a Custom Drywall Patch
To start, you’ll need to create a drywall patch that matches the size and shape of the hole. Use a drywall piece slightly larger than the damaged area, and cut it to fit precisely. Proper alignment of the patch is crucial for both structural integrity and appearance.

Installing and Securing the Patch
Once your patch is ready, apply a layer of joint compound around the edges and press it firmly into place. Use screws to secure the patch, making sure to recess them properly to avoid visible bumps. For added support, consider using furring strips or a support board behind the patch, especially for larger repairs.
| Backing Method | Description | Best Use |
|---|---|---|
| Furring Strips | Narrow strips of wood used to provide additional support | Larger holes or weakened areas |
| Support Board | A larger piece of material (e.g., plywood) for extensive backing | Very large holes or damaged sections |
By following these steps and using the right materials, you can achieve a professional-looking repair that will last. Remember to apply a compound to finish and blend the repair with the surrounding wall area, ensuring a seamless finish.
Working with Joint Compound and Spackle

To achieve a seamless finish on your drywall, you need to know how to work with joint compound and Spackle effectively. Both are used for drywall repairs, but they have different properties and uses.
Choosing Between Joint Compound and Spackle
Joint compound is ideal for larger repairs and finishing joints, while Spackle is better suited for small holes and dents. Your choice depends on the size and nature of the repair.
Mixing and Applying Techniques
When applying joint compound or Spackle, use a knife to spread it evenly. Adjust the knife angle and pressure to achieve the desired thickness. Ensure the edges are smooth and blend well with the surrounding wall.
Feathering Edges for a Seamless Finish
Feathering the edges of your repair is crucial for a seamless finish. Use a wide knife to spread the compound thinly towards the edges. This technique helps avoid visible transitions.
- Identify proper feathering techniques that blend repair edges invisibly with existing walls
- Learn how to adjust knife angle and pressure to create gradually thinning compound edges
- Understand the importance of wide feathering for larger repairs to avoid visible transitions
- Discover how different knife sizes contribute to effective feathering at various repair stages
- Recognise common feathering mistakes that lead to visible repair lines after painting
- Learn how to assess your feathering work while the compound is still wet and make adjustments
Sanding Techniques for a Smooth Finish
To ensure a seamless blend with the surrounding wall, proper sanding techniques are essential. Sanding is a critical step that can make or break the quality of your drywall repair.
Selecting the Right Sandpaper Grit
Choosing the correct sandpaper grit is vital for achieving a smooth finish. Start with a medium-grit sandpaper (120-150) to remove excess joint compound, then progress to a finer grit (220-240) for final smoothing.
Proper Sanding Methods
When sanding, use a gentle, even motion to avoid creating scratches or depressions. Work in a well-lit area to inspect your progress. Use a sanding block to keep the sandpaper flat and prevent unevenness.
Common Sanding Mistakes to Avoid
Be cautious of over-sanding, which can damage the drywall paper or expose the patch. Insufficient sanding can leave bumps or ridges. Regularly clean your sandpaper and work area to prevent dust buildup. As one expert notes, “Sanding is not just about removing excess compound; it’s about creating a surface that’s ready for painting.”
Priming and Painting Repaired Areas
Once you’ve completed the drywall repair, the next crucial step is to prime and paint the area to achieve a seamless finish. This process not only enhances the appearance but also protects the repair.
Why Priming Is Essential
Priming is a vital step as it creates a uniform base for painting, ensuring that the repair blends in with the surrounding area. A good primer can help hide the repair and create a smooth surface for painting.
Matching Existing Paint Colours
To achieve a seamless finish, it’s crucial to match the existing paint colour as closely as possible. Take a sample of the original paint to a hardware store to find a matching colour, or use a colour-matching app.
Techniques for Blending Repairs
To blend the repair with the surrounding wall area, use techniques such as feathering the edges of the paint
“Feathering involves applying thin layers of paint, gradually increasing the coverage towards the edges,”
says a painting expert. You can also use different application tools to achieve the desired texture and appearance, and consider applying multiple thincoats for a more even finish.
- Apply multiple thin coats of paint for a more even finish.
- Use the right sheen to make the repair less noticeable.
- Evaluate the repair under different lighting conditions to ensure it remains invisible.
Repairing Textured Drywall Surfaces

Textured drywall surfaces add complexity to the repair process, but with the right techniques, you can achieve a seamless finish. To start, it’s essential to understand the type of texture you’re dealing with.
Identifying Common Textures
Common textures include orange peel, knockdown, and popcorn ceilings. Identifying the texture type is crucial for selecting the right repair approach. You can often determine the texture by visual inspection or by gently feeling the surface.
Recreating Texture Patterns
Recreating the texture pattern involves using the appropriate tools and techniques. For instance, an orange peel texture can be recreated using a specialized brush or a texture spray product. Practice on a small, inconspicuous area first to ensure a match.
Using Texture Spray Products
Texture spray products are ideal for achieving consistent results, especially for complex textures. To use these products effectively, you should:
- Identify when aerosol texture products are appropriate for drywall repairs
- Learn proper techniques for applying spray textures to achieve consistent results
- Understand how to control spray pattern, density, and coverage with these products
- Discover the importance of practice applications before spraying actual wall repairs
- Recognise when to apply second coats or layers to build up texture appropriately
- Learn how to protect surrounding areas from overspray when using texture products
By mastering these techniques and understanding when to apply second coats, you can ensure a successful repair that blends with the surrounding wall surface, maintaining the original texture.
Conclusion
Armed with the right techniques and materials, you’ll find that patching small drywall holes is a breeze. To achieve professional-looking results, remember to prepare the area properly, apply the repair compound carefully, and finish with a smooth sanding.
By mastering these simple drywall repair skills, you can save money and maintain your home’s appearance. With practice, you’ll become more confident in tackling small repairs, and your walls will benefit from prompt attention to holes and other damage.